18 Mar 2025 12.00 AM I 734 Views
How do I create and connect a Google Analytics ID to the Commmerce website?
- This Article is for stores running on Solo plan or higher
Follow the steps below to create a Google Analytics ID:
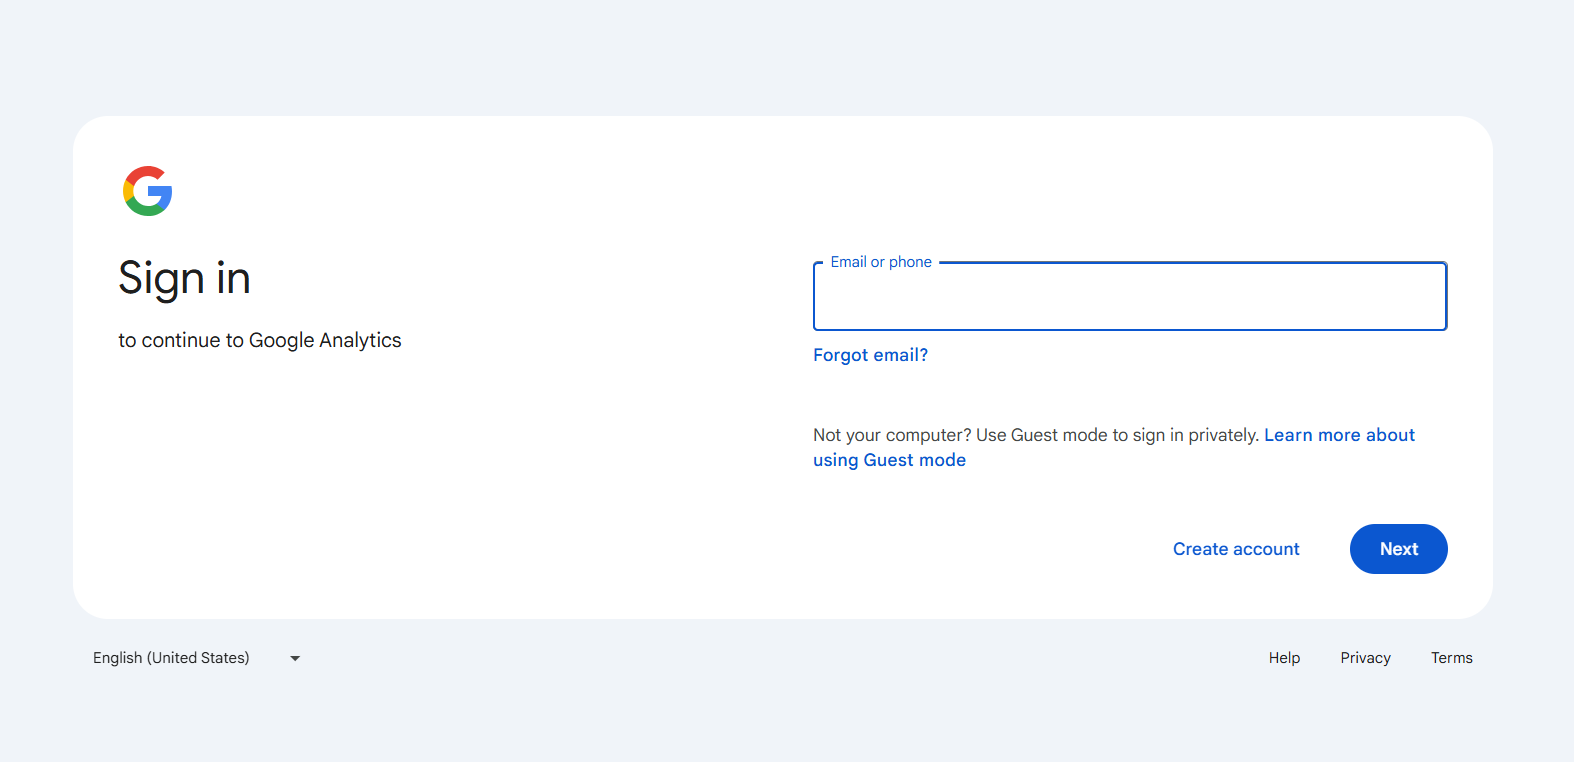
Step 1. Search for Google Analytics on Google. You will be prompted to log in with your Gmail account. Please log in with the Gmail account that you use for your business.
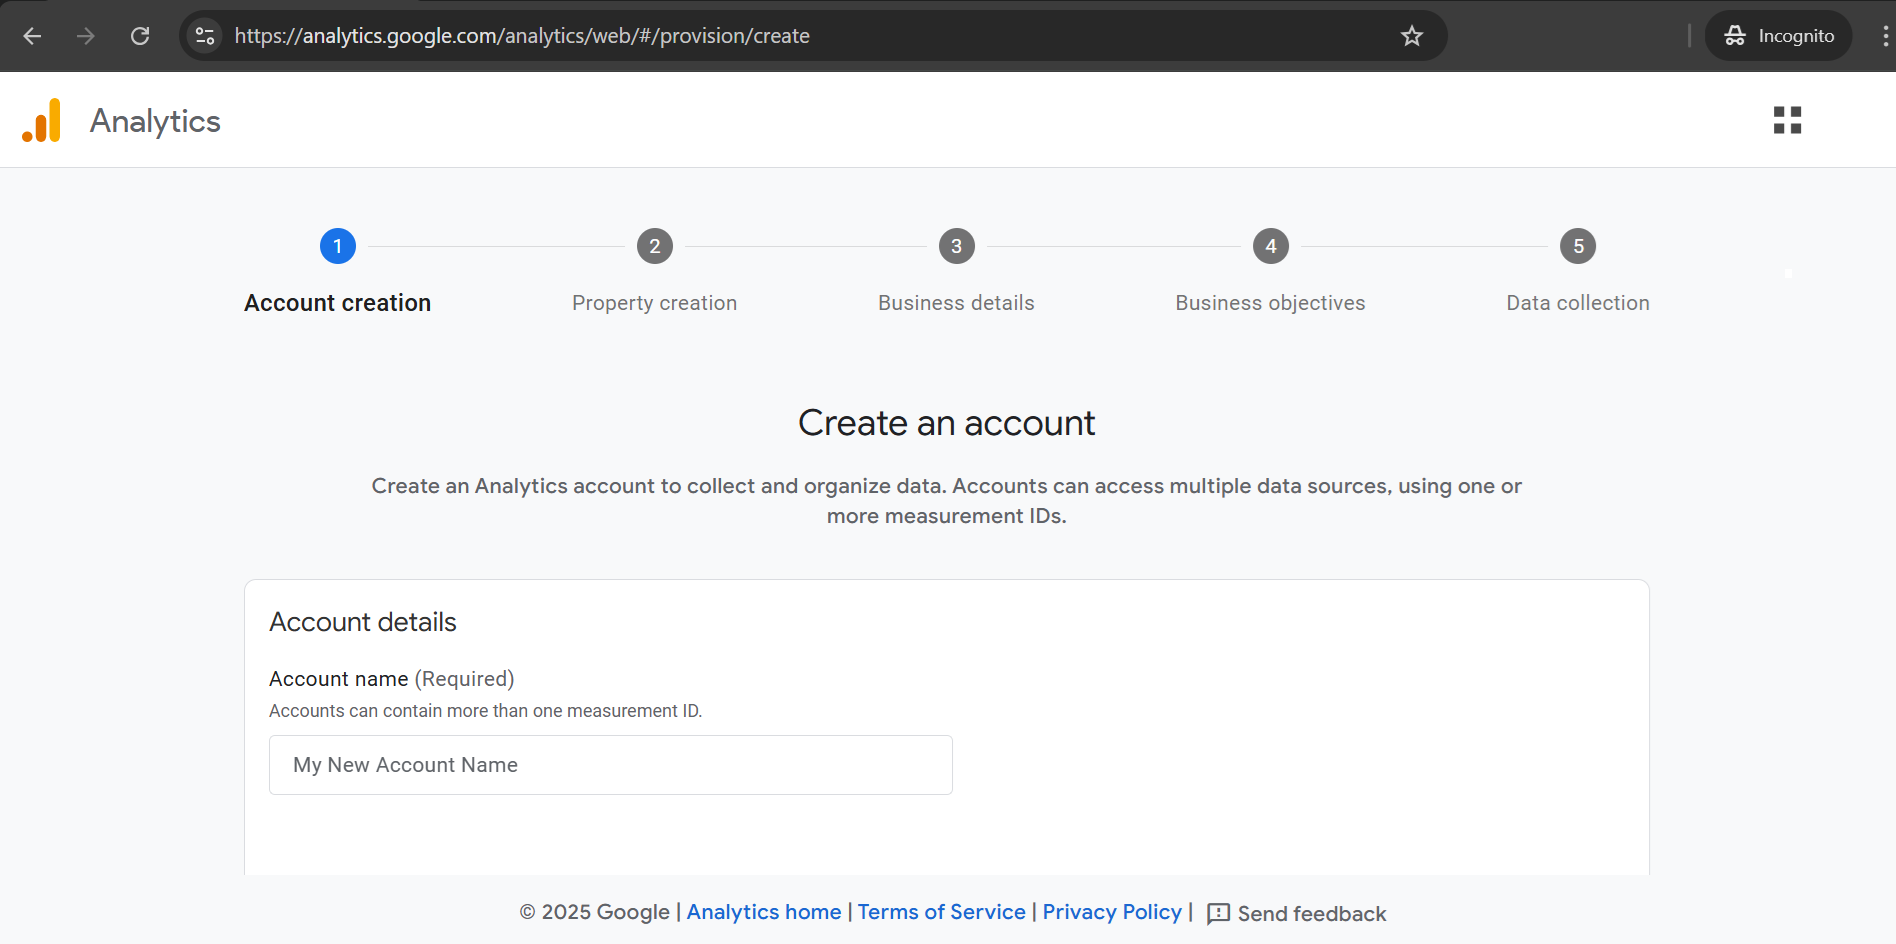
Step 2. Once you log in, you will be redirected to the
'Create an Account' page (as shown below) Alternatively you can
click here to go to the Google Analytics page.
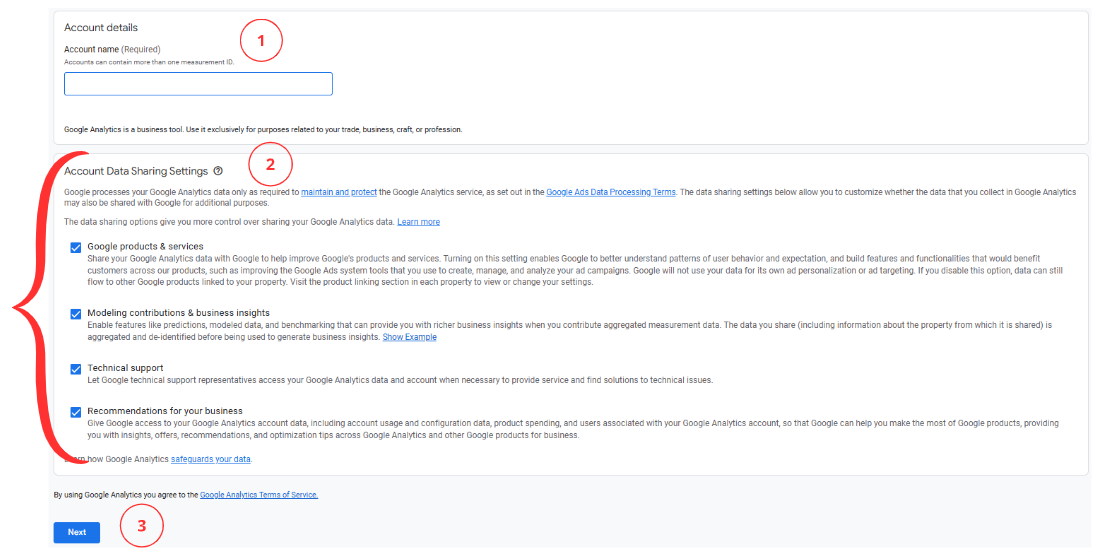
Step 2.1. In the account details, Enter the account name (as shown in "1"). In the Account Data Sharing Settings, enable all the four options (as shown in "2"), then click the Next button (as shown in "3").
Step 2.2. Fill in the Property details with your business name (as shown in "4"). Then, set the reporting time zone to India and the currency to the Indian Rupee in the dropdown (as shown in "5"), and click the Next button (as shown in "6").
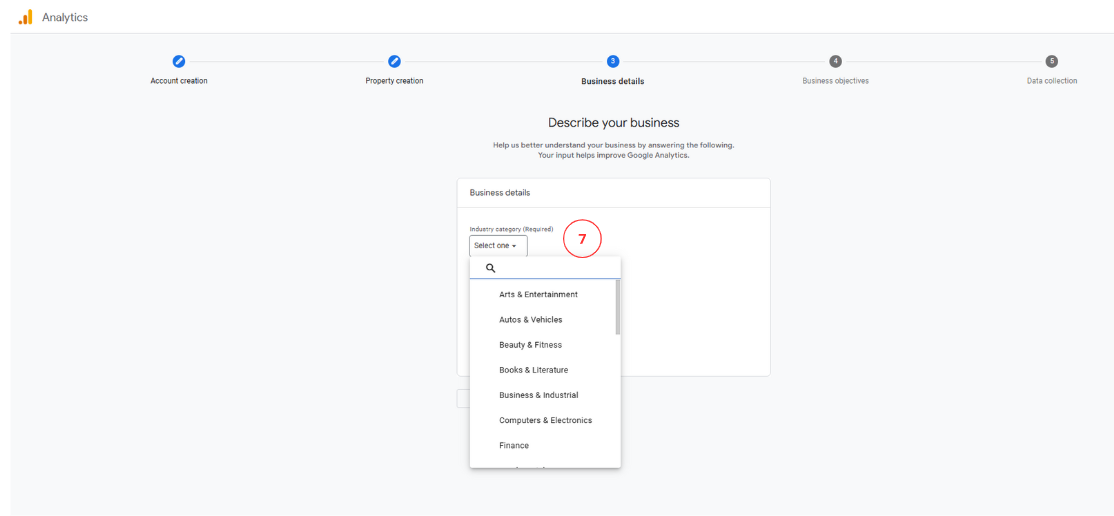
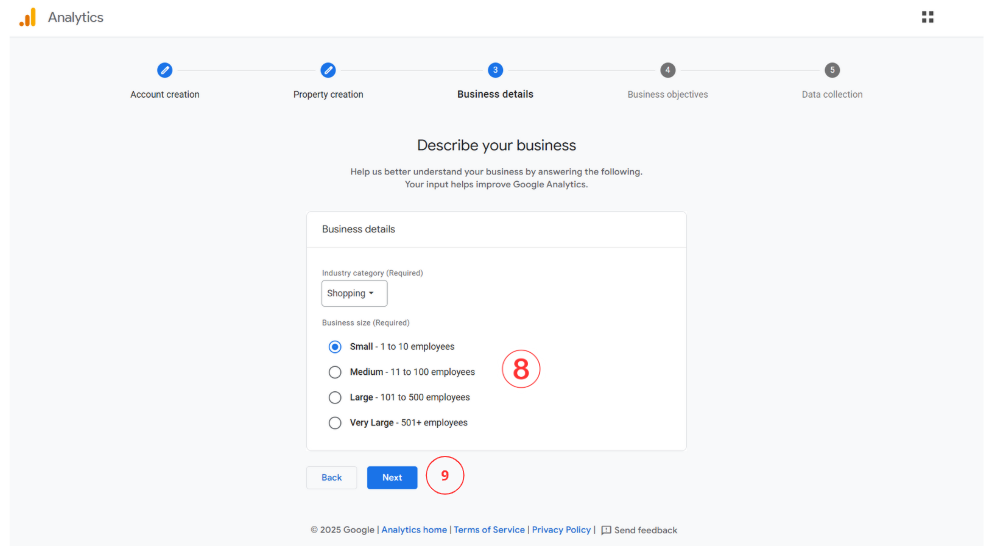
Step 2.3. Once you click the Next button, you will be redirected to the 'Describe Your Business' page. Select your industry category from this dropdown (as shown in "7"). Then, select your business size (as shown in "8"), and click the Next button (as shown in "9").
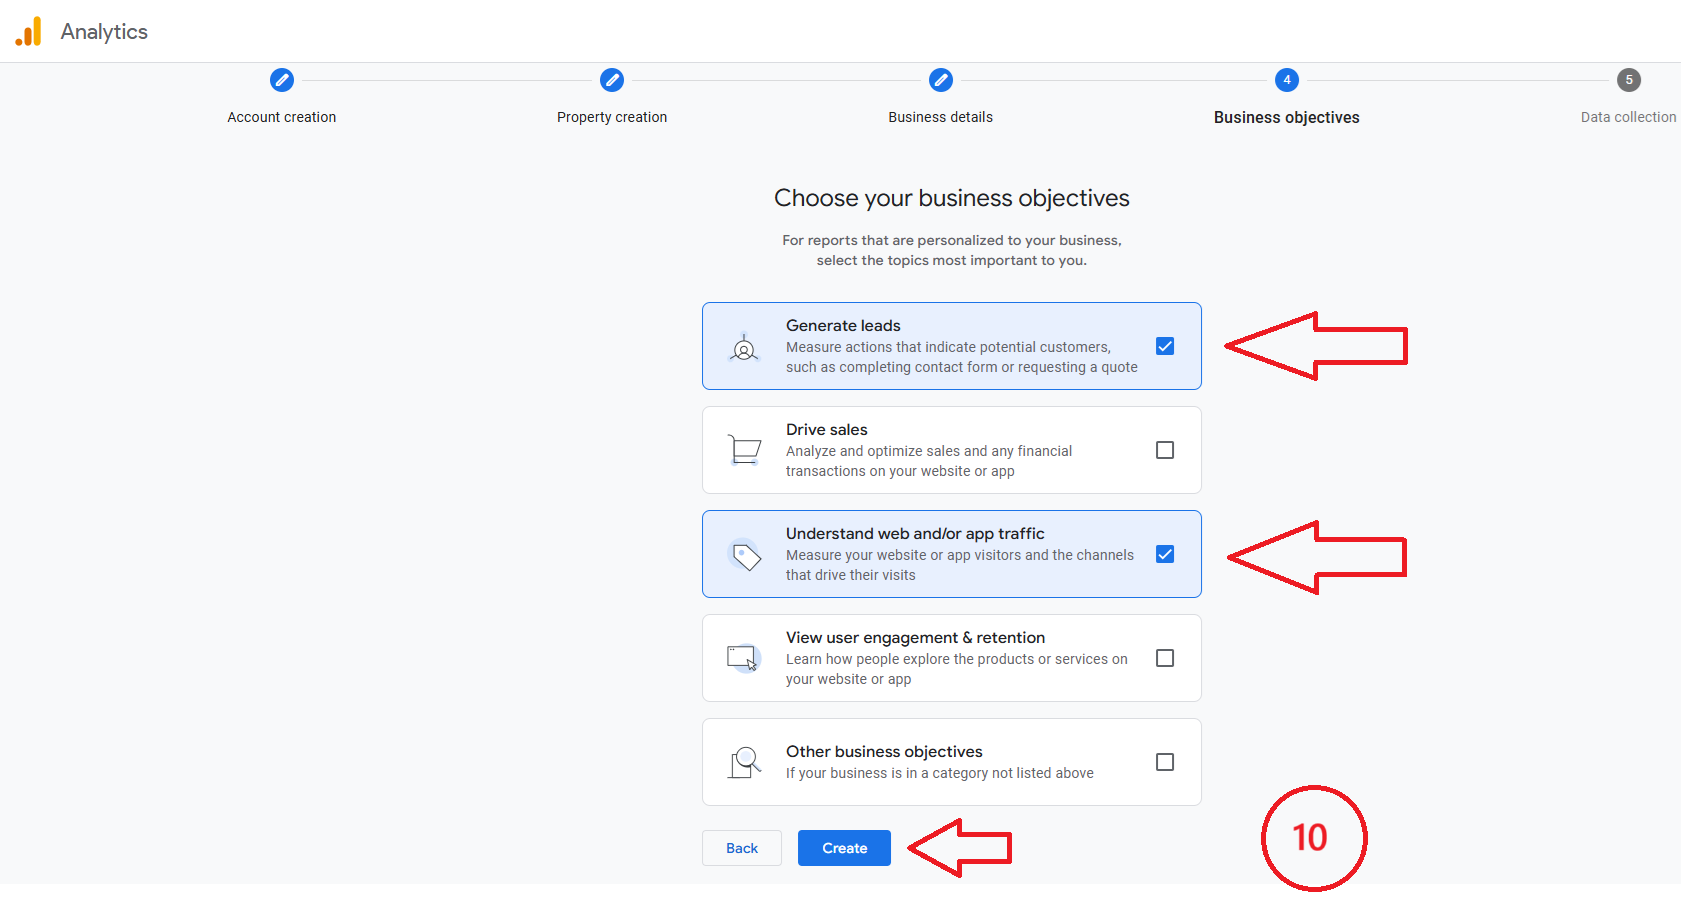
Step 2.4. Once you click the 'Next' button, you will be redirected to 'Choose Your Business Objectives.' In this section, select 'Generate Leads' and 'Understand Web and/or App Traffic,' then click the 'Create' button (as shown in "10").
Step 2.5. The Google Analytics Terms of Service Agreement will pop up. In that, select 'India' as the country and click the 'Accept' option (as shown in “11”). Then scroll down, enable the option in the image below, and click the 'I Accept' button (as shown in “12”).
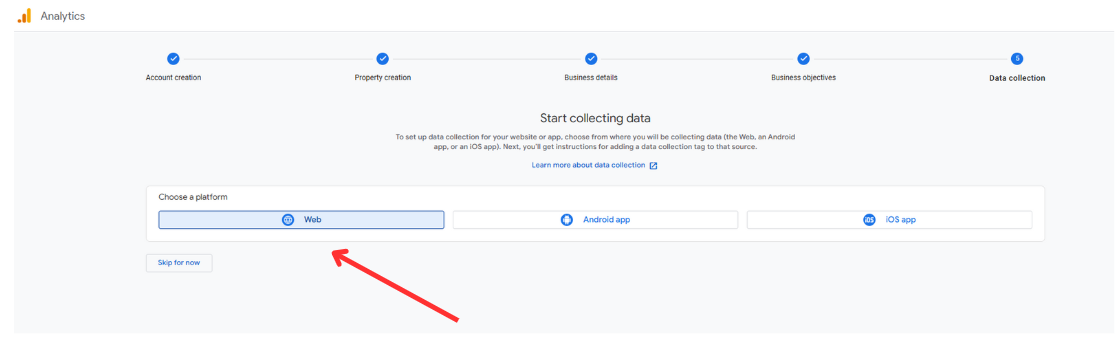
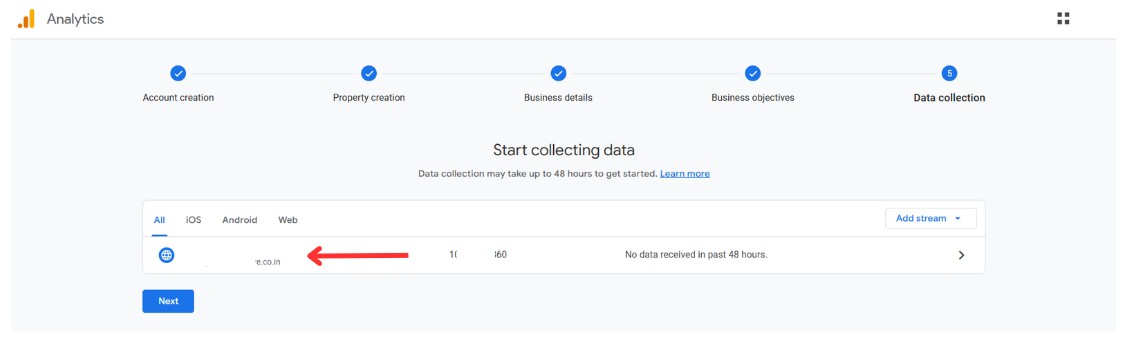
Step 3. Once you accept the Terms and Conditions, you will be redirected to the Data Collection section. In that section, select the 'Web' option (as shown below).
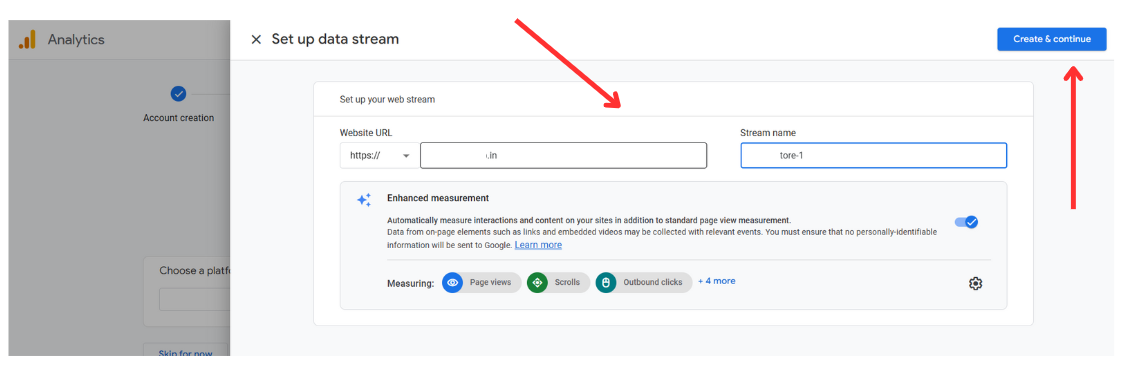
Step 4. When you click on the 'Web' option, a pop-up will open. In that pop-up, update your store URL and the Stream name (business name), then click the 'Create and Continue' button (as shown below).
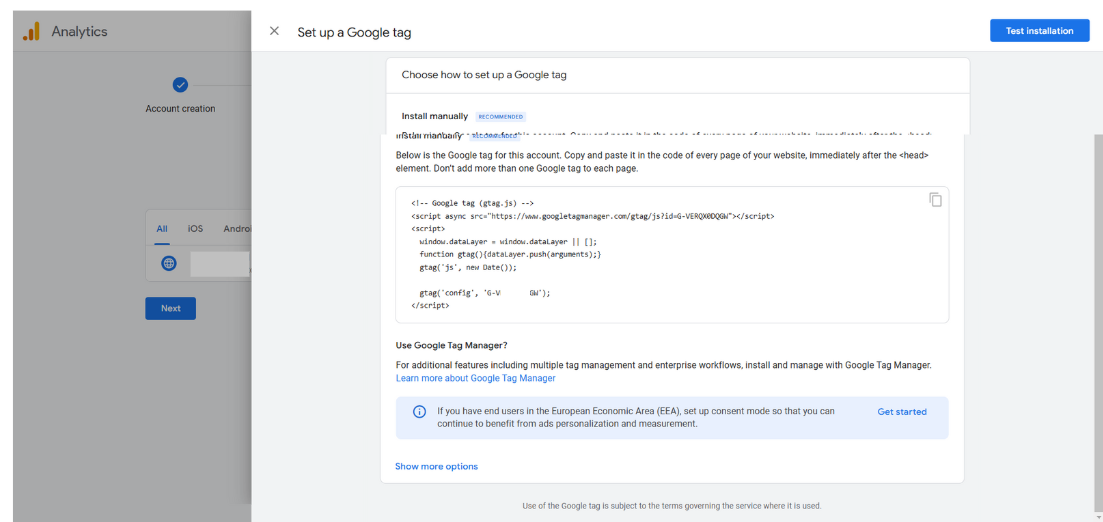
Step 5. Then a 'Set Up a Google Tag' pop-up will appear; close it by clicking on the ‘X’ icon.
Step 6. Click on your store name
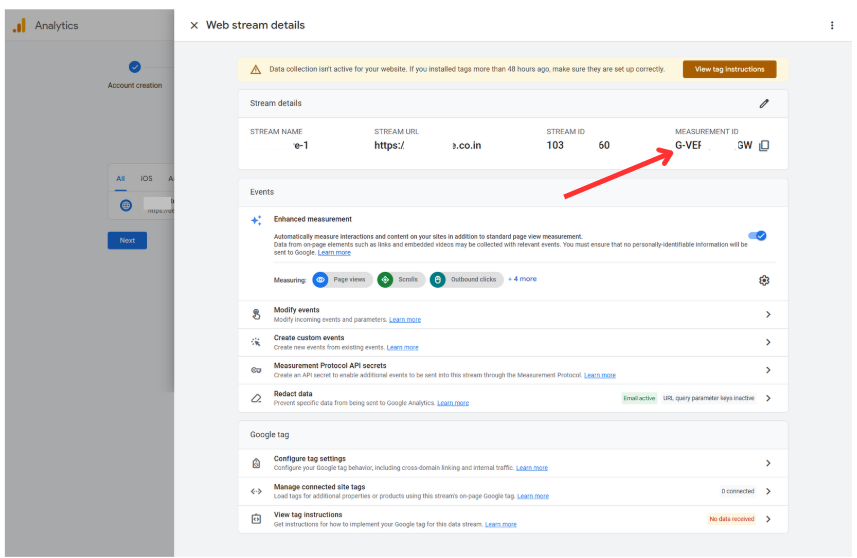
Step 7. The Web Stream Details pop-up will appear. Copy the Measurement ID (as shown below). Save it in Notepad.
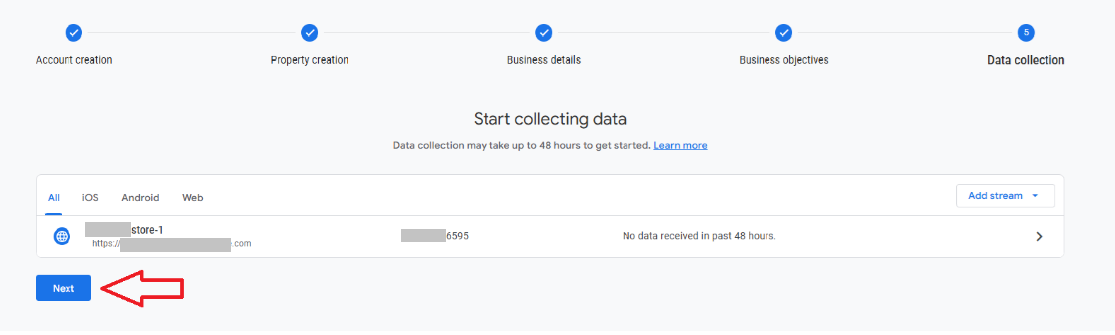
Step 8. Close the ‘web stream details’ popup and click the Next button.
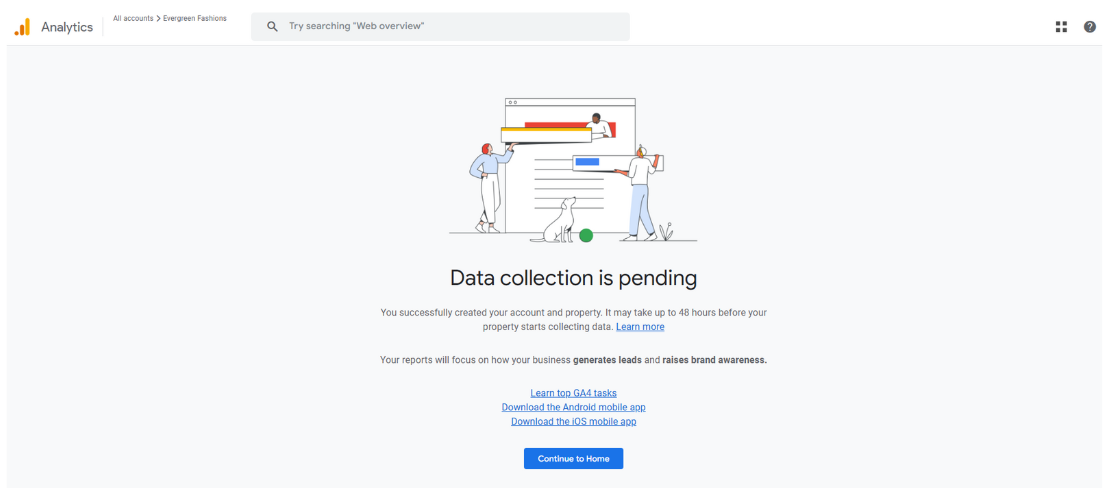
Step 9. The page will redirect to the 'Data Collection is Pending' page, with a 'Continue to Home' button at the bottom. Click on the button.
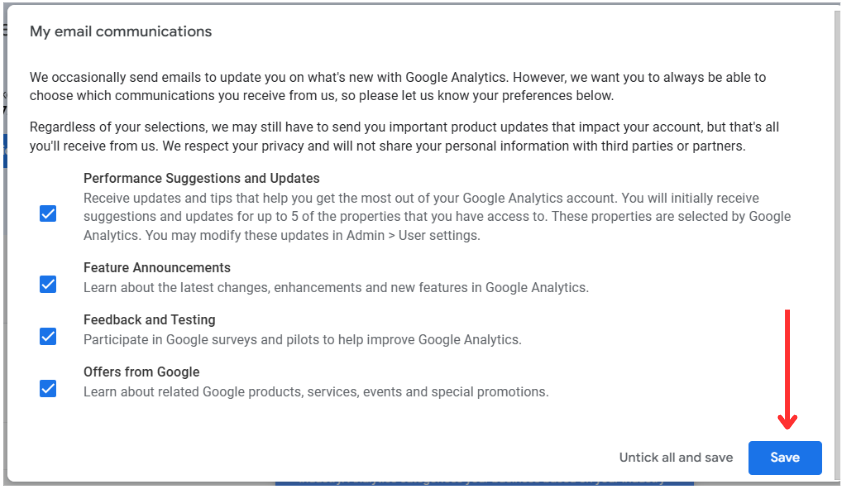
Step 10. A pop-up will appear titled My Email Communications. Click on the Save option.
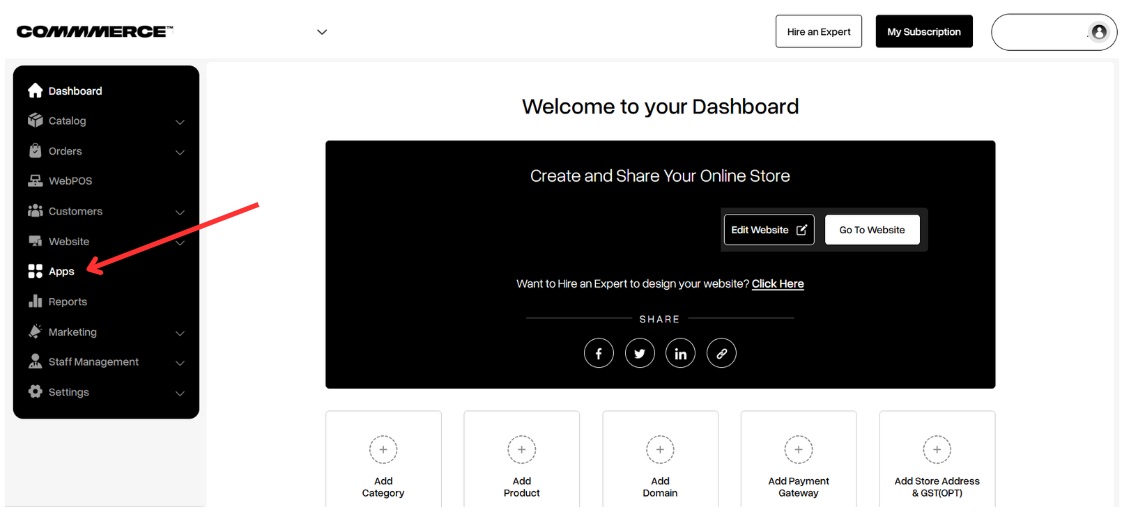
Step 11. Log in to the Commmerce admin panel and click on the 'Apps' option on the left-hand side (as shown below)
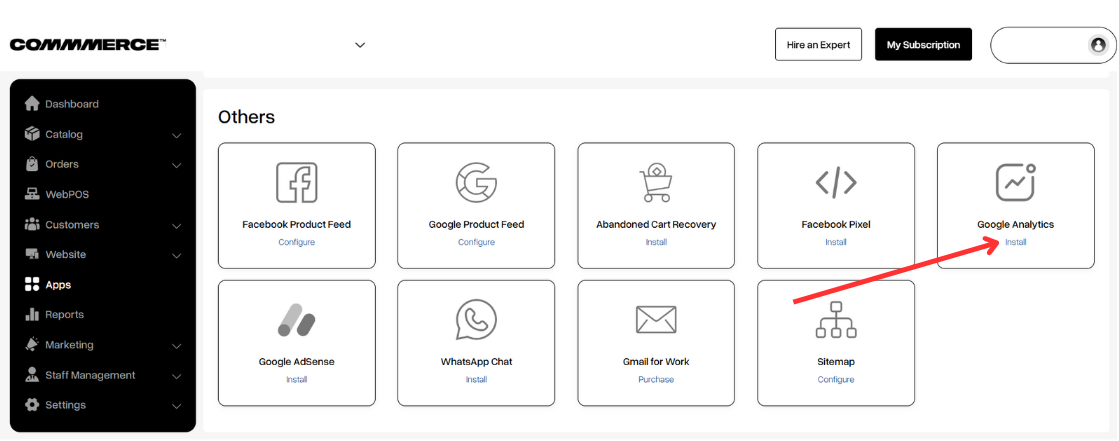
Step 12. Then go to the 'Others' section, find Google Analytics, and click on the 'Install' option.
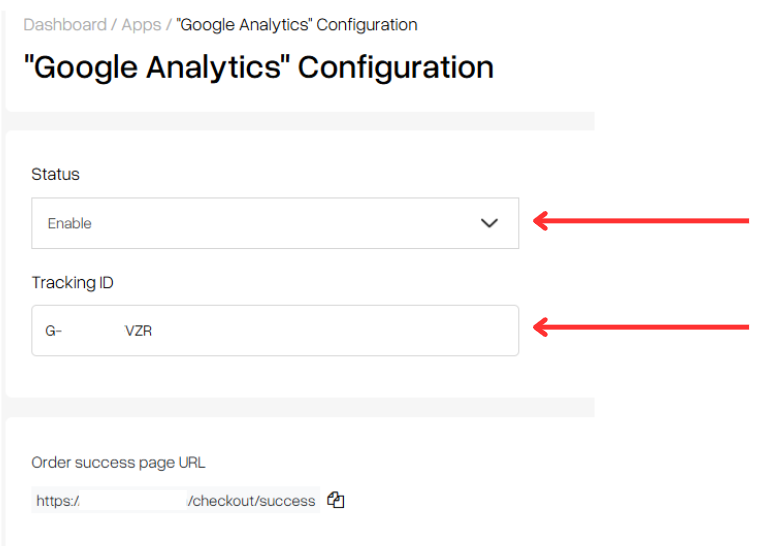
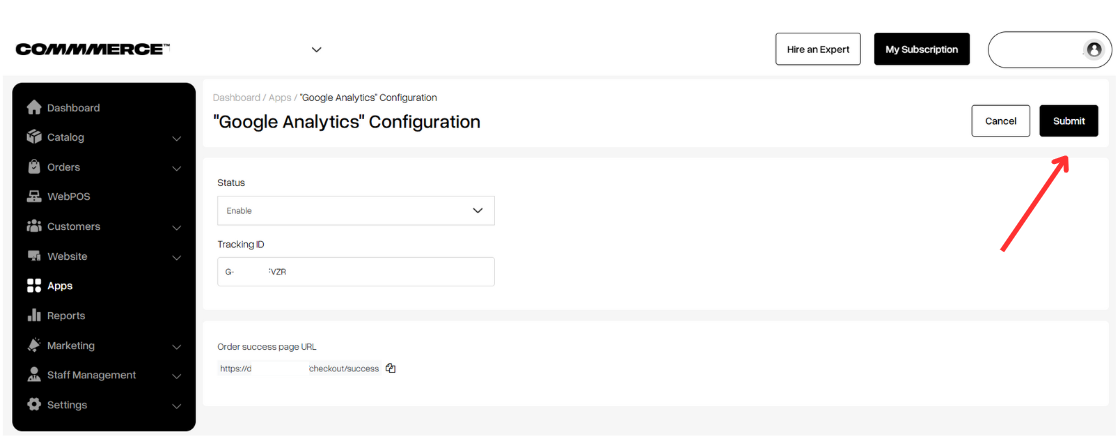
Step 13. Change the status to 'Enable' and add the Tracking ID (Measurement ID that you copied in step 7). E.g G-XXXXXXXVZR
Step 14. Once the details are updated, click on the 'Submit' button at the top right corner.
How do I add the 'Debugger for Google Analytics 4 (GA4)' as a Chrome extension to check the Google tag triggers on my website?
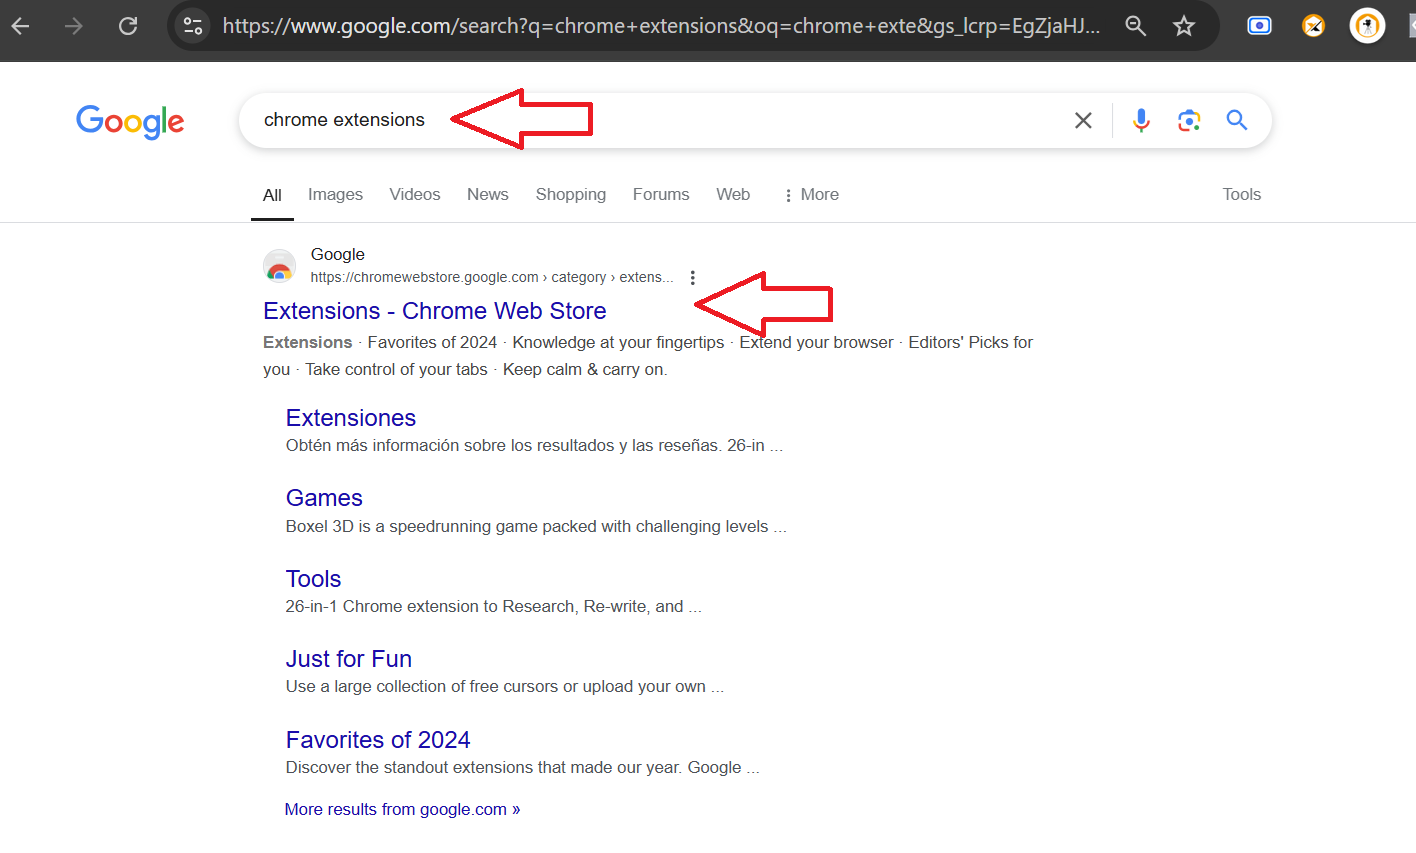
Step 1. To add the '
Debugger for Google Analytics 4 (GA4)' as a Chrome extension, open the Chrome browser and search for '
Chrome extensions.' Click on the first link in the search results, or
click here to open extensions on the Chrome web store directly.
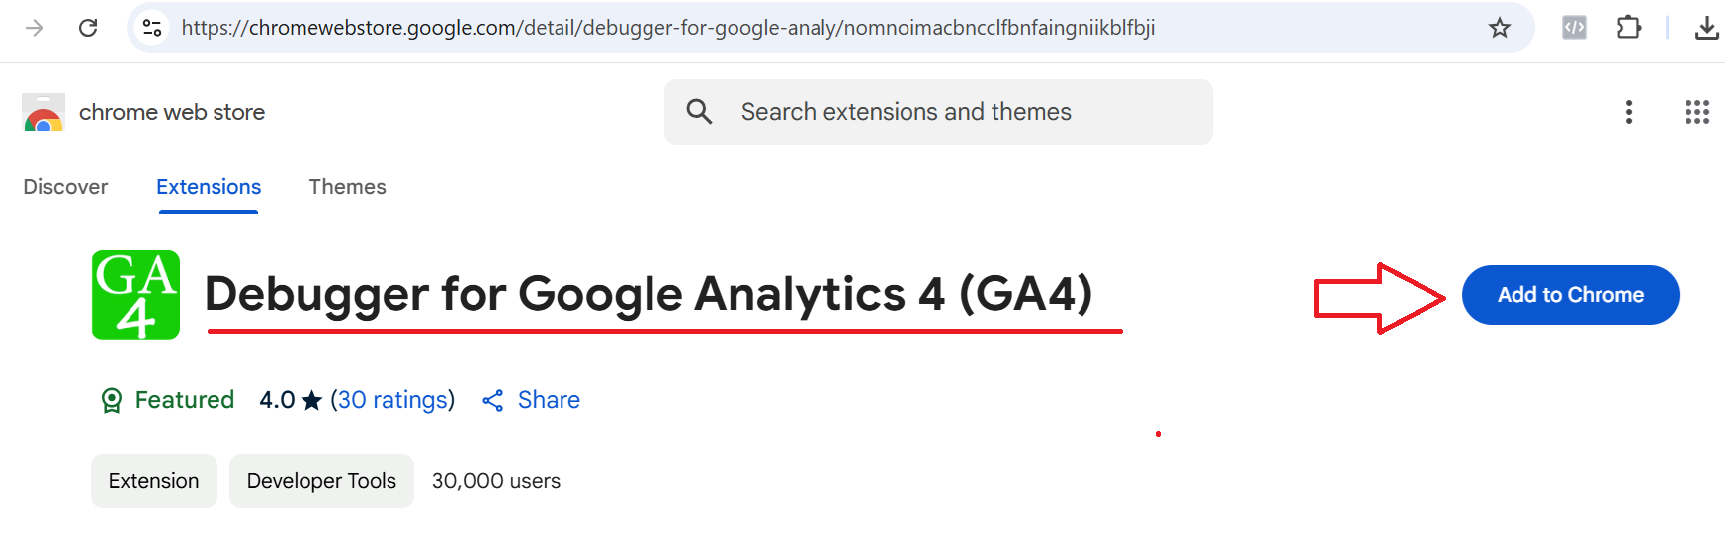
Step 2. Once the Chrome Web Store is open, search for 'Debugger for Google Analytics 4 (GA4)' in the search bar.
Step 3. Click on the ‘Add to Chrome’ button.
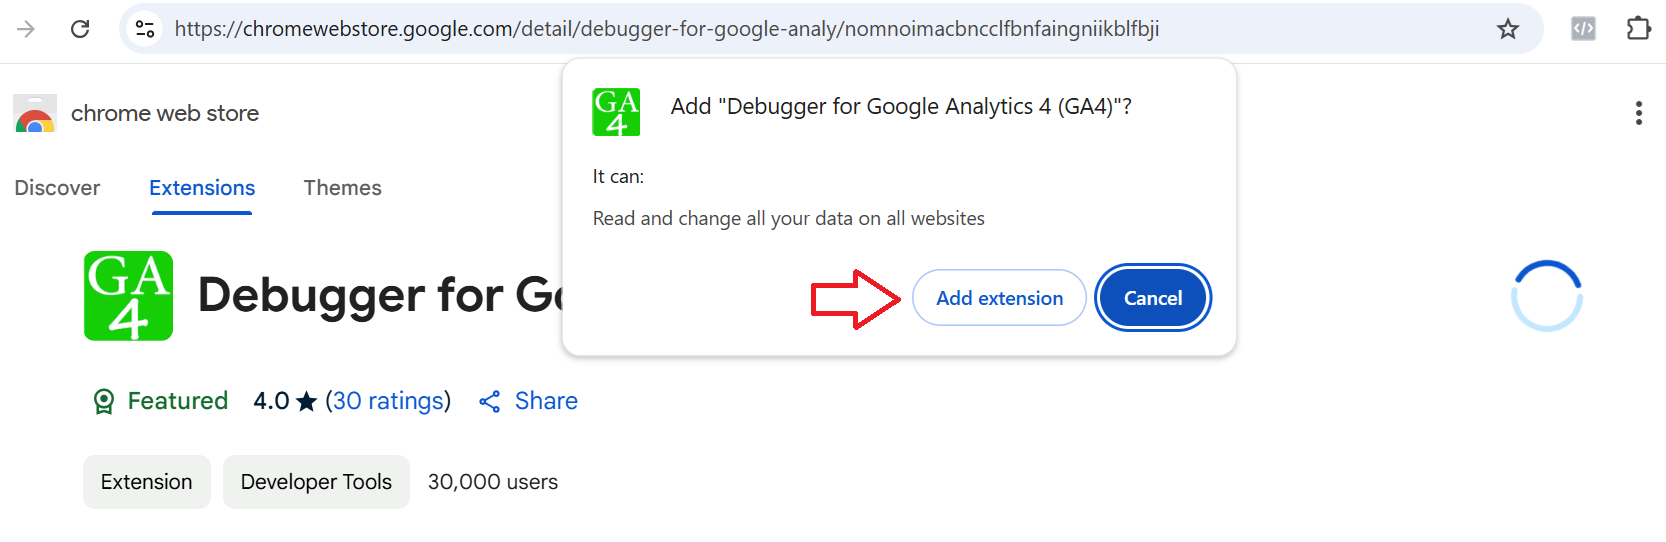
Step 4. A pop-up will appear. Click on ‘Add Extension’ to add the extension to Chrome.
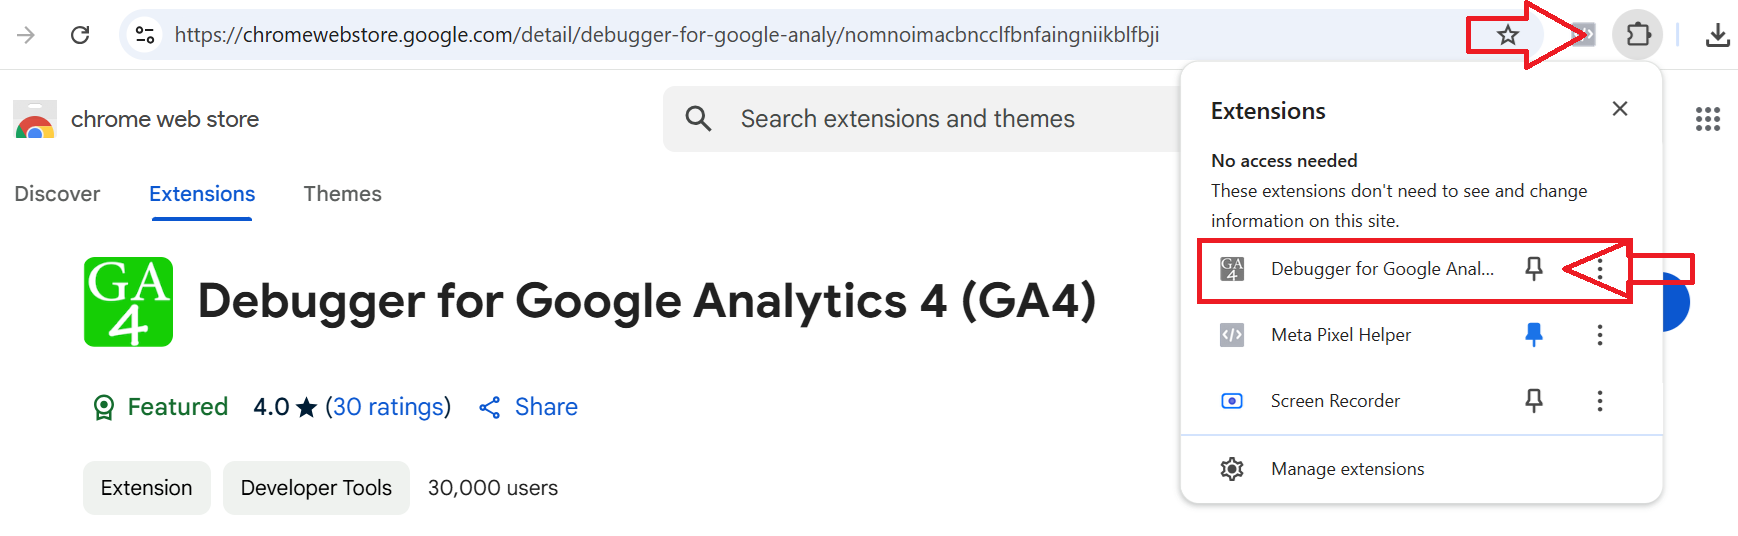
Step 5. In the browser, click on the extension icon and check if "Debugger for Google Analytics 4 (GA4)" is visible. Then, click on the 'Pin’ icon.
Step 6. Once
“Debugger for Google Analytics 4 (GA4)” is pinned, follow the below steps to check Google tag triggers on the website.
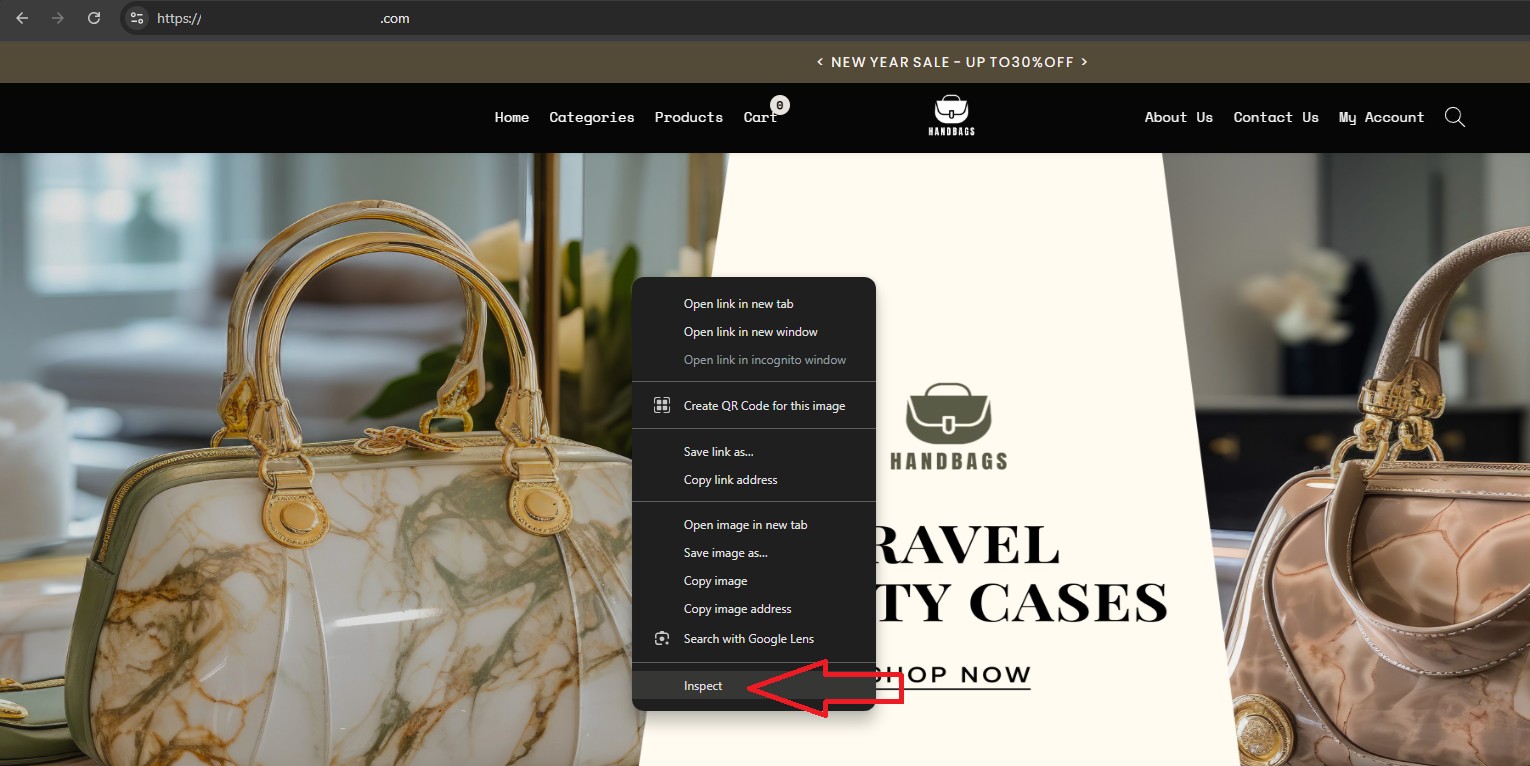
- Open Google Chrome, then enter your website URL in the address bar and click on the enter button to search the website.
- Once your website is open right-click on the website page and select "Inspect" (as shown in the image). (or press Ctrl + Shift + I on Windows/ Cmd + Option + I on Mac).
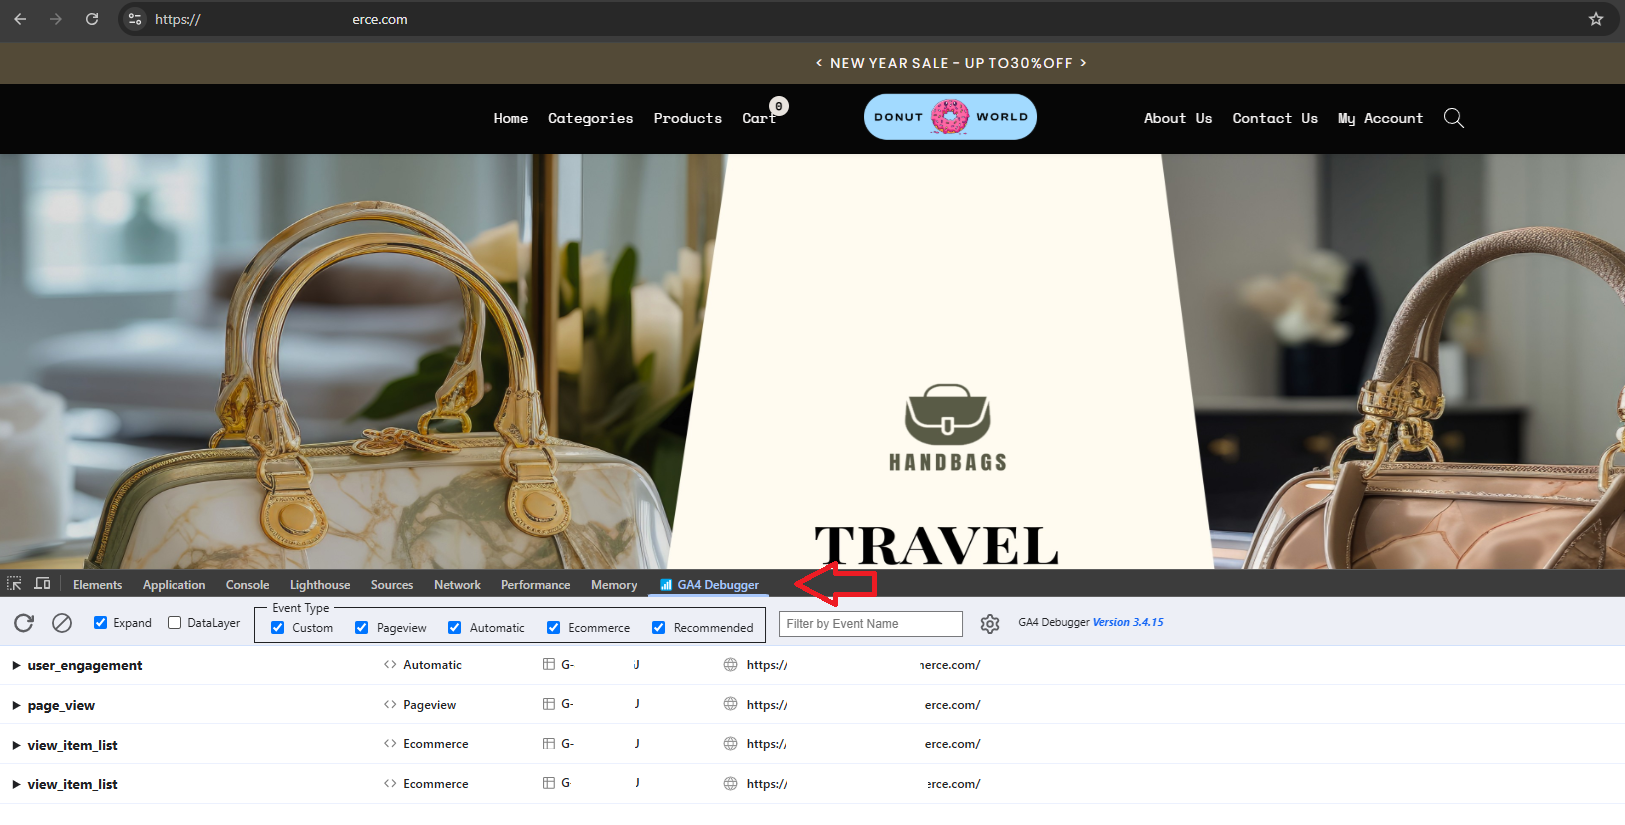
Step 7. A slider (Developer Window) will appear on the page, then click on the GA4 Debugger option (as shown below). After this, you can see the Gtag events triggered in the GA4 Debugger tab.
How do you check Gtag Event Triggers on your website?
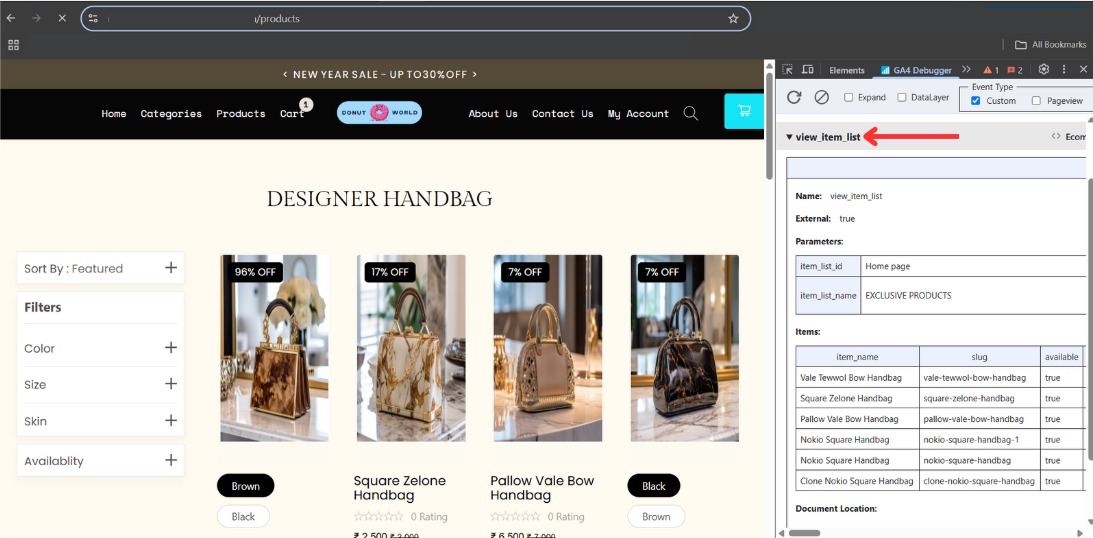
Step 1. The View_Item_list event will get triggered when the user is redirected to a page where the product list is displayed. This includes the Product List page, Category List page, Product Details page, and the Home page (if the product list is added).
Step 2. The View Item event will get triggered when the user clicks on the product card and is redirected to the Product Details page.
Step 3. The view Cart event will get triggered when the user is redirected to the Cart page after clicking on the ‘Cart’ menu.
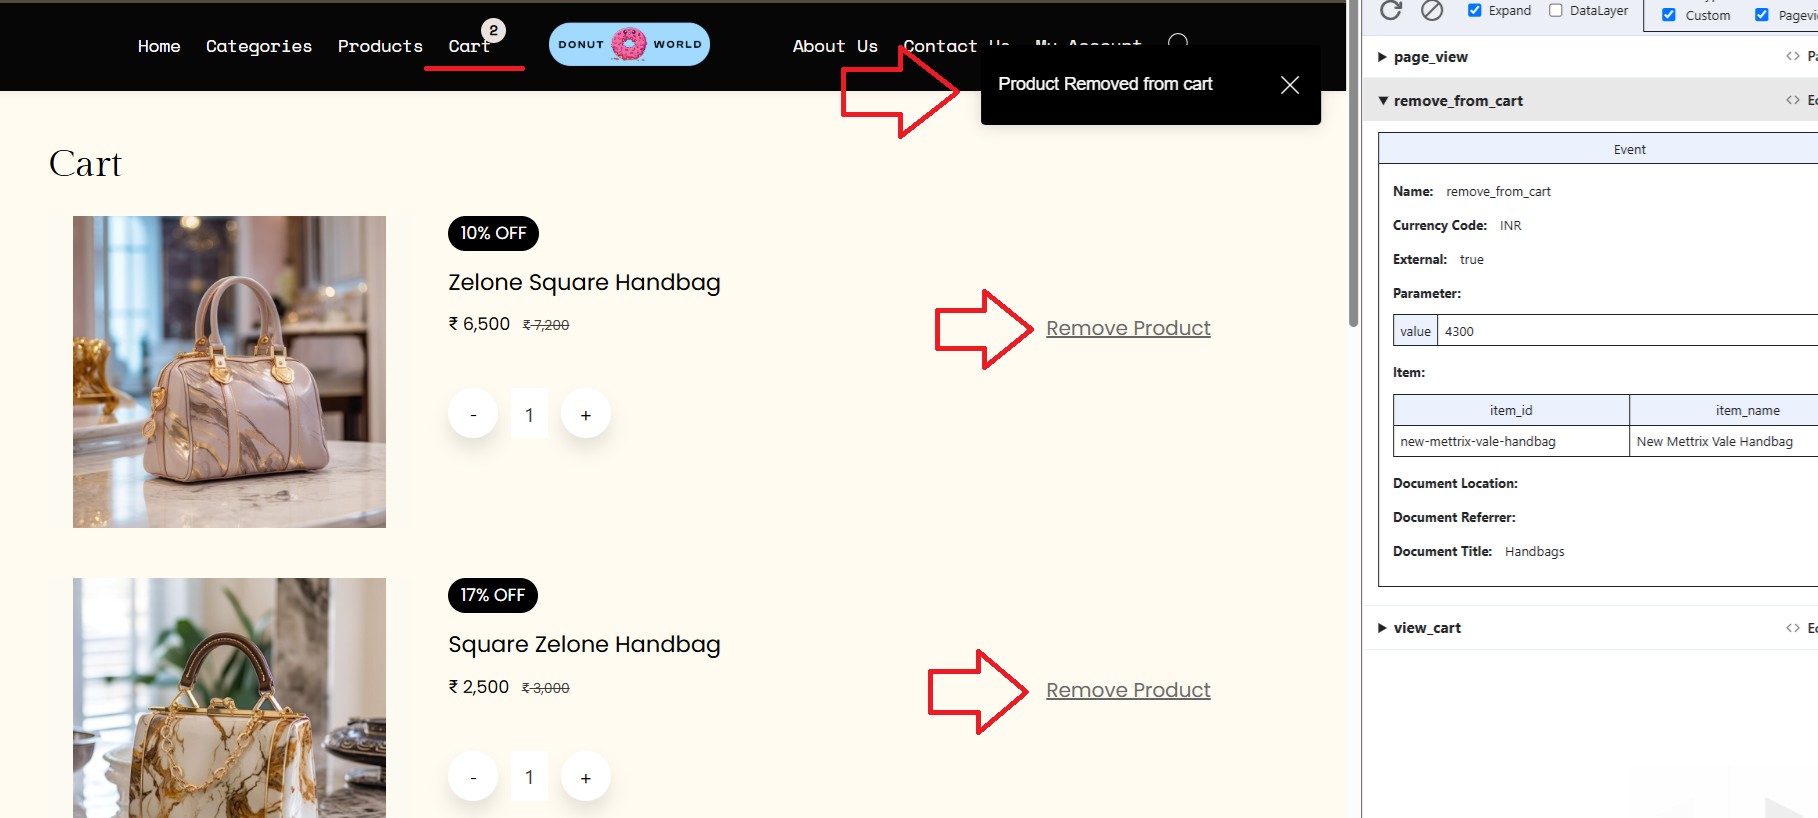
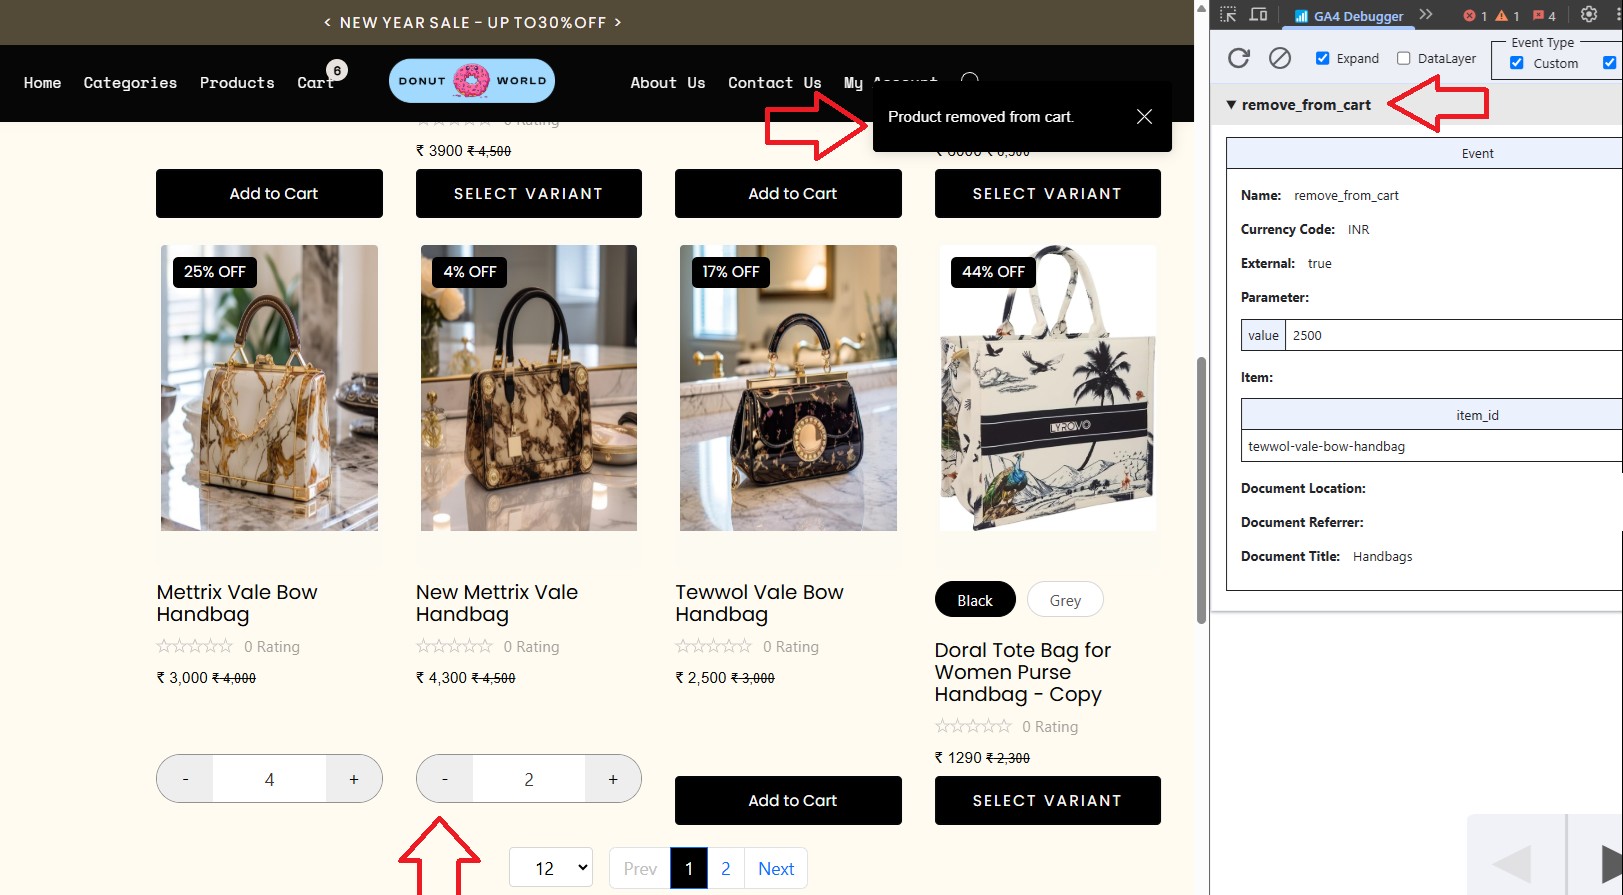
Step 4. The remove from cart event will be triggered when the user clicks on the “Remove Product” link on the cart page or removes a product from the product card. The “Remove Product from Cart” option is available only on the cart page.
Step 5. Remove Product from Product Card: Product cards are available on the Home Page, Category Page, Product List Page, and Product Details Page.
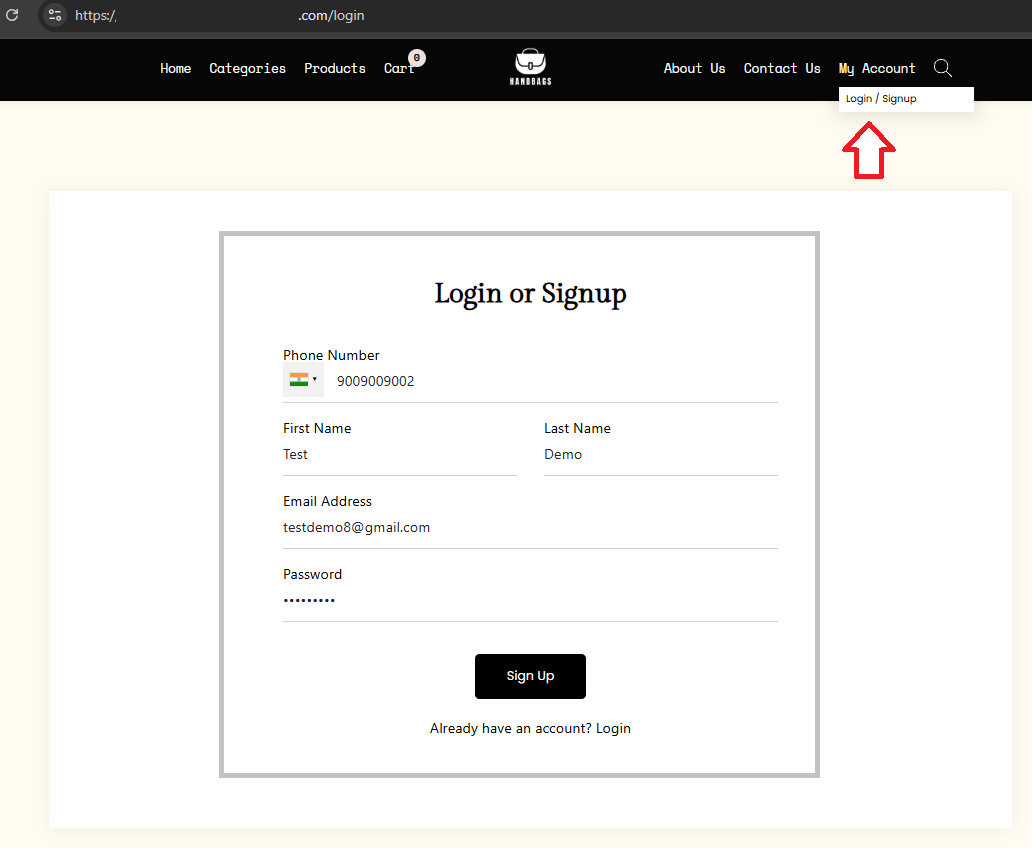
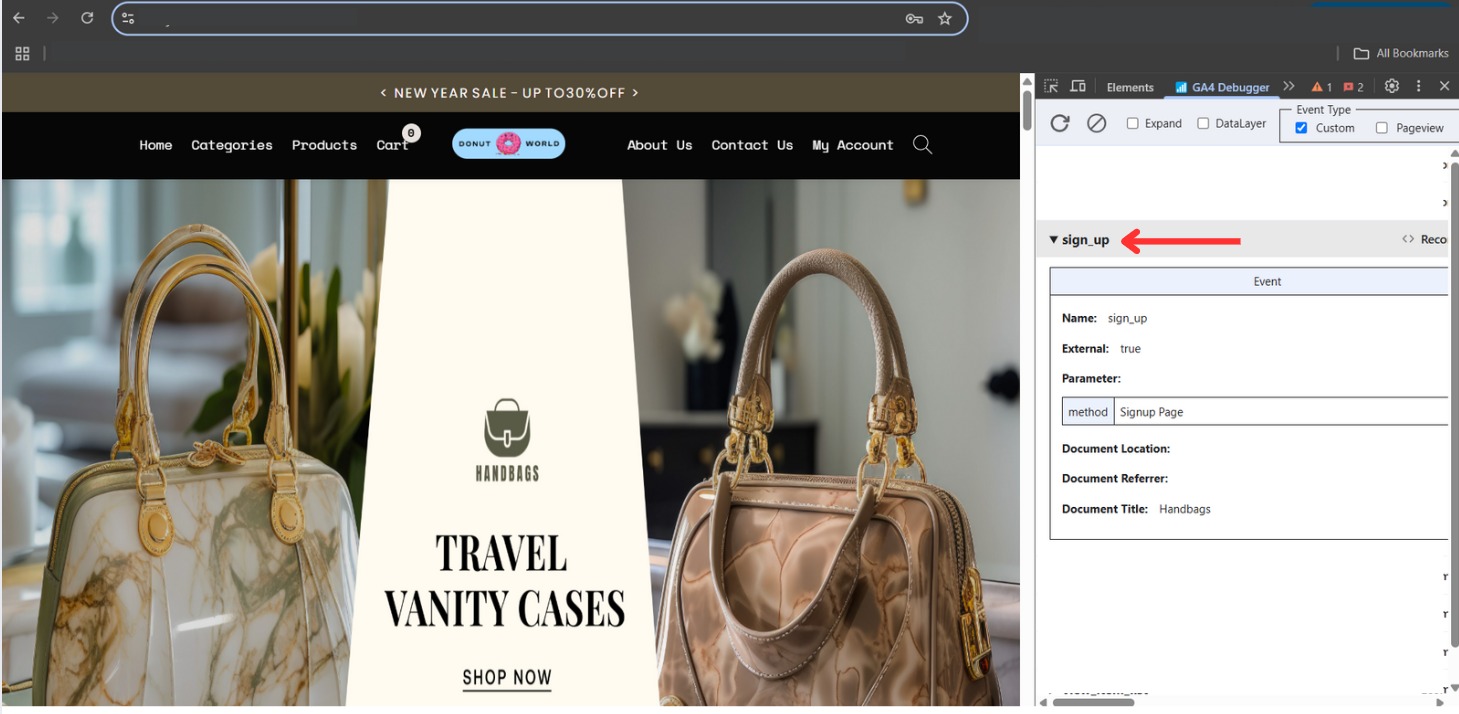
Step 6. The signup event will get triggered when a new user signs up on your website from the checkout page or login page.
SignUp from the Checkout page:
SignUp from the login page:
On the Commmerce platform, which GTag Analytics events are triggered automatically?
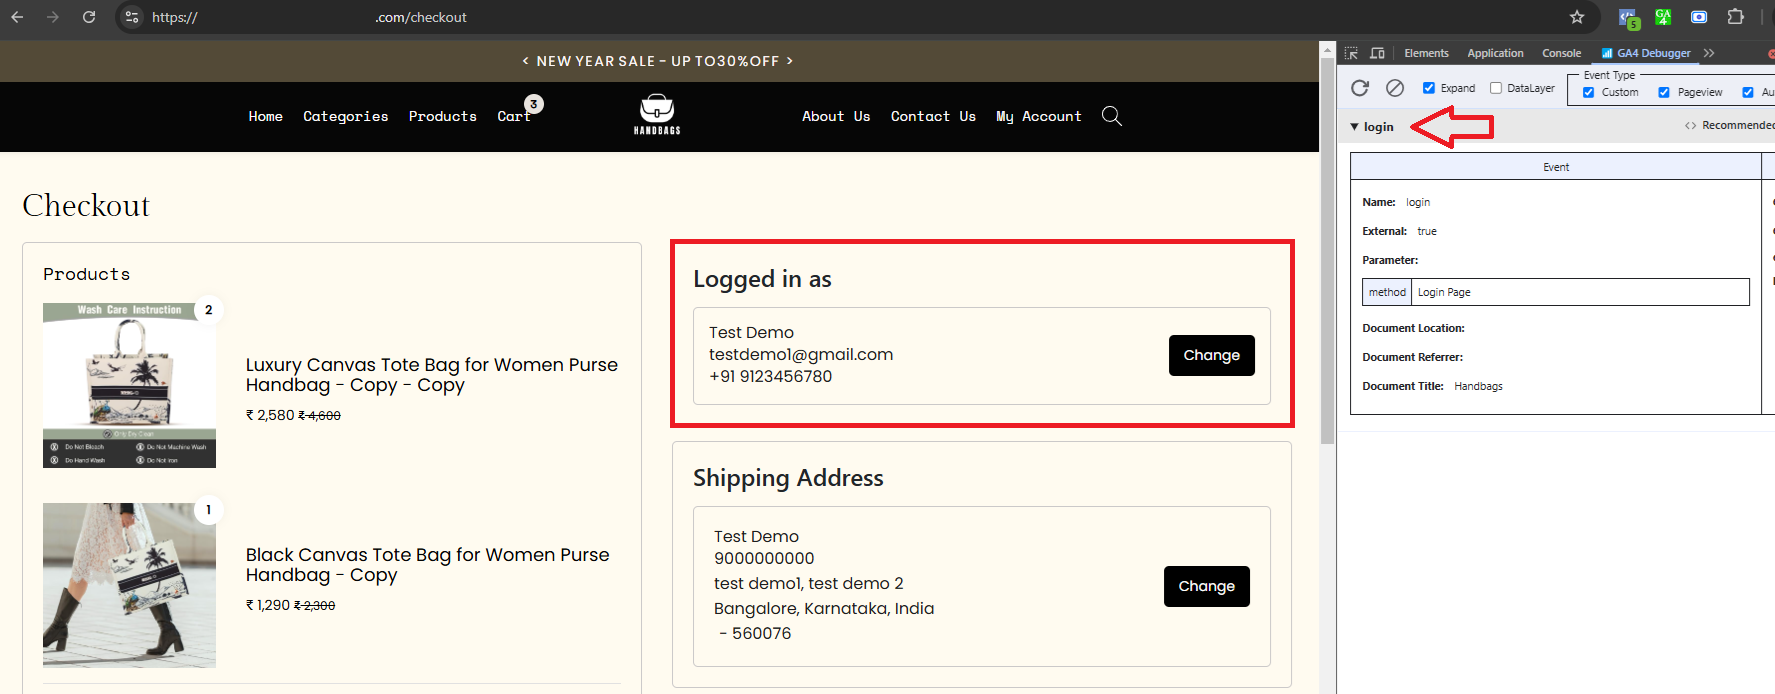
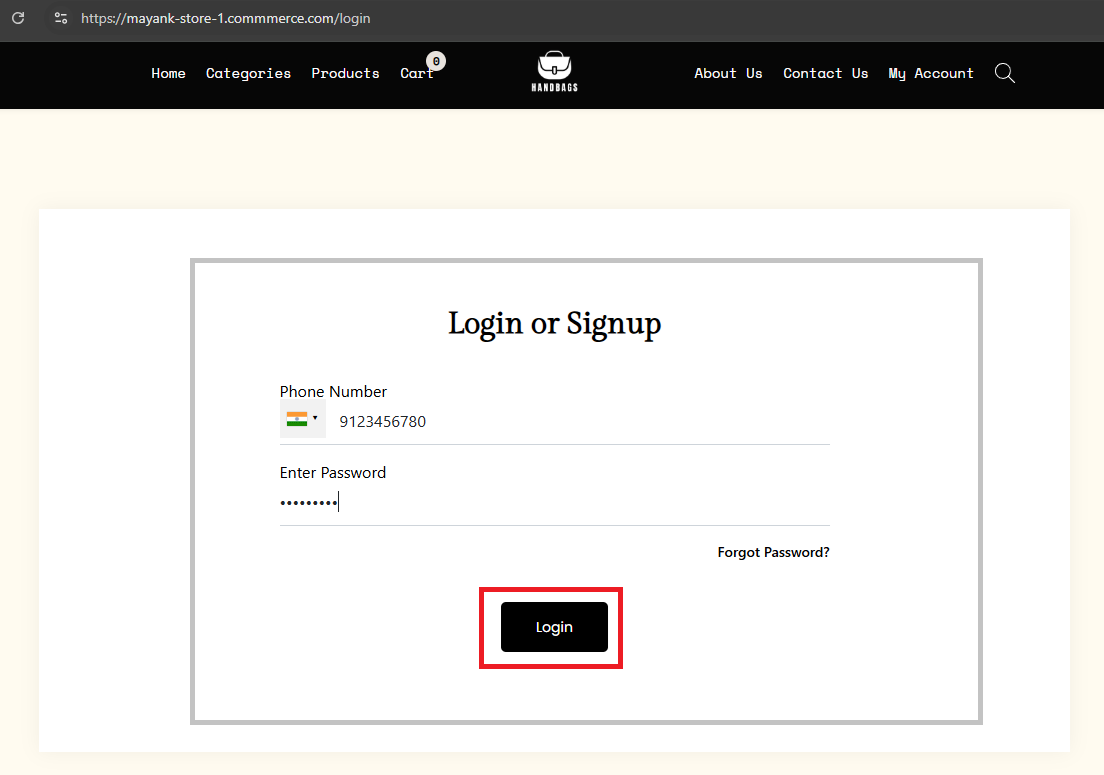
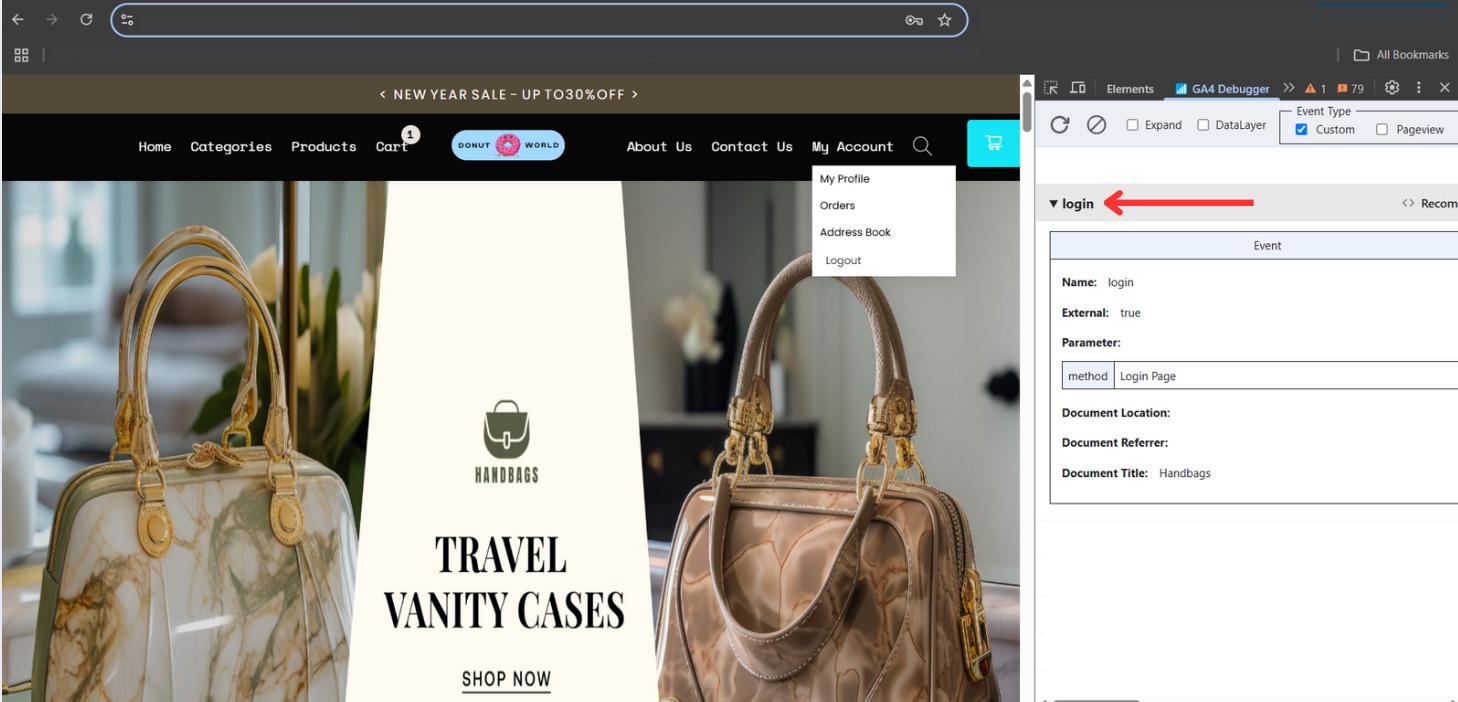
1. The Login event will get triggered when a user logs into your website from the Checkout Page or the Login Page.
Login from the Checkout page:
Login from the login page:
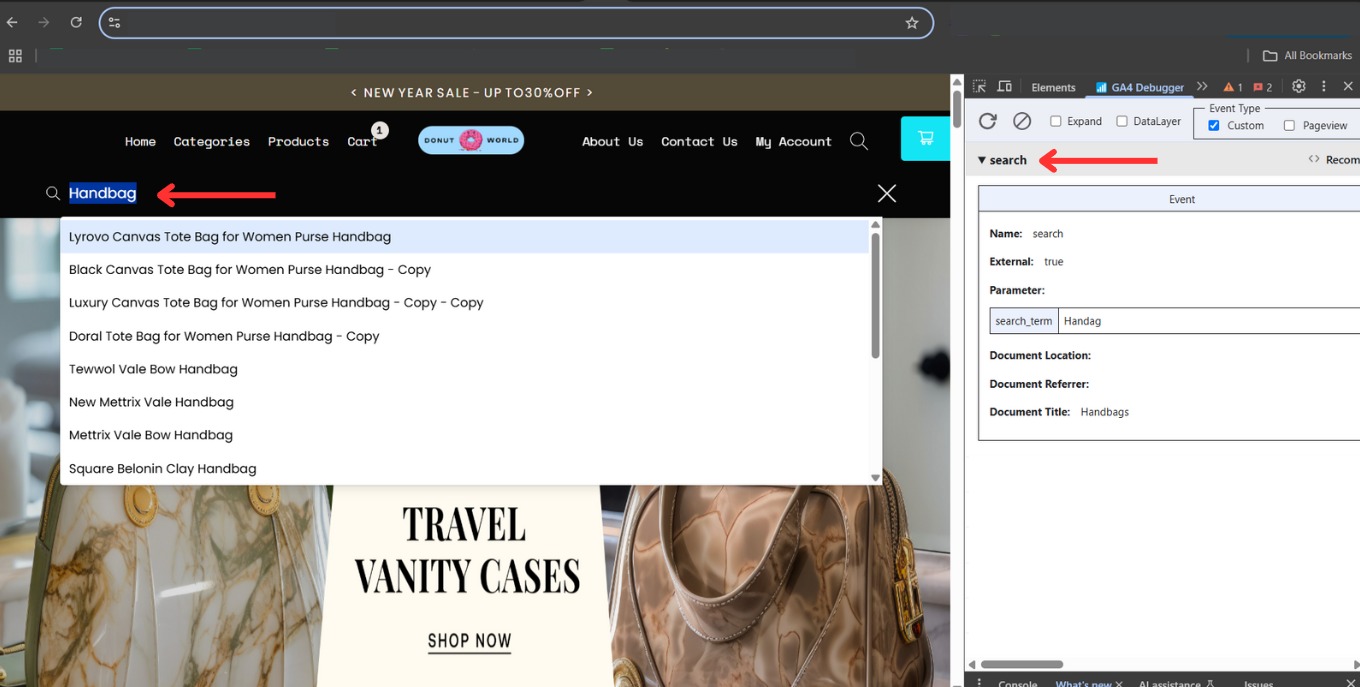
2. The Search event will get triggered when the user clicks on the search icon in the header menu and enters a keyword in the search bar to search for a product. Search events can be triggered from any page since the search icon is available in the header menu across all pages.
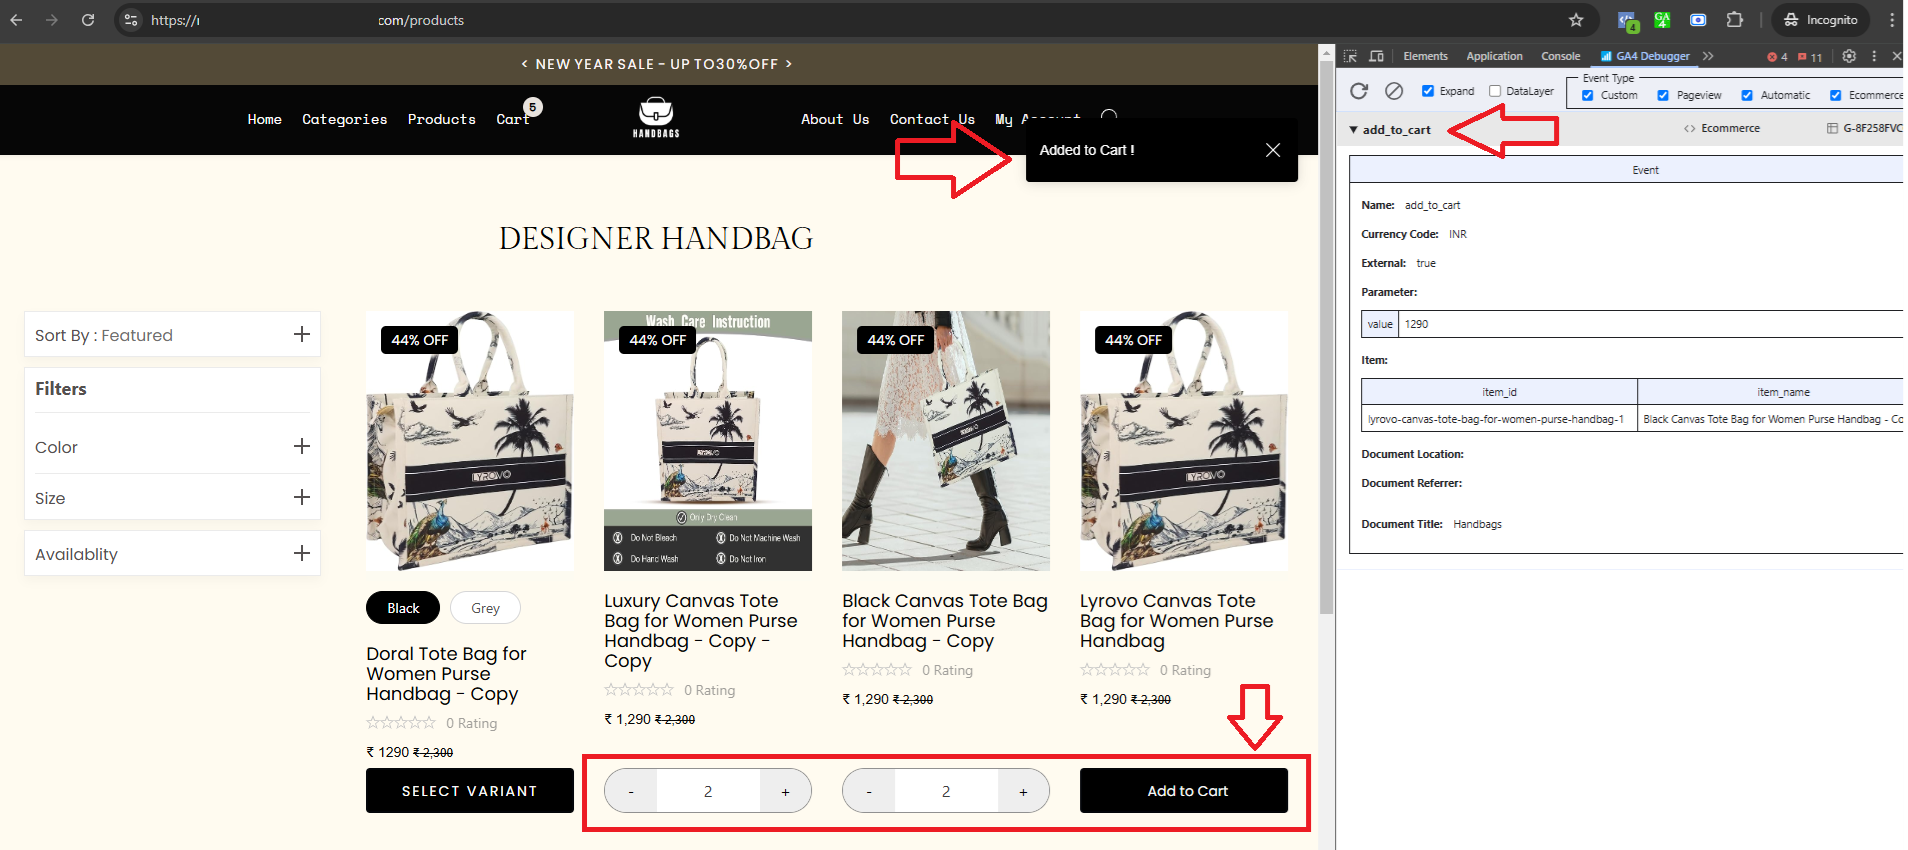
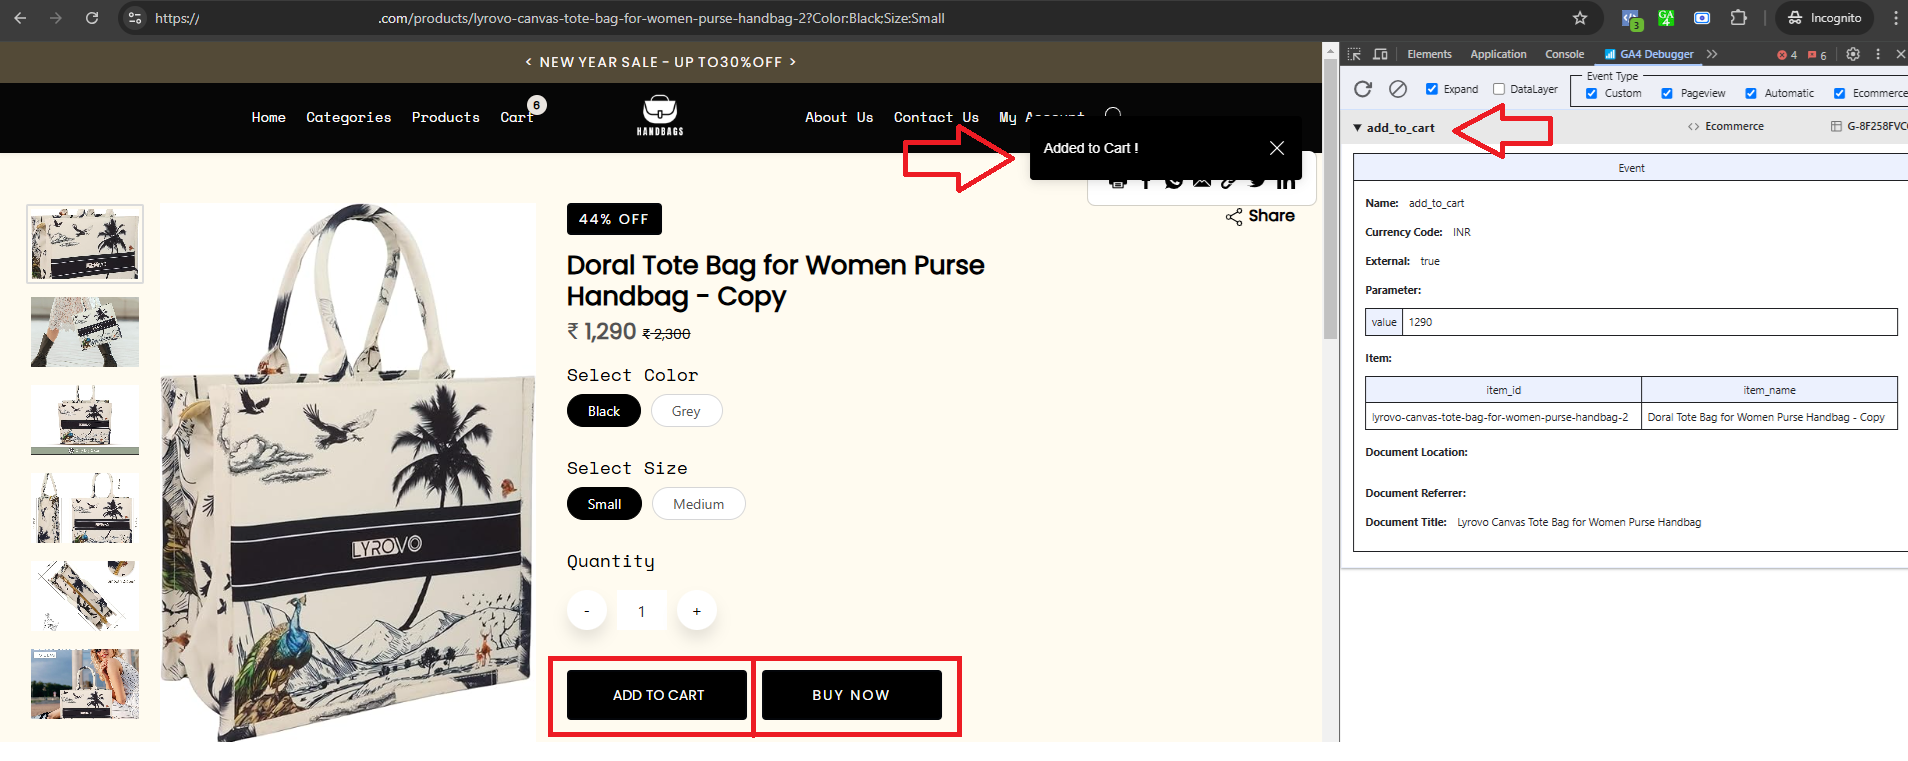
3. The
Add to Cart event will be triggered when the user clicks on the
"Add to Cart" or
"Buy Now" button.
The
"Add to Cart" button is available on:
- Home page product cards
- Product list product cards
- Category list product cards
- Product details page under "You May Like" and "Related Products" sections
- Select a Variant pop-up
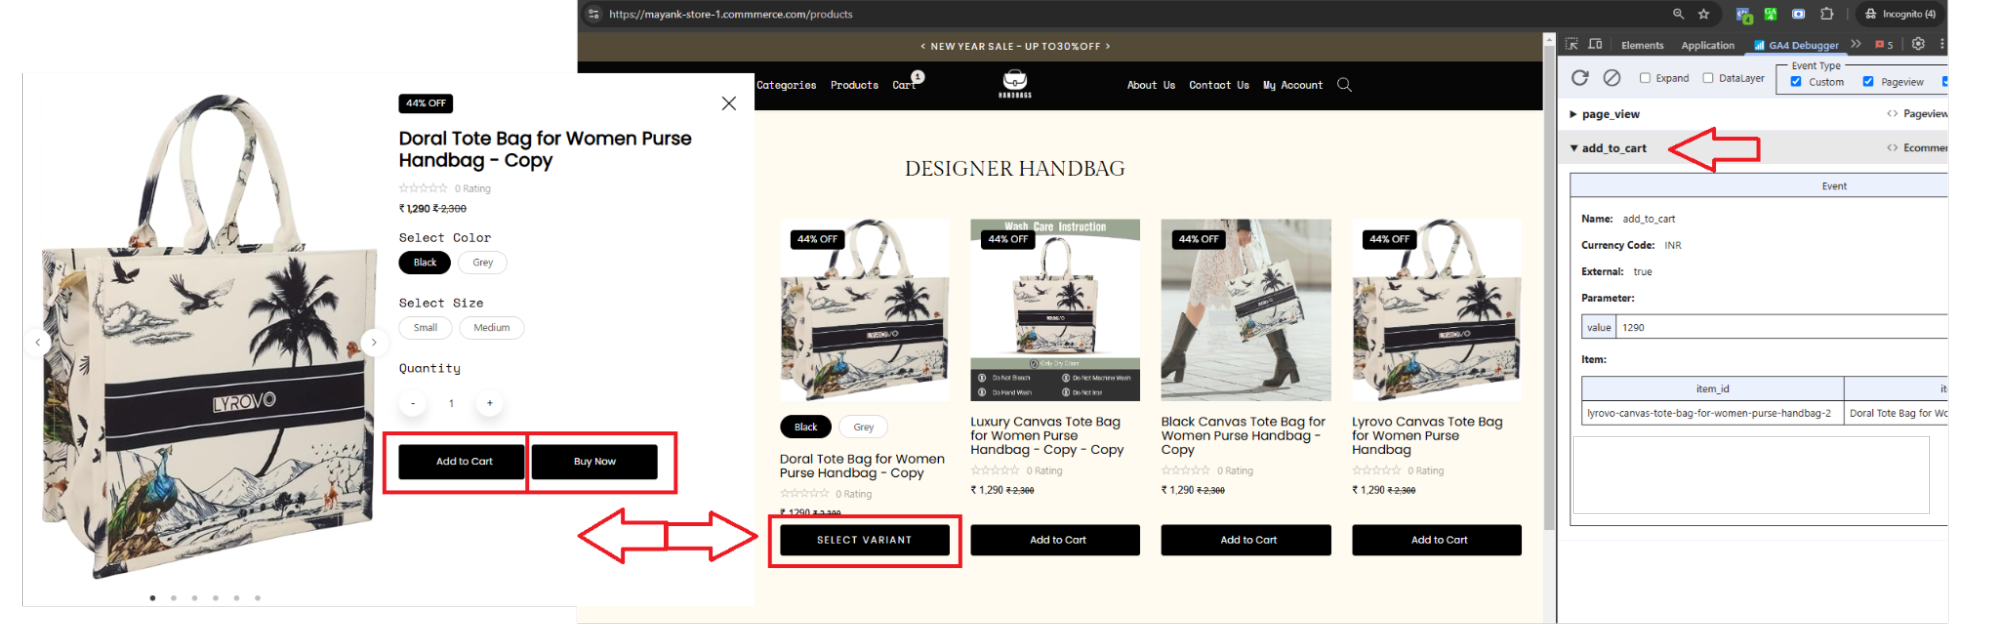
The
"Buy Now" button is available on:
- Product details page
- Select a Variant pop-up
The ‘Add to cart’ and ‘Buy now’ buttons on the select variant pop-up.
The ‘Add to cart’ and ‘Buy now’ buttons on the product details page.
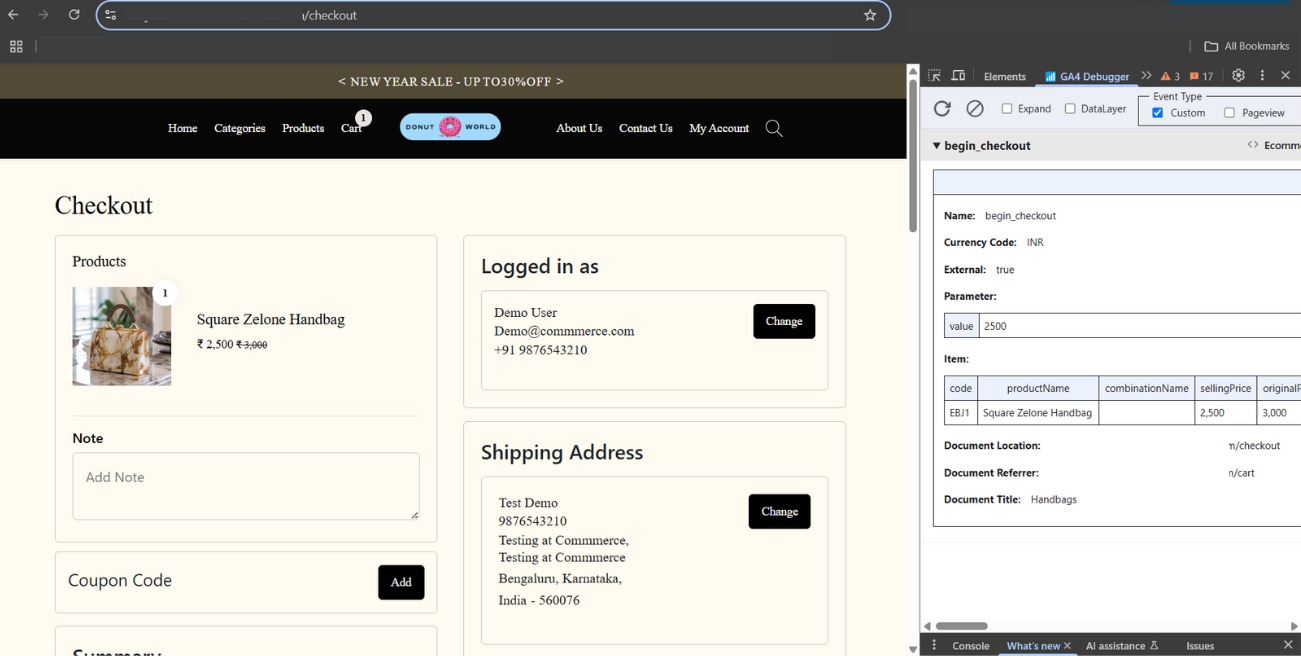
4. The Begin Checkout event will get triggered when a logged-in user is redirected to the Checkout page or when a non-logged-in user reaches the Login/Signup options on the Checkout page.
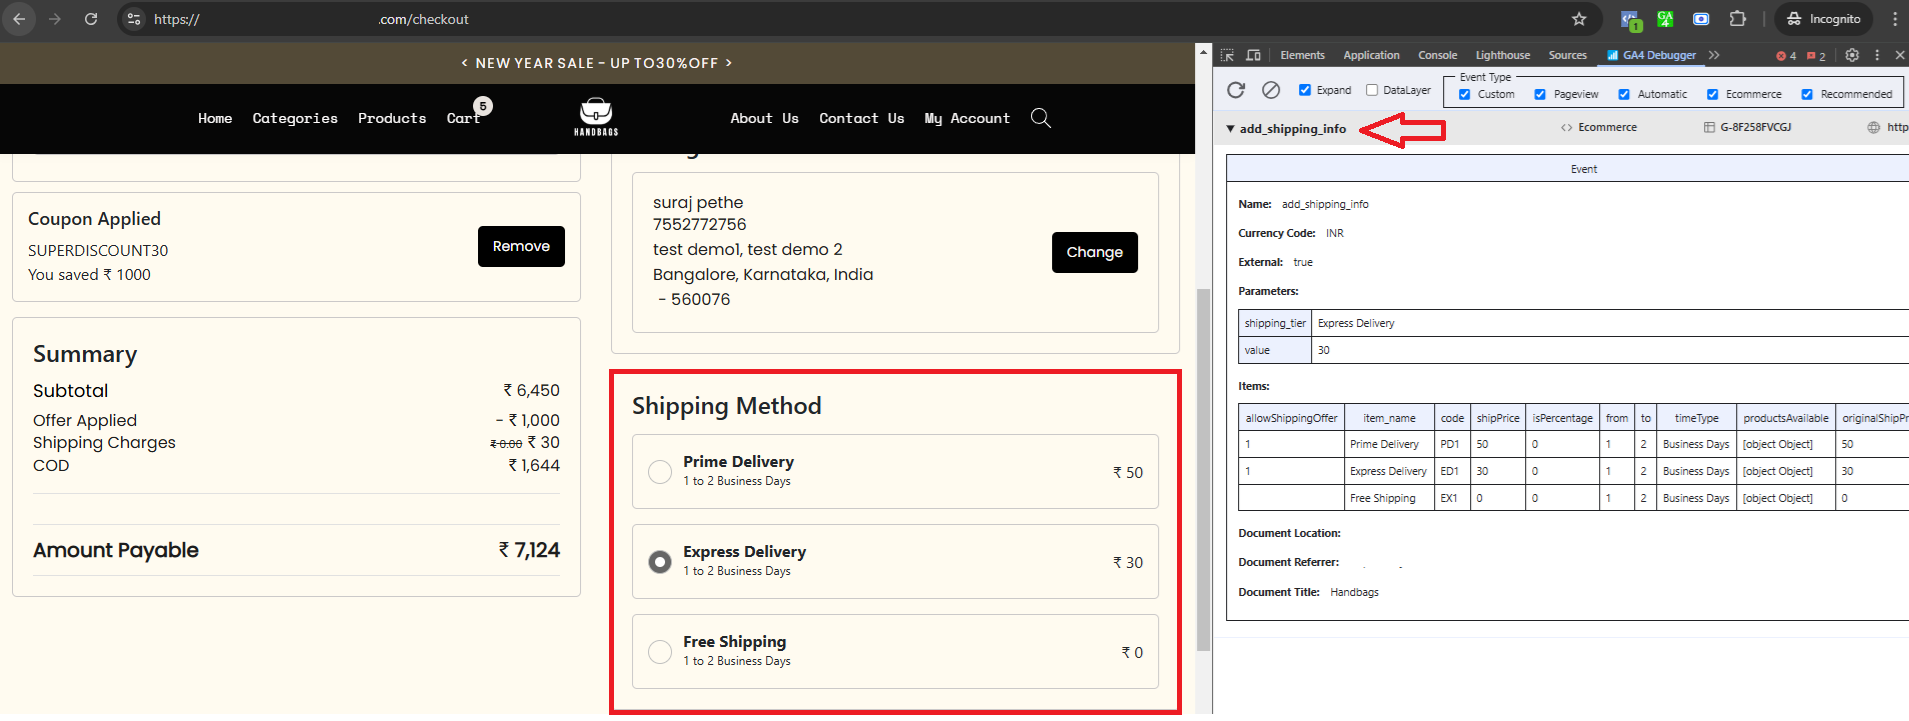
5. The ‘add_shipping_Info’ event will get triggered as soon as the user selects the shipping method on the checkout page.
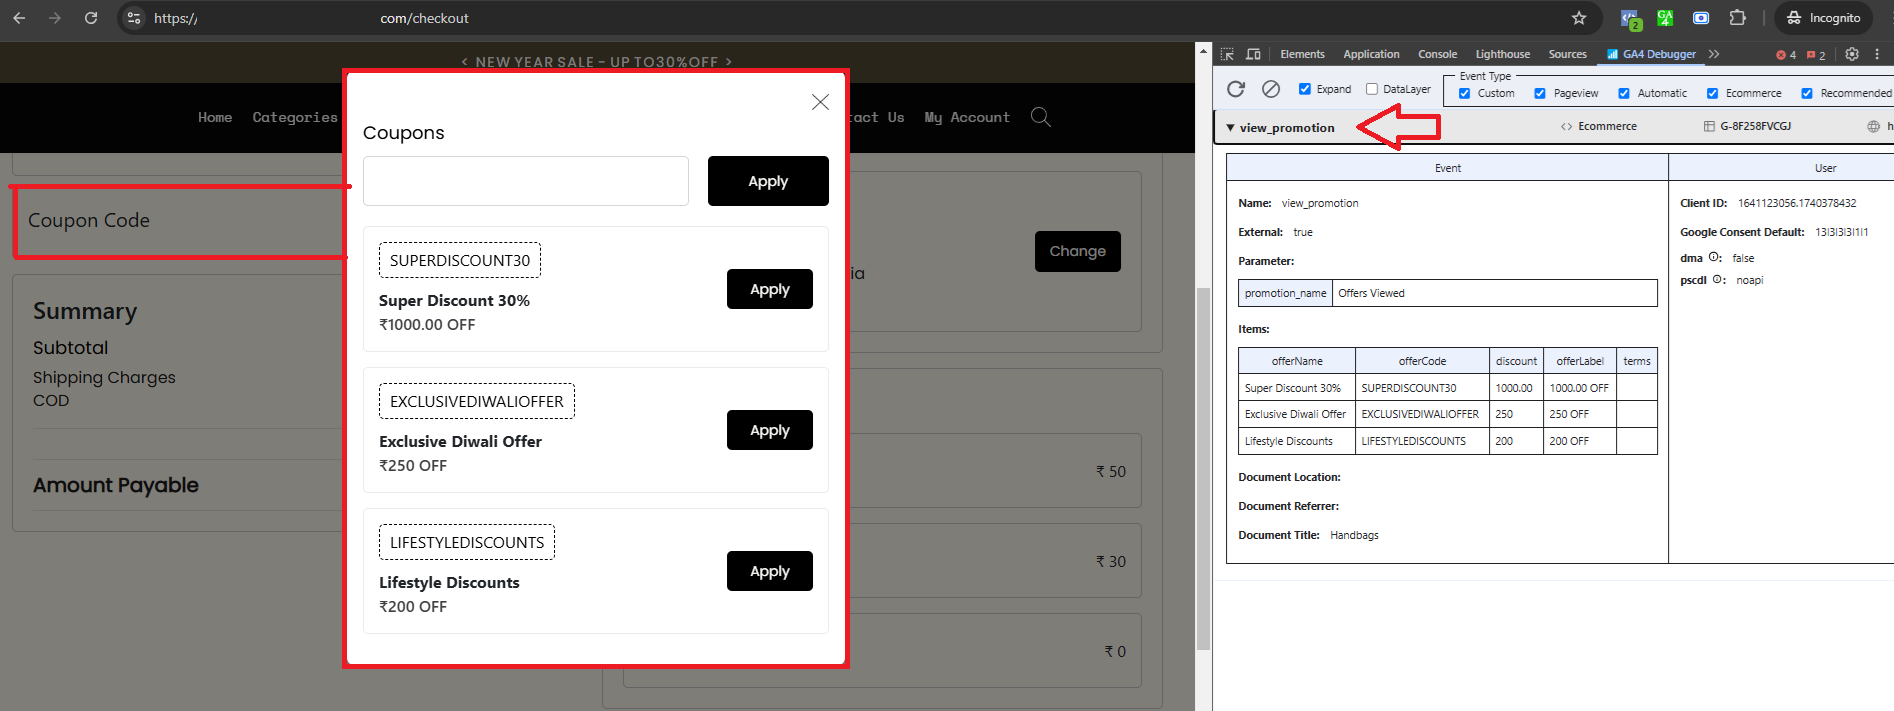
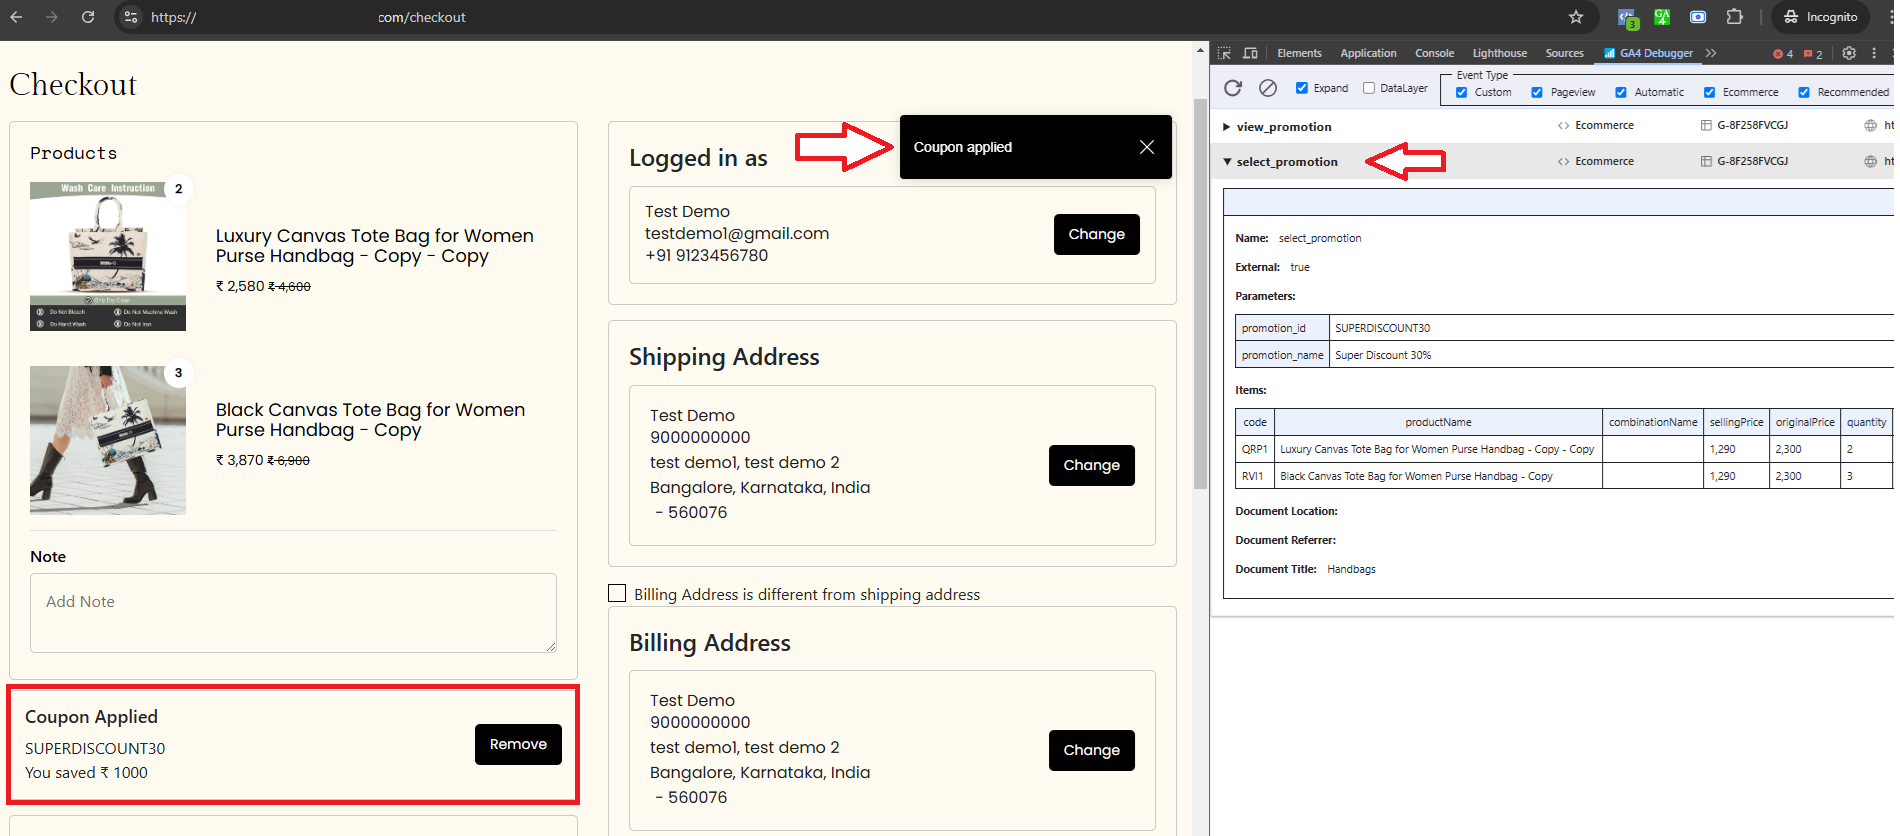
6. The View Promotion event will get triggered on the Checkout page when the user clicks the "Add" button on the Coupon Code section, and then an offer list pop-up will appear.
7. The ‘select_promotion’ event will get triggered on the checkout page when the user applies for an offer.
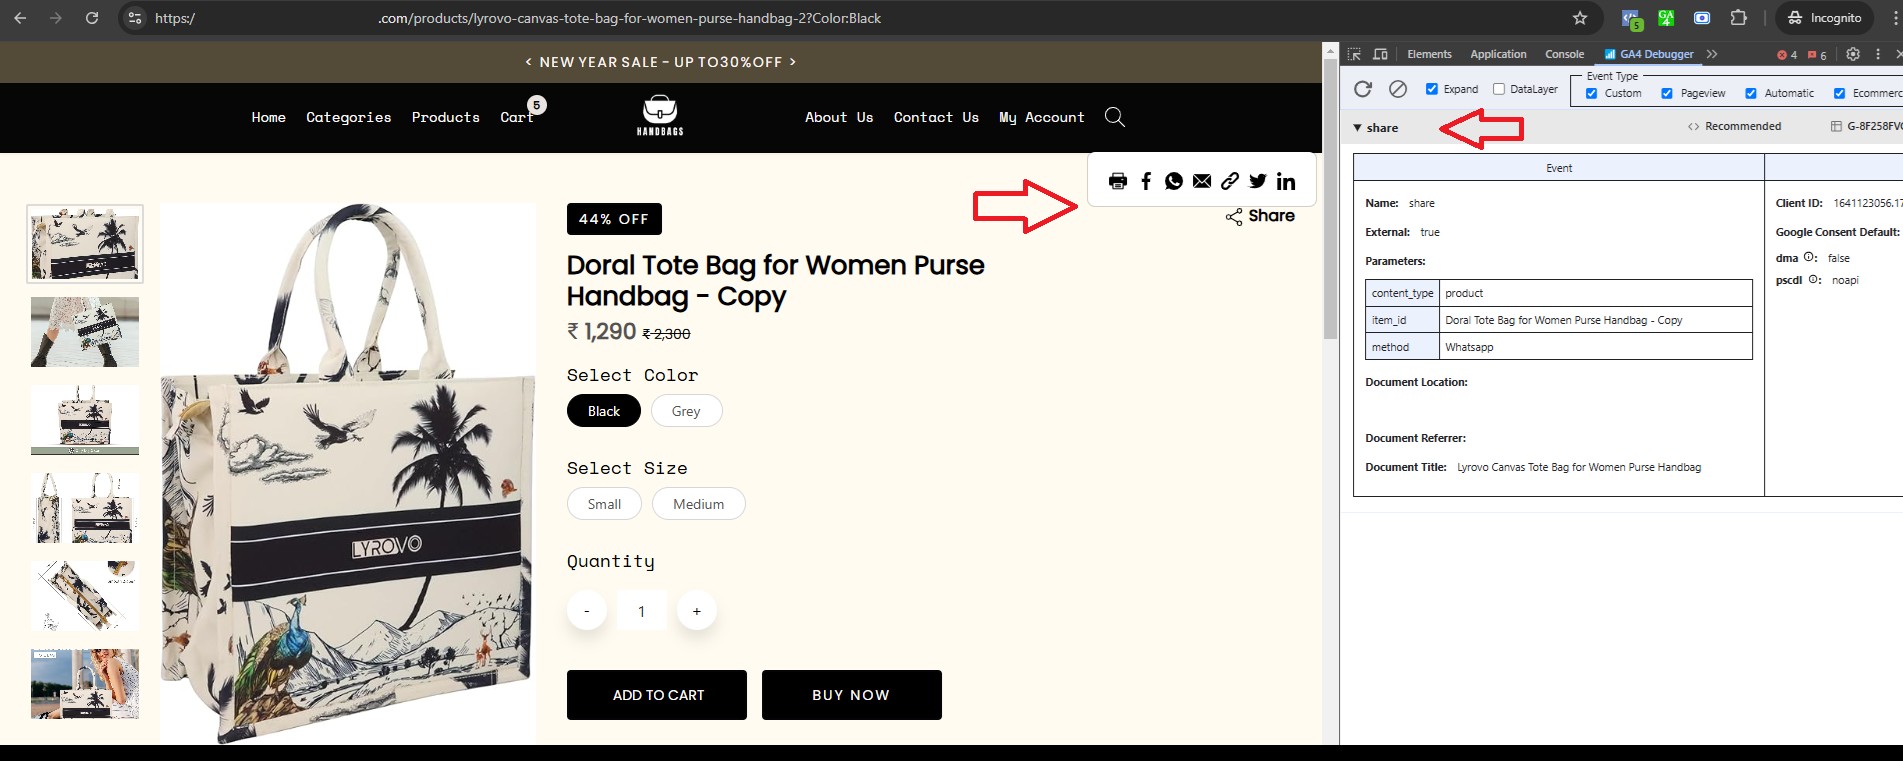
8. The Share event will be triggered on the Product Details page when the user clicks on the Share icon and selects a platform to share the product.
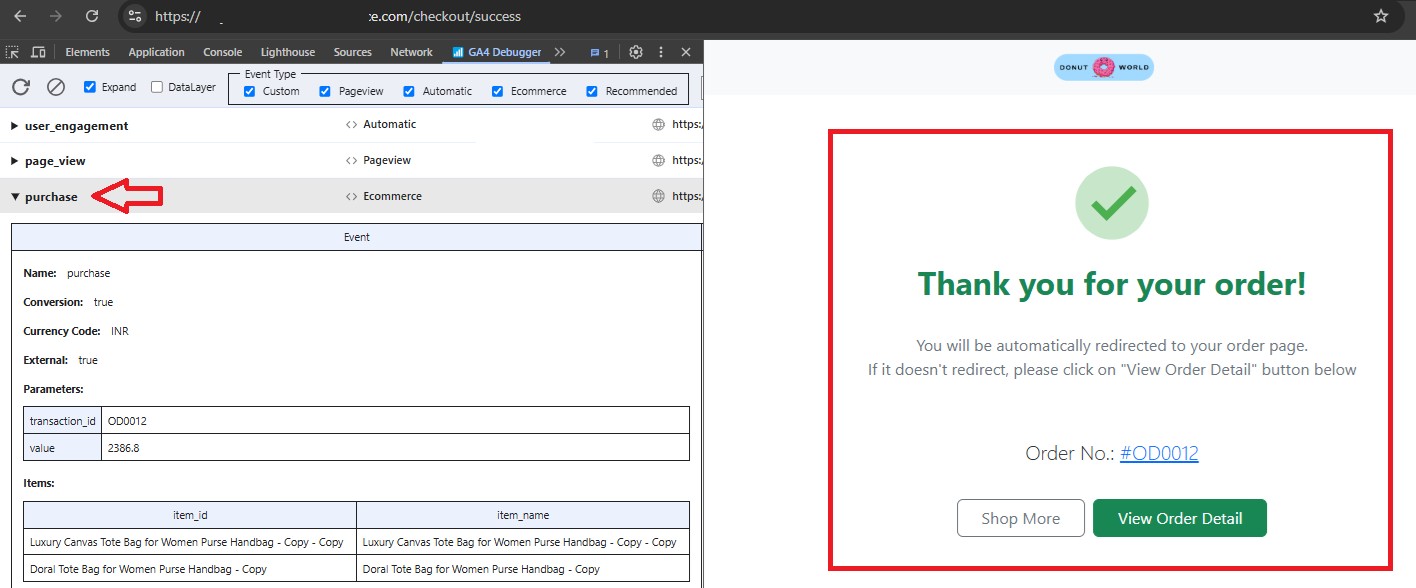
9. The ‘purchase’ event will be triggered on the Order Success page when the user clicks the ‘Place Order’ button and makes a payment. The page will then redirect to the Order Success page.
How to check Google Analytics data on your dashboard?
To check Google Analytics data on your dashboard, follow these steps:
Step1. Search for
Google Analytics on Google, which will prompt you to log in with your
Gmail account or directly
click here to go to the Google Analytics page.
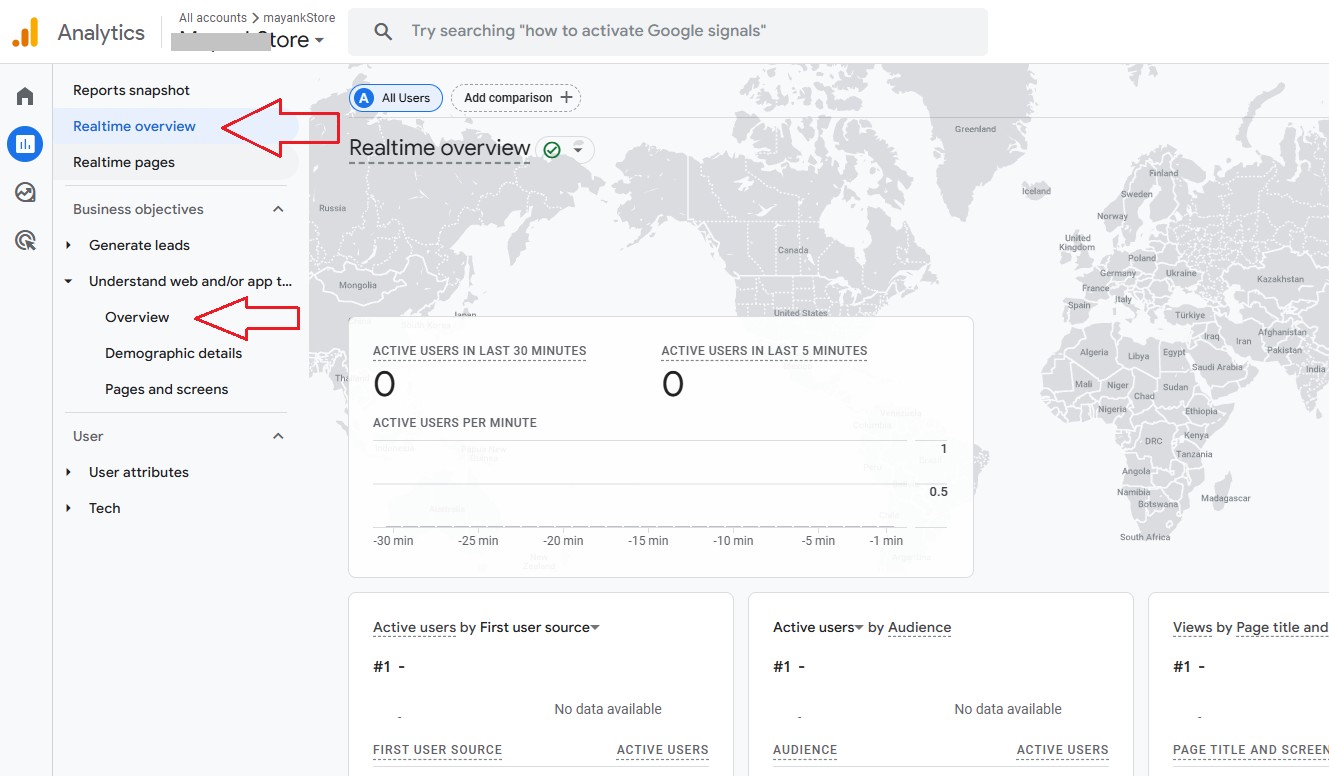
Step 2. Once you log in, you will be redirected to the dashboard. Hover your mouse cursor over the left sidebar and click on ‘Reports.’
Step 3. The page will be redirected to the ‘Reports’ section. Click on ‘Realtime Overview,’ then under ‘Understand web and/or app traffic,’ click on the ‘Overview’ option.
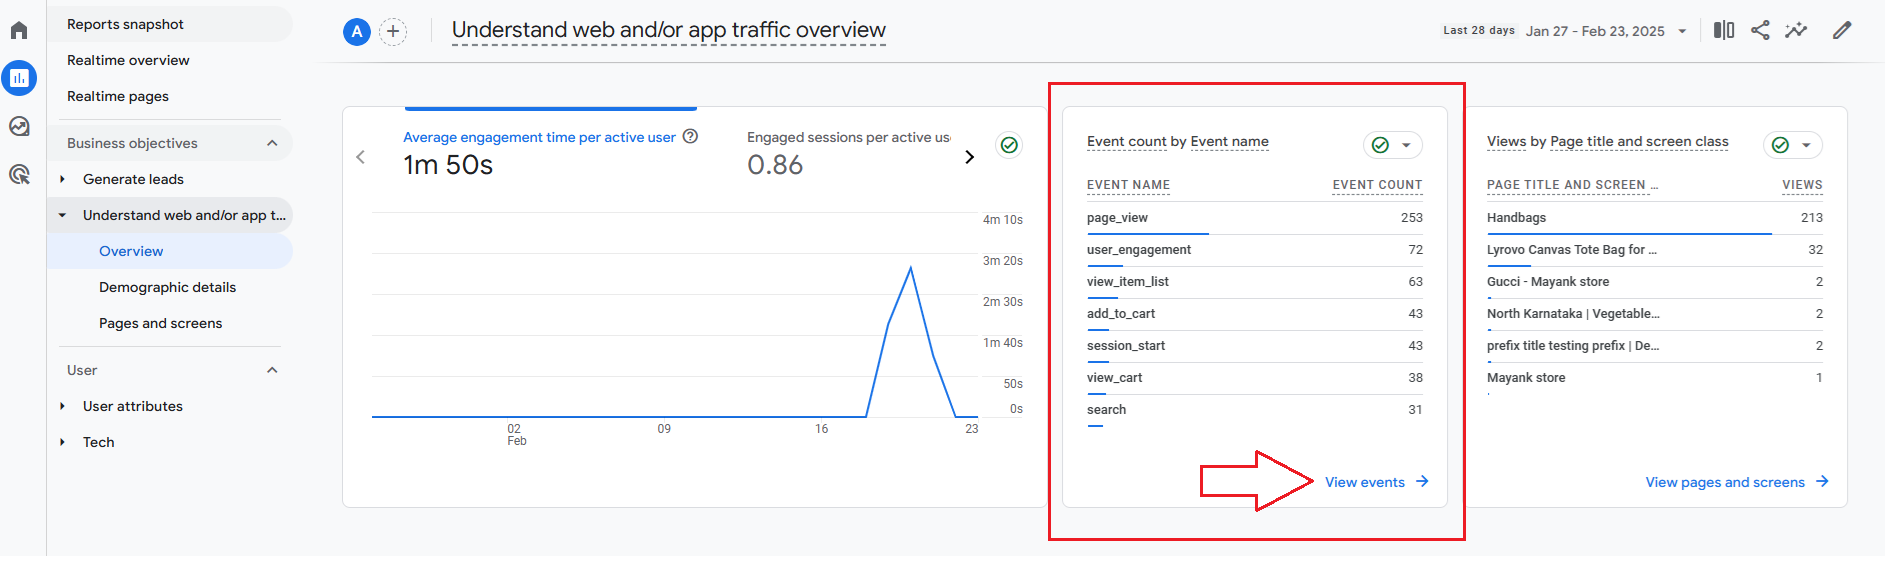
Step 4. The page will be redirected to the ‘Event count by Event name,’ then click on ‘View events.’
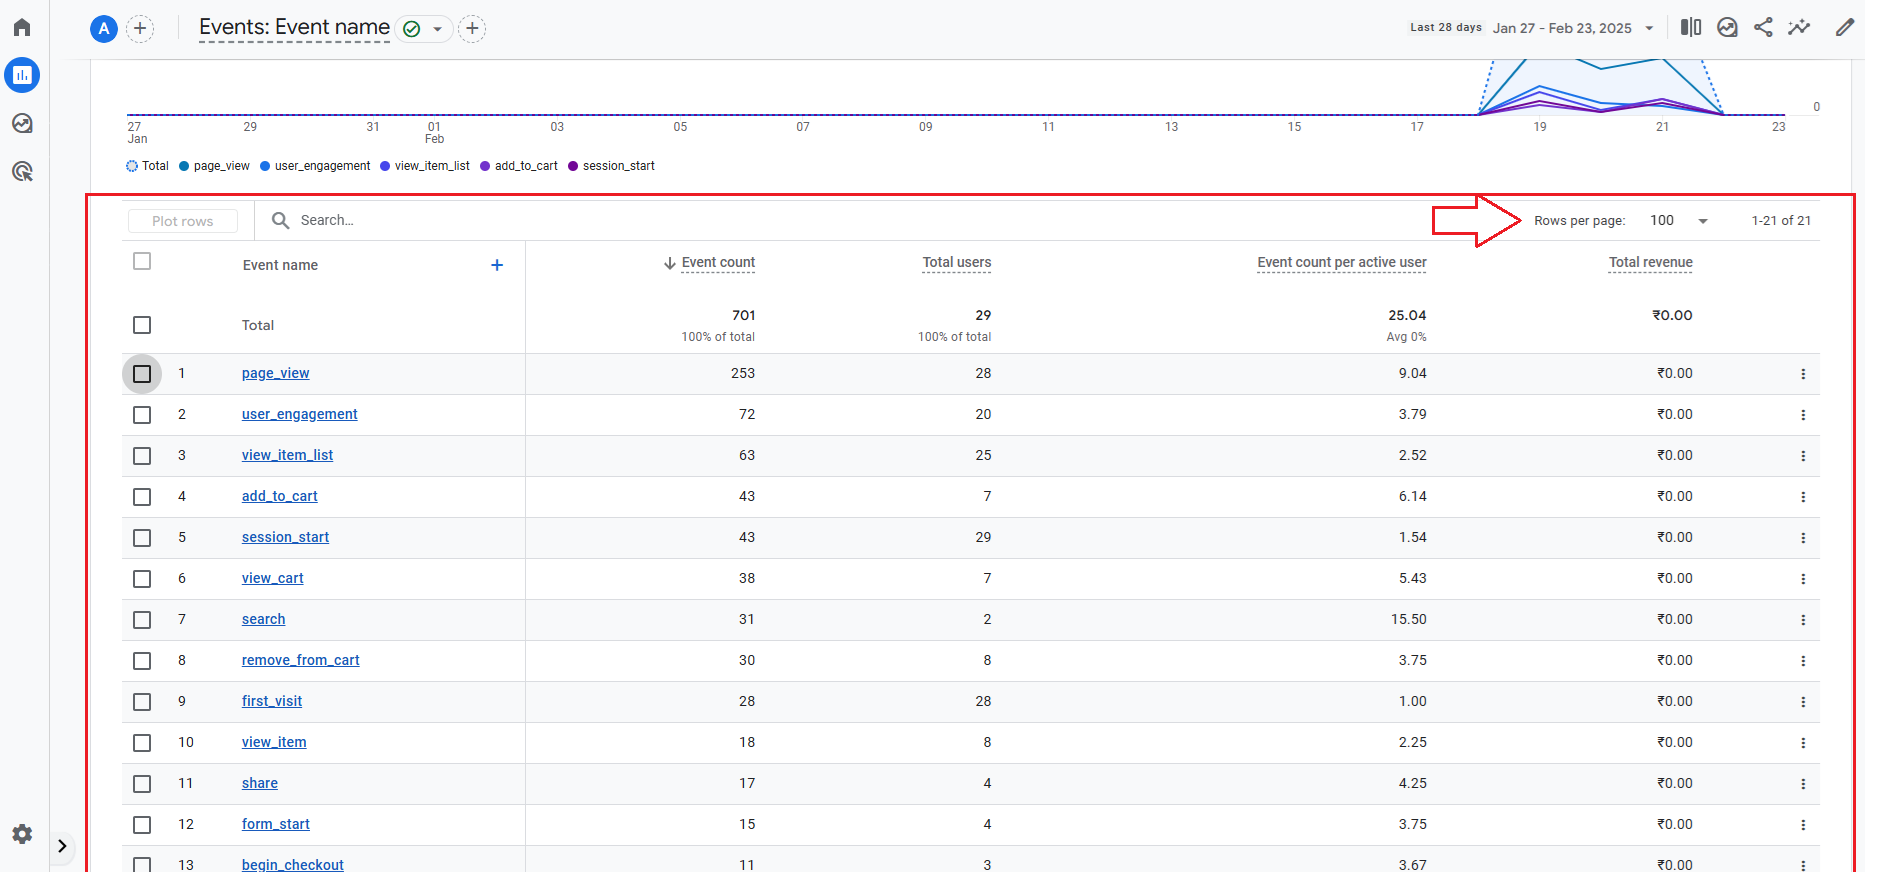
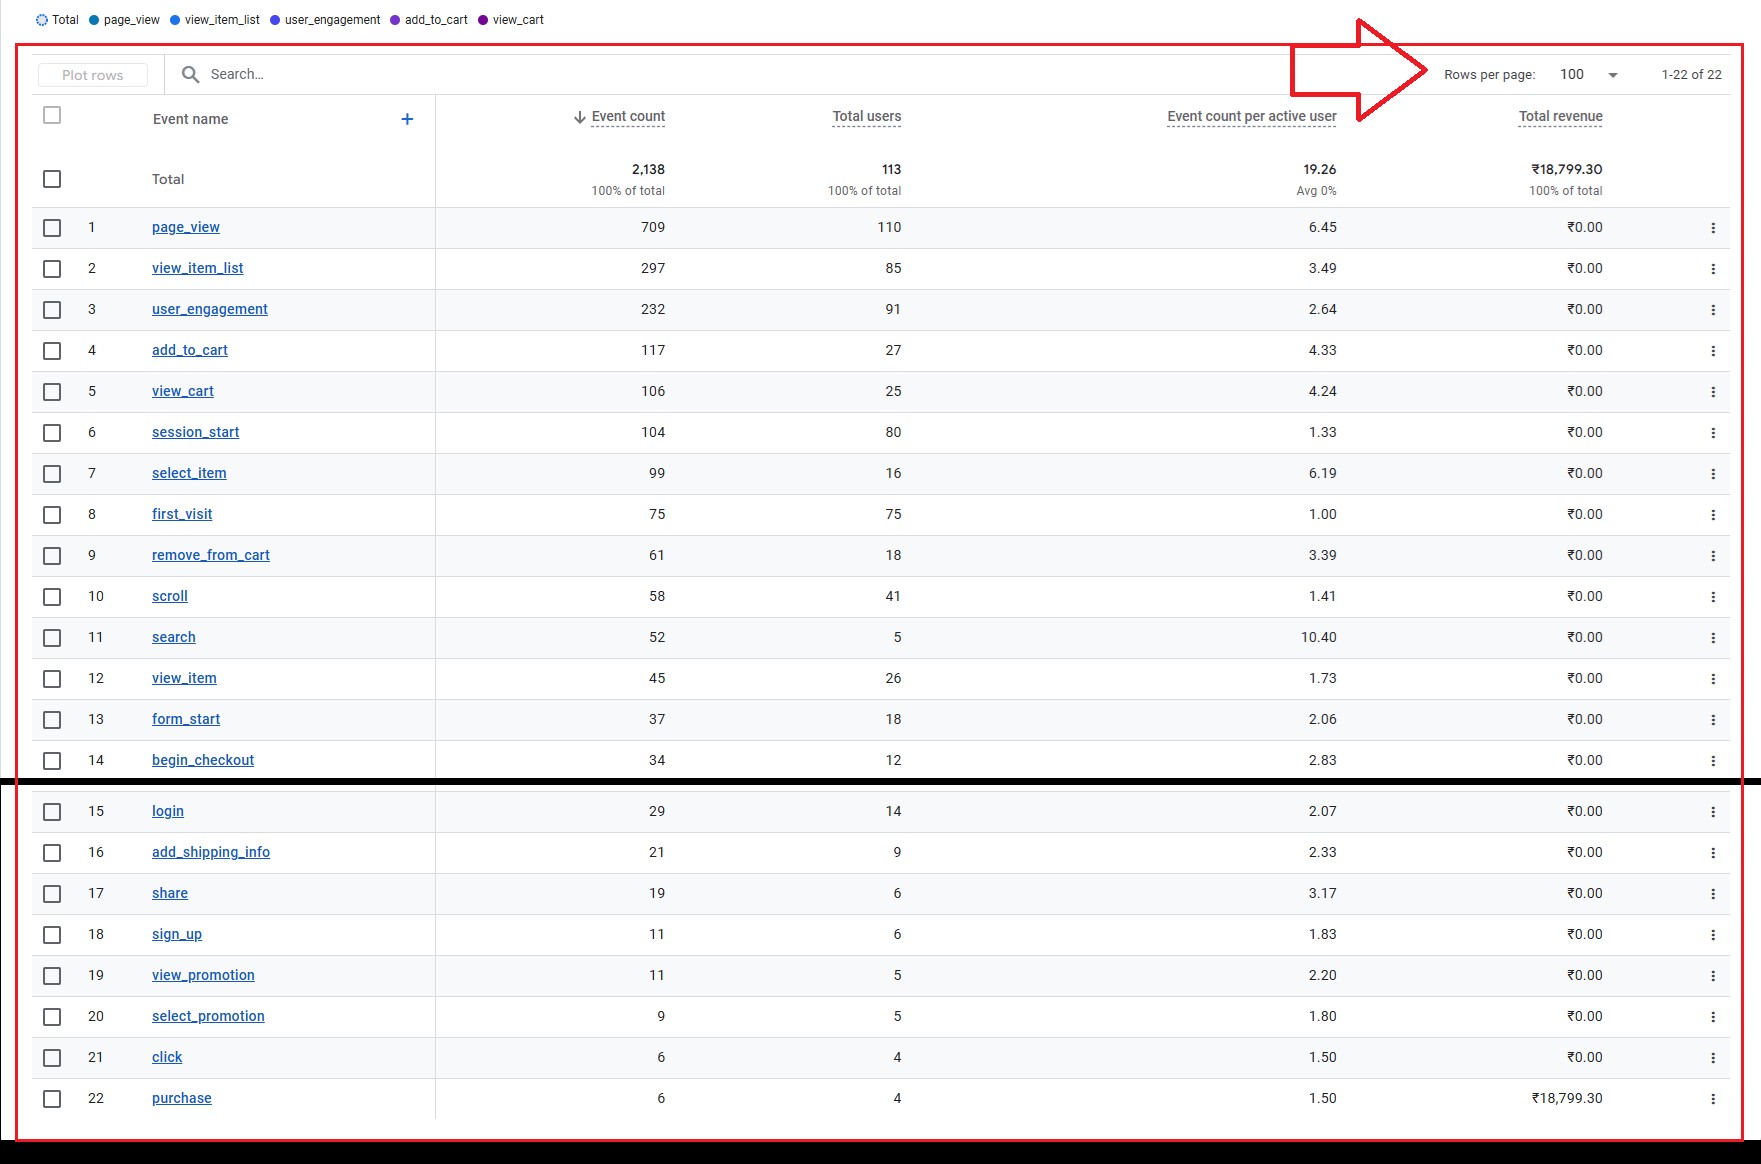
Step 5. Once the page is redirected to the ‘Event count by Event name’ dashboard, you can view all triggered events and their counts. (Please change the ‘Rows per page’ count to 25 to display all triggered events.)
Note: This dashboard will display all triggered events on your website, including ‘Event Name,’ ‘Event Count,’ ‘Total Users,’ and ‘Event Count per Active User’ data.

.png)
.jpg)

_(1).png)
_(1).png)
_(1).png)
_(1).png)