24 Feb 2025 12.00 AM I 593 Views
How to create a Facebook Pixel ID and connect it to the Commmerce website?
- This Article is for stores running on Solo plan or higher
Follow these steps to set up the Meta pixel and events on your Commmerce website:
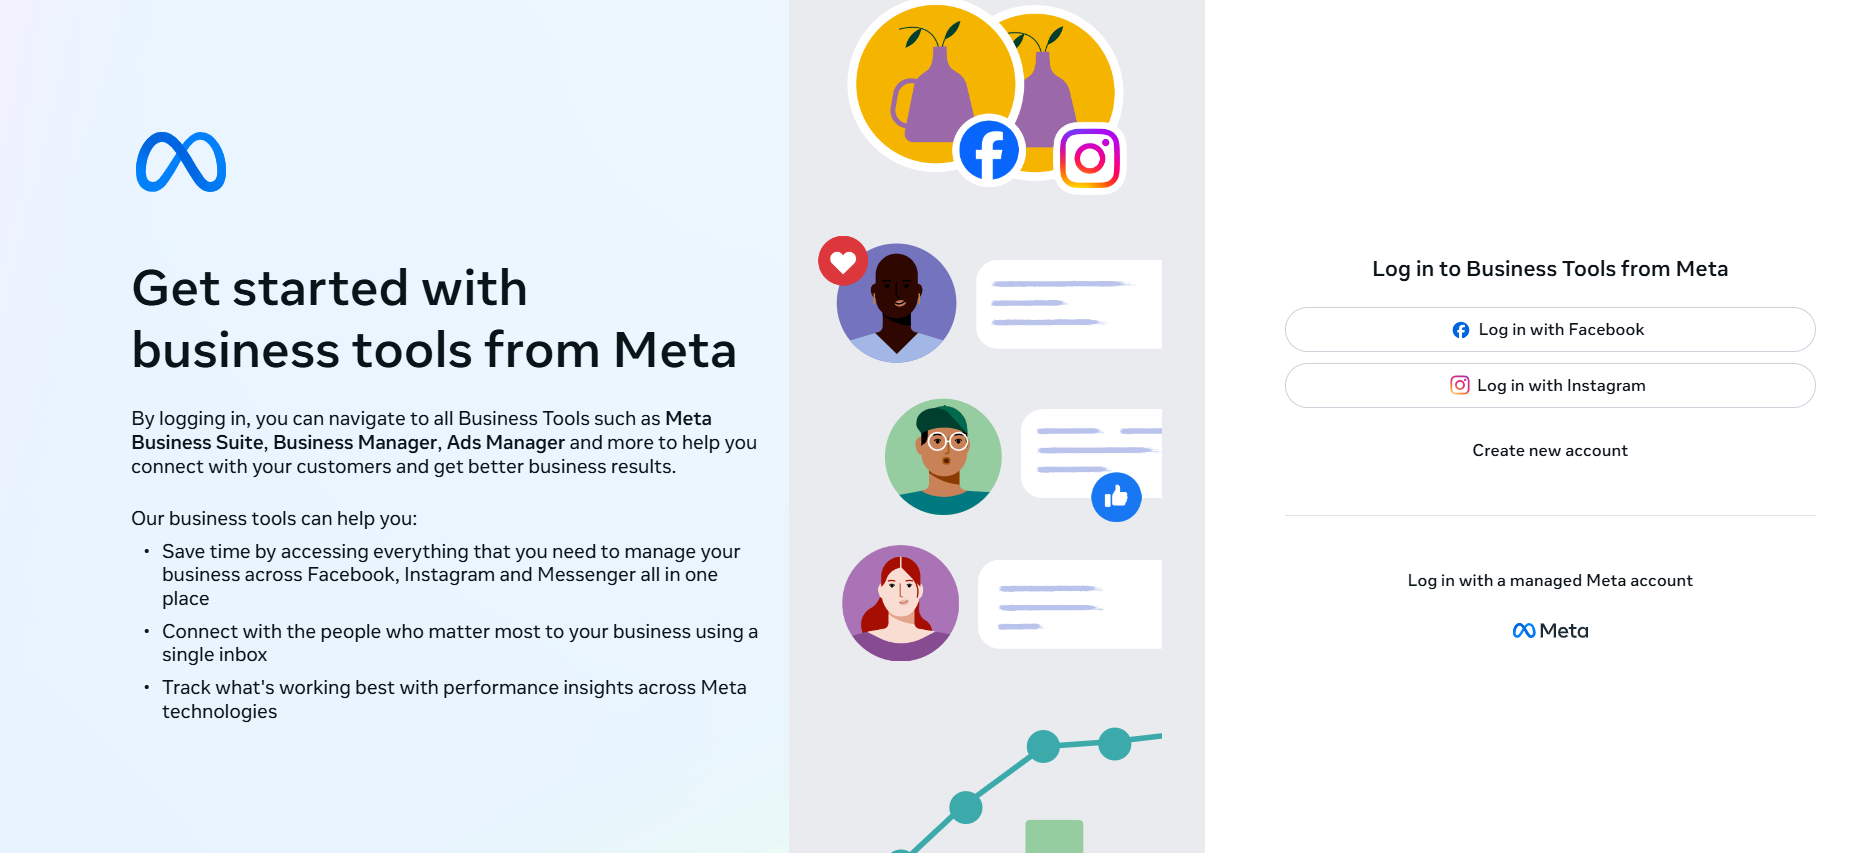
Step 1. Log in to
Facebook Business Manager by clicking the
‘Log in with Facebook’ button. To do so
click here
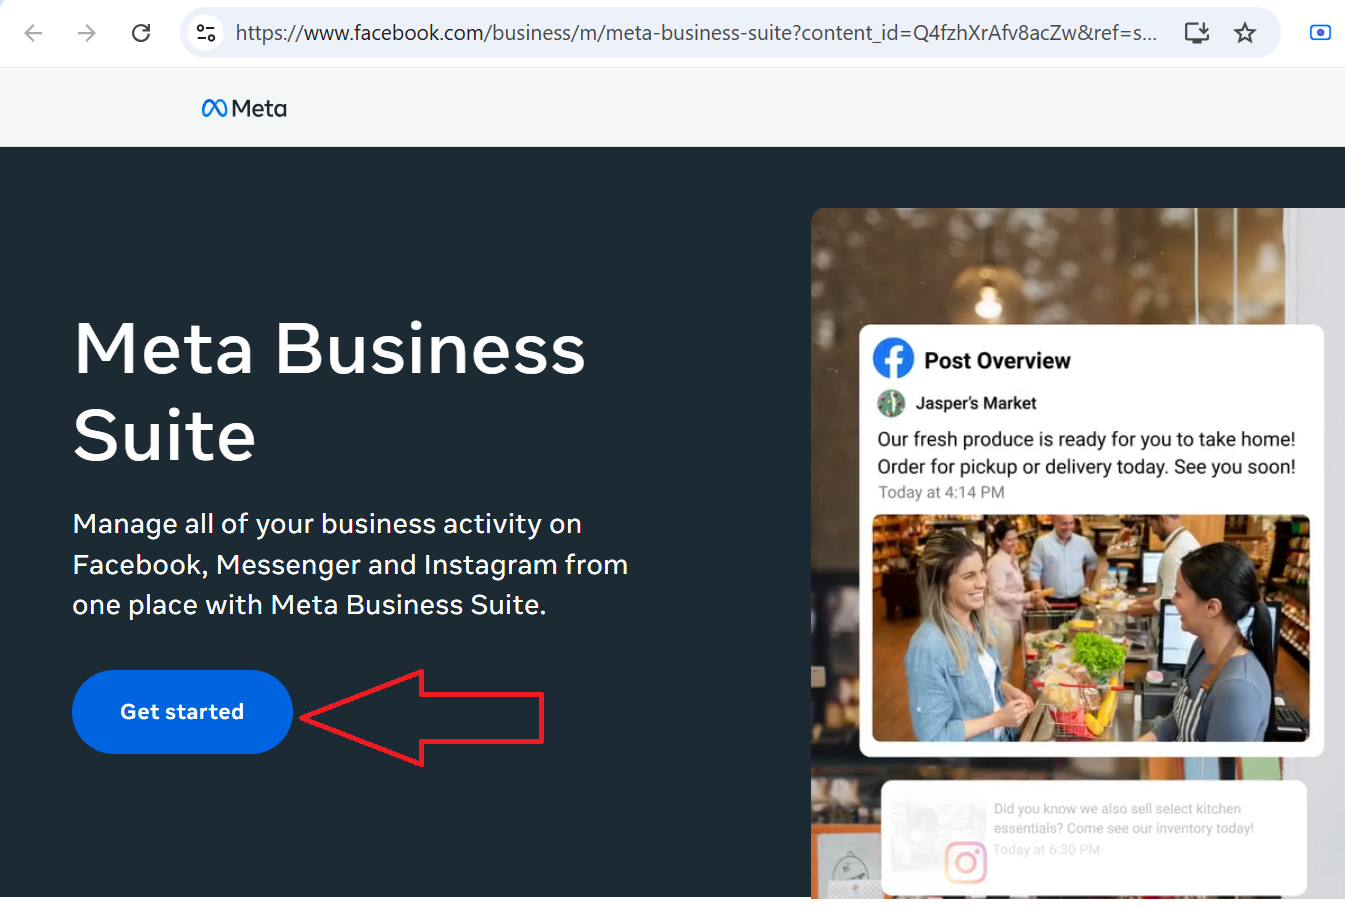
Step 2. Click on the Get Started button (as shown below)
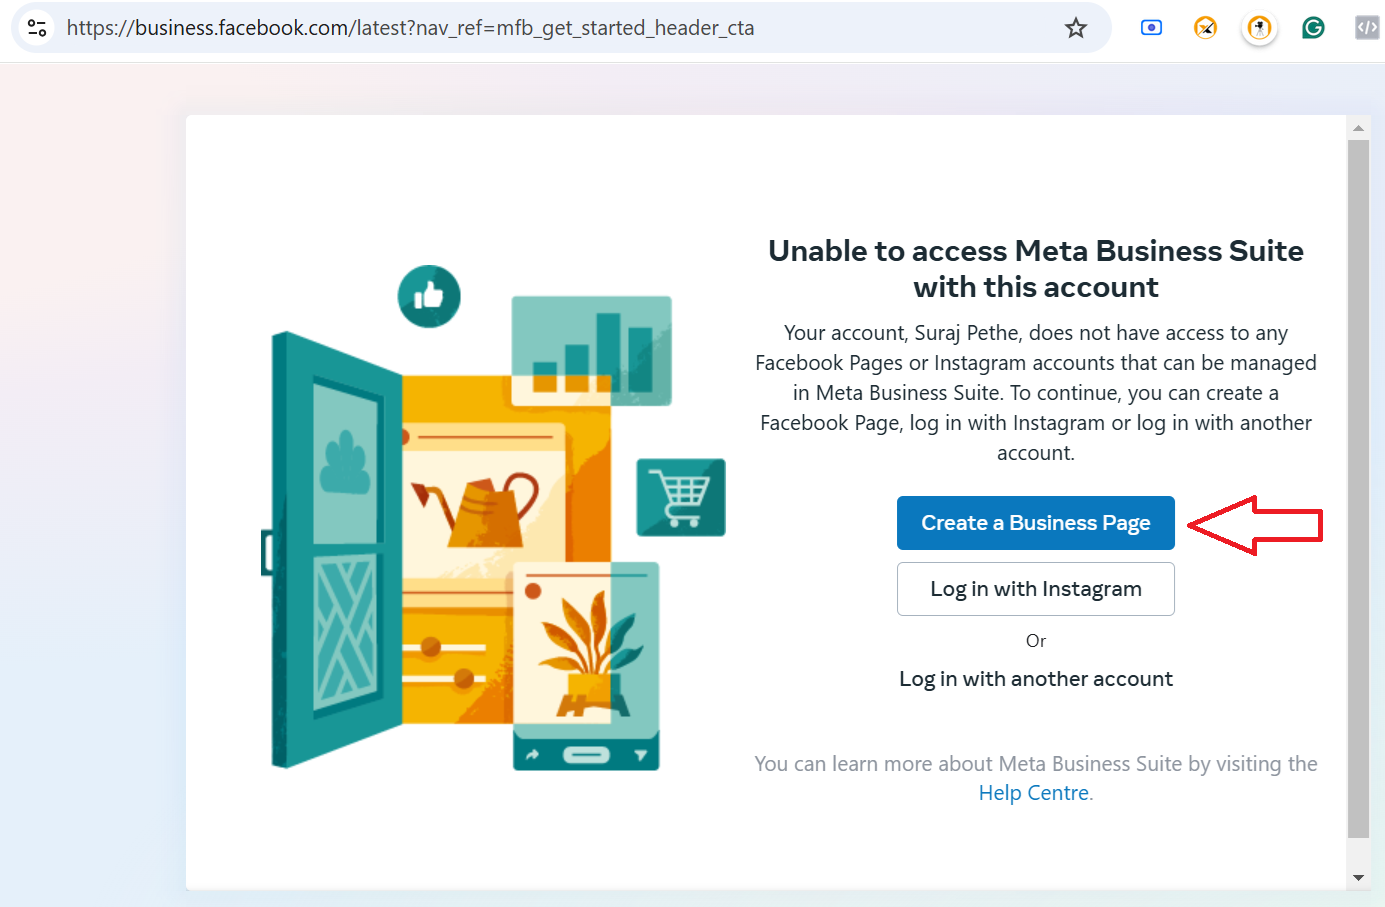
Step 3. Click on the Create a Business Page button (as shown below)
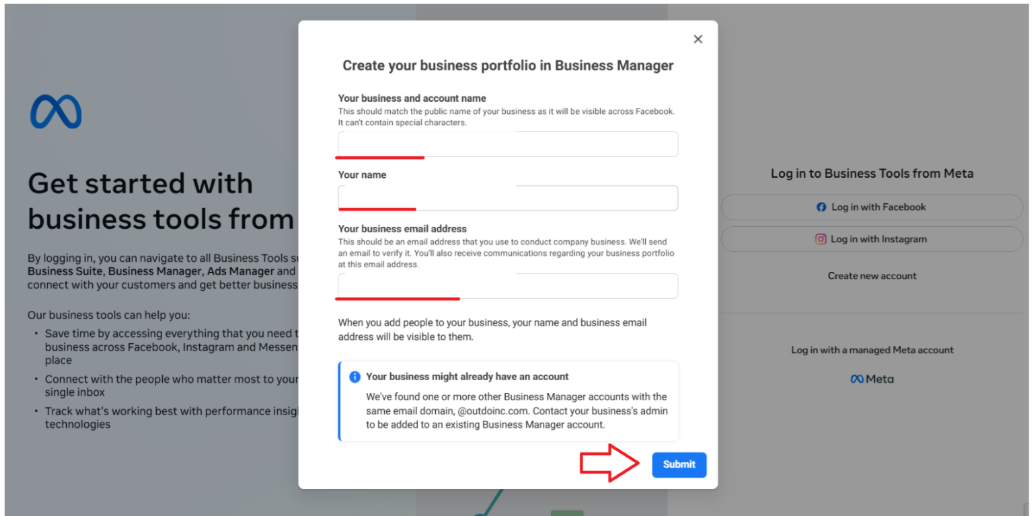
Step 4. After clicking on the Create a Business Page button, you will get a pop-up. Enter the user details & business details and then click the Submit button. (as shown below)
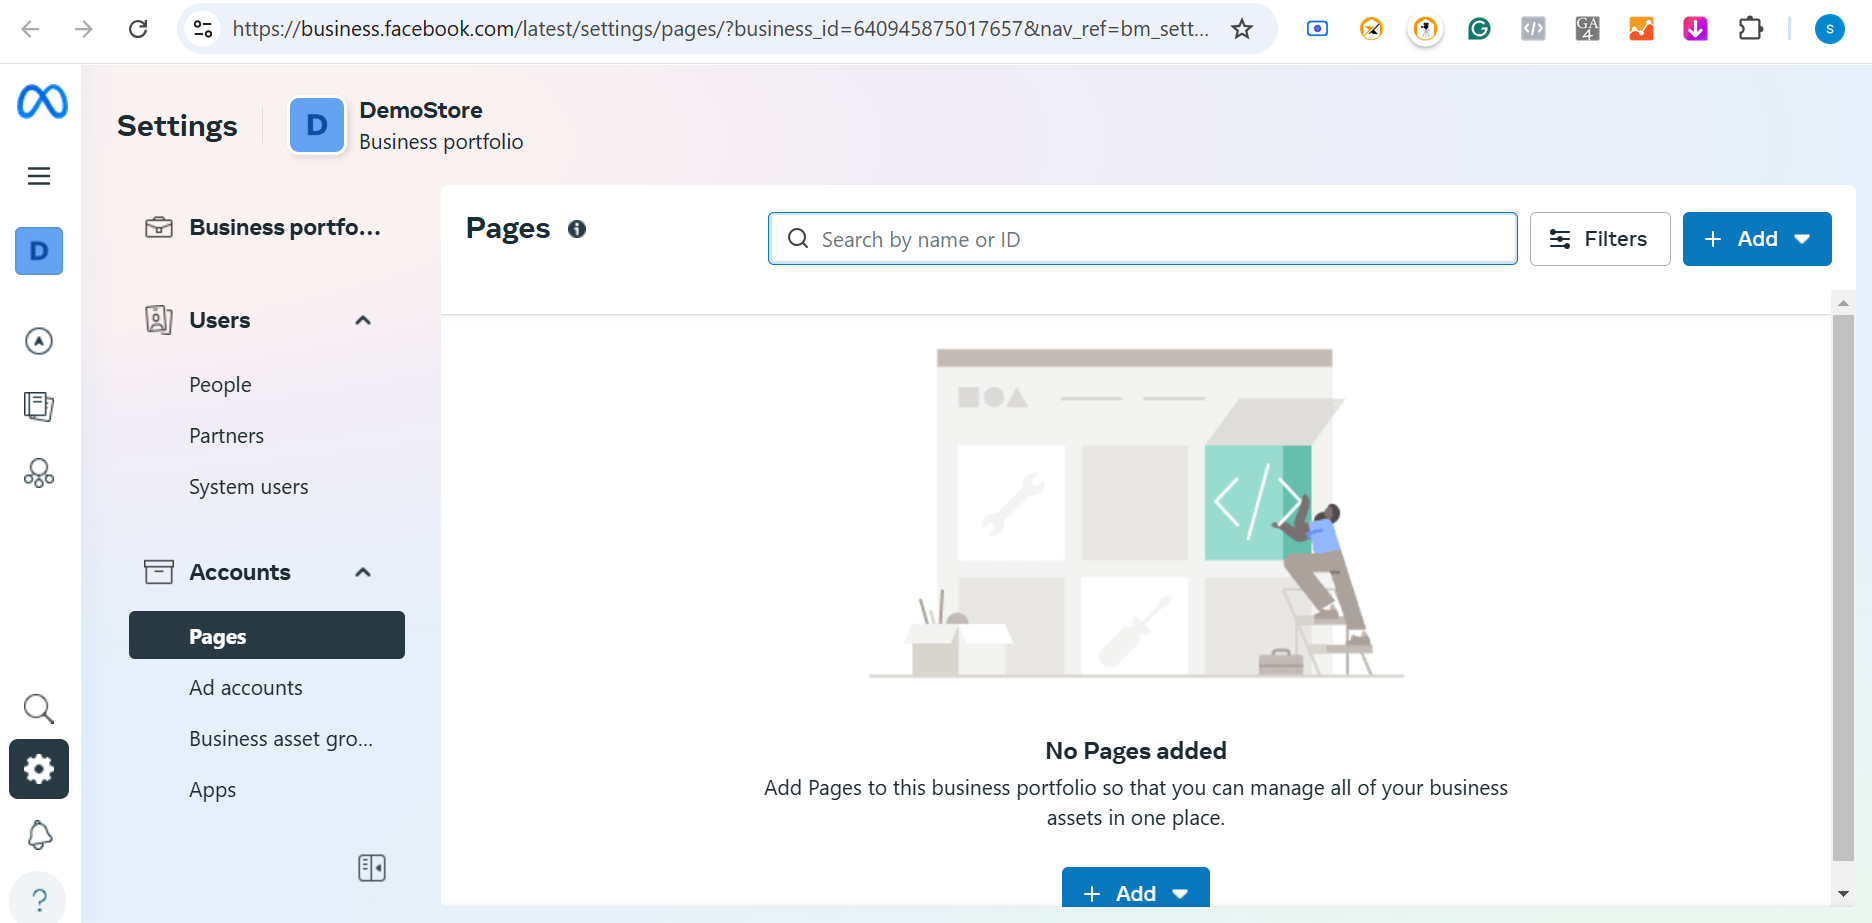
Step 5. The page will redirect you to the Meta Dashboard (as shown below)
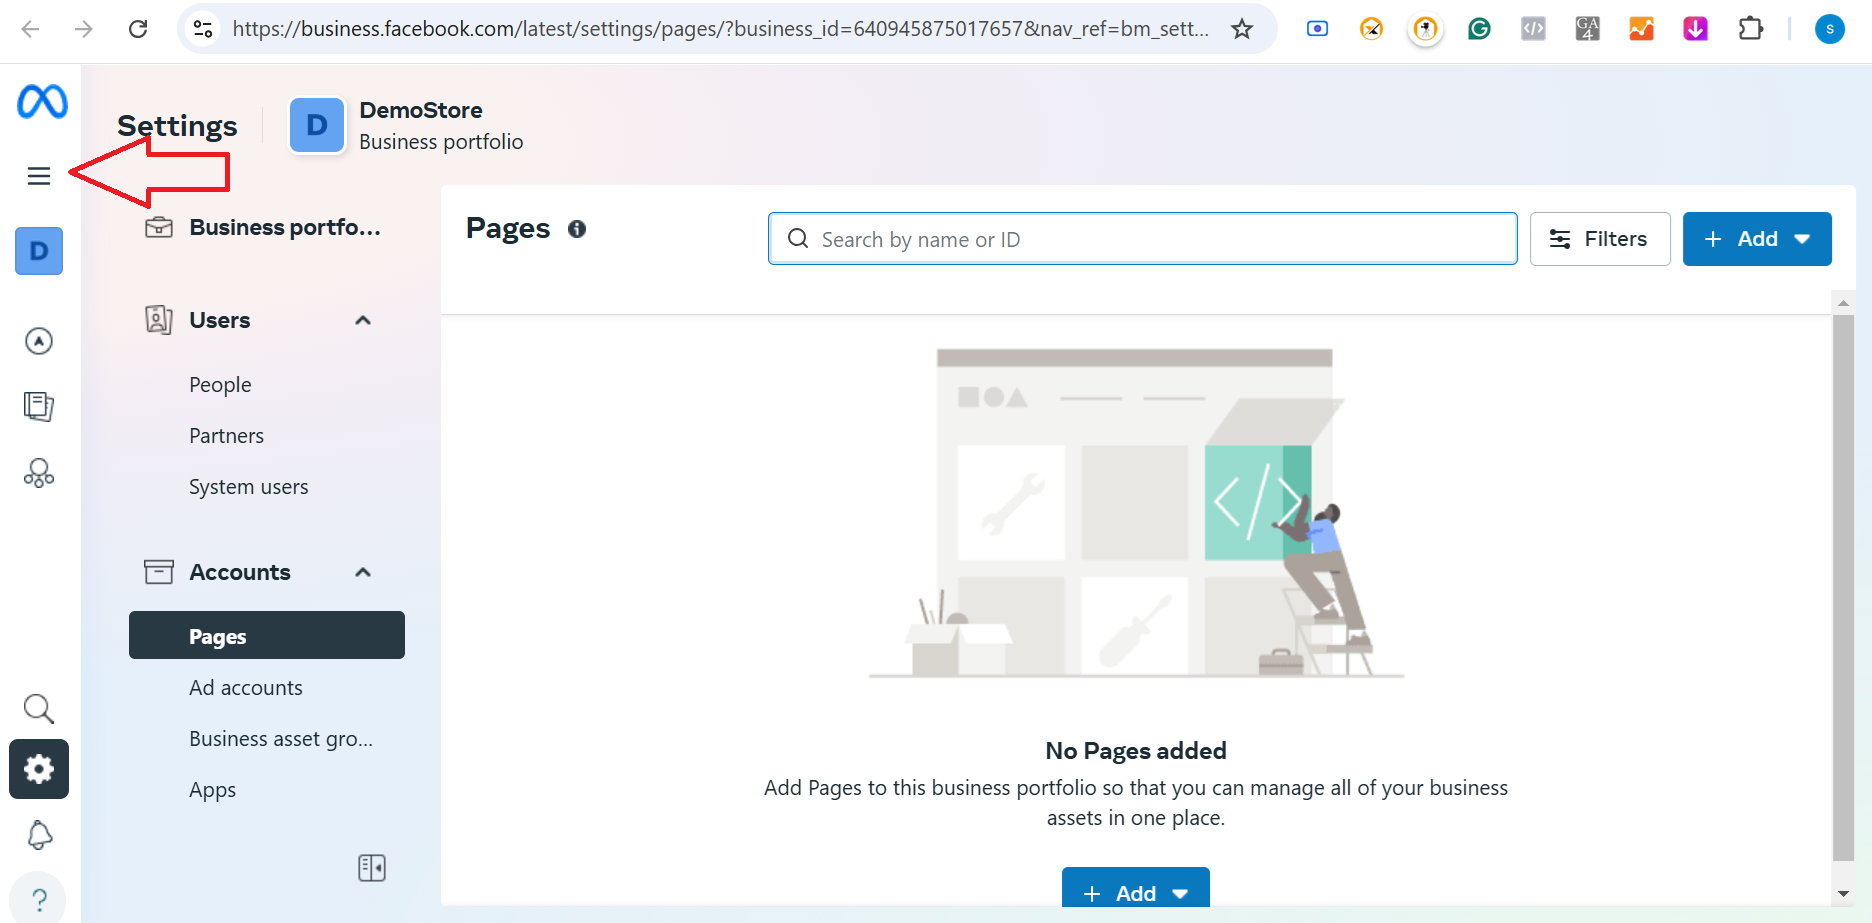
Step 6. Click on the three horizontal lines on the left side of the page. This will open a navigation panel. (as shown below)
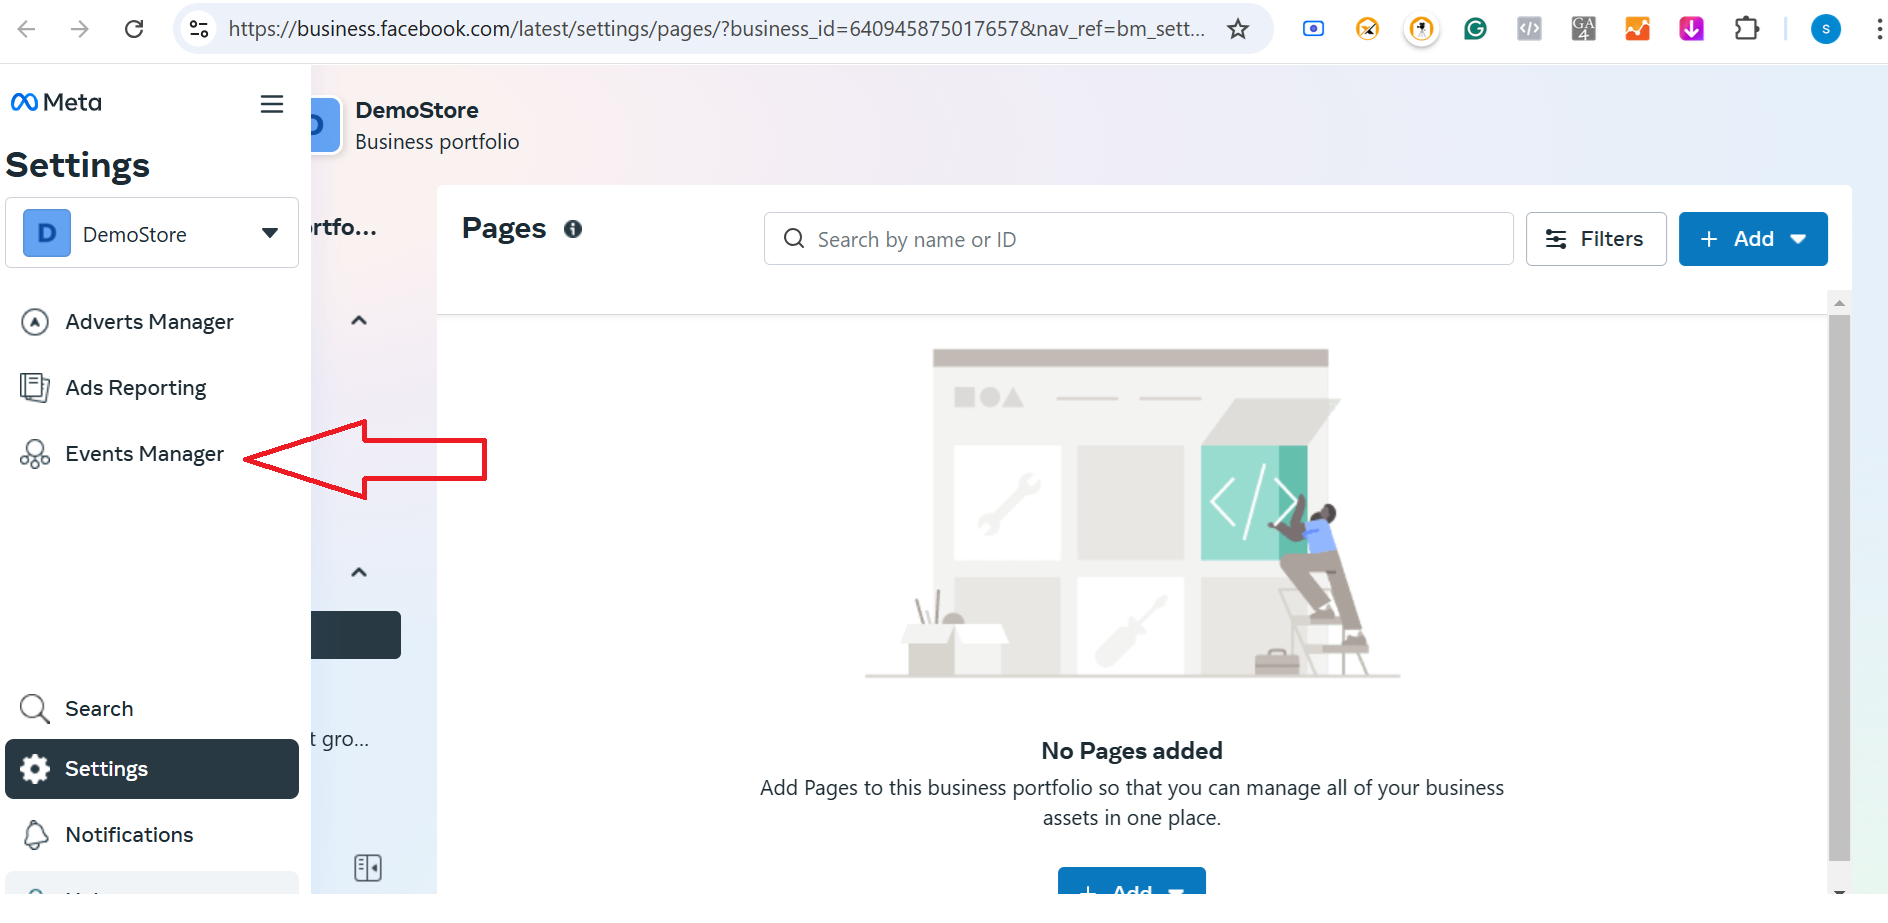
Step 7. Then click on the Events Manager option (as shown below)
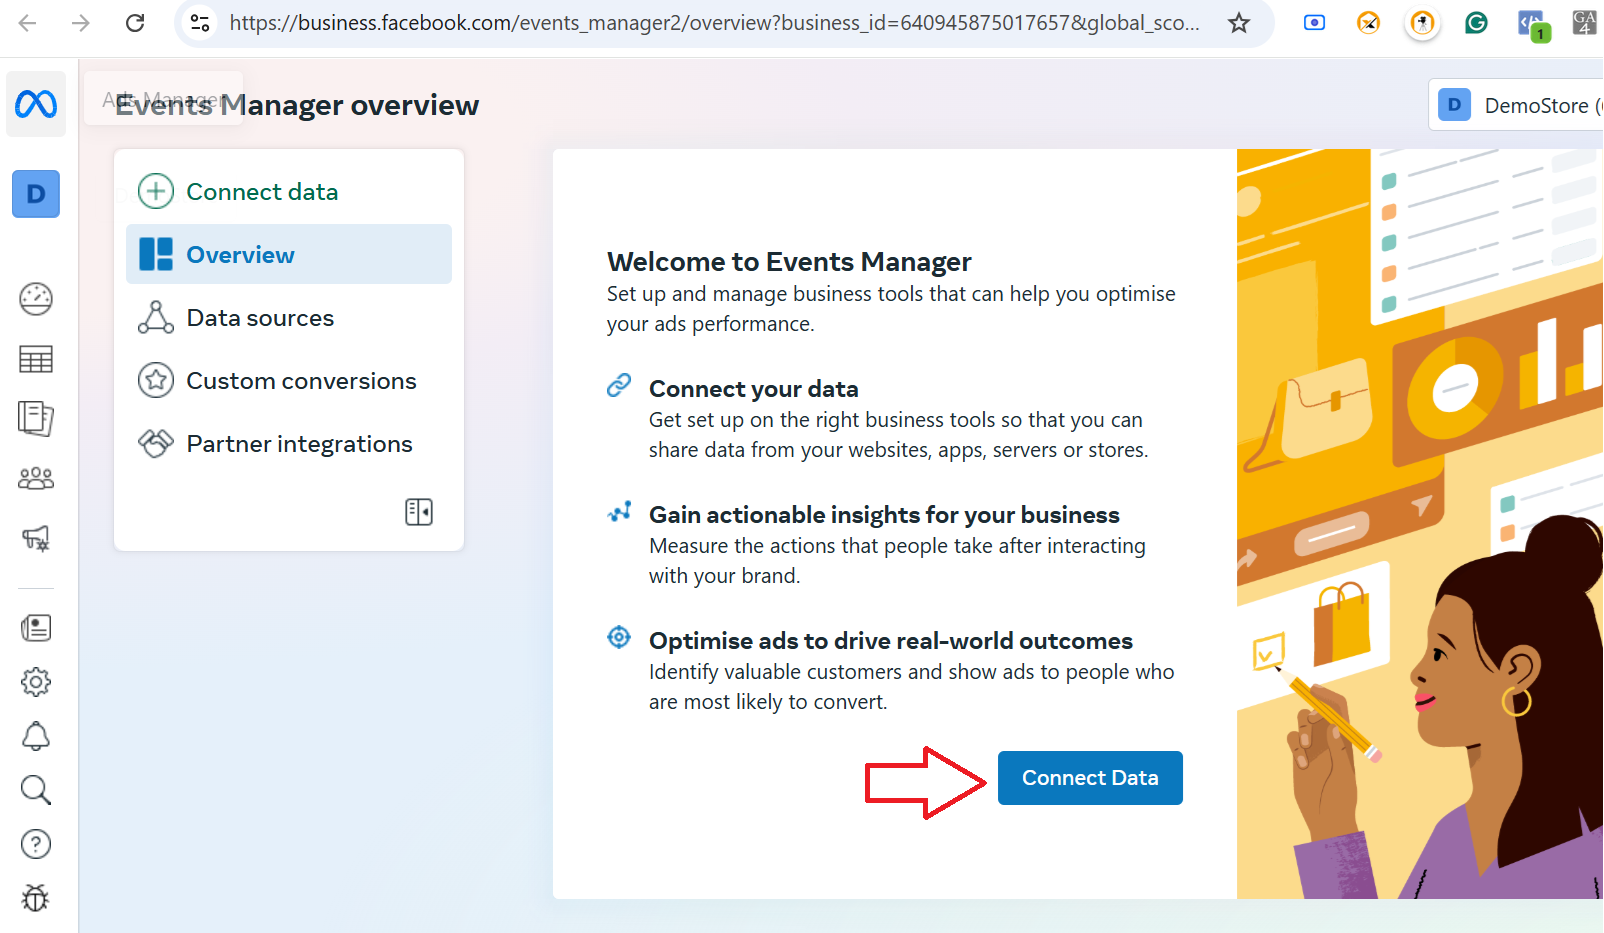
Step 8. The page will redirect you to the Events Manager overview page. Then click on the Connect Data button (as shown below)
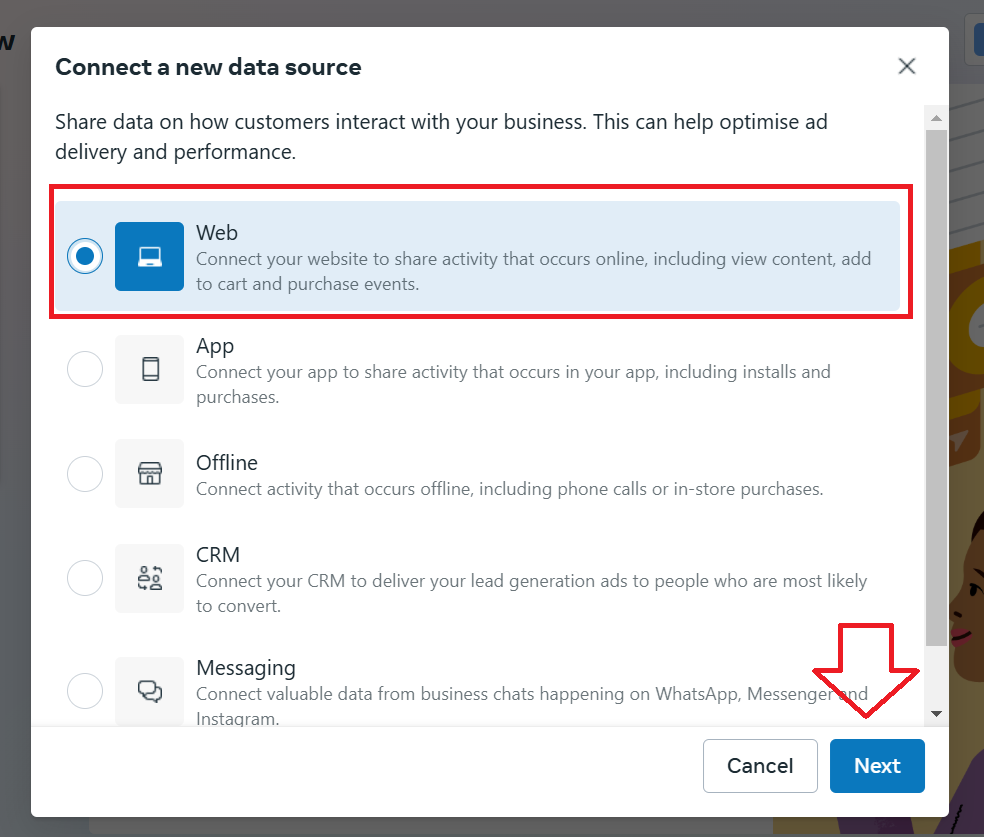
Step 9. After clicking on the Connect Data button, you will get a pop-up. Select the Web option on ‘Connect a new data source’, and click the Next button (as shown below)
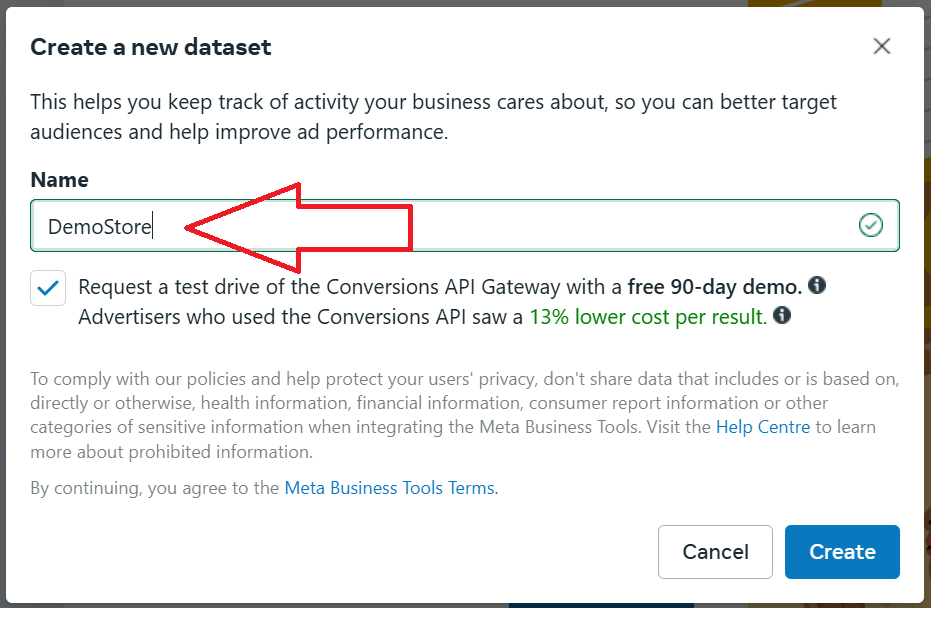
Step 10. It will open the ‘Create a new dataset’ page. In the Name field add your business name and then click the Create button (as shown below)
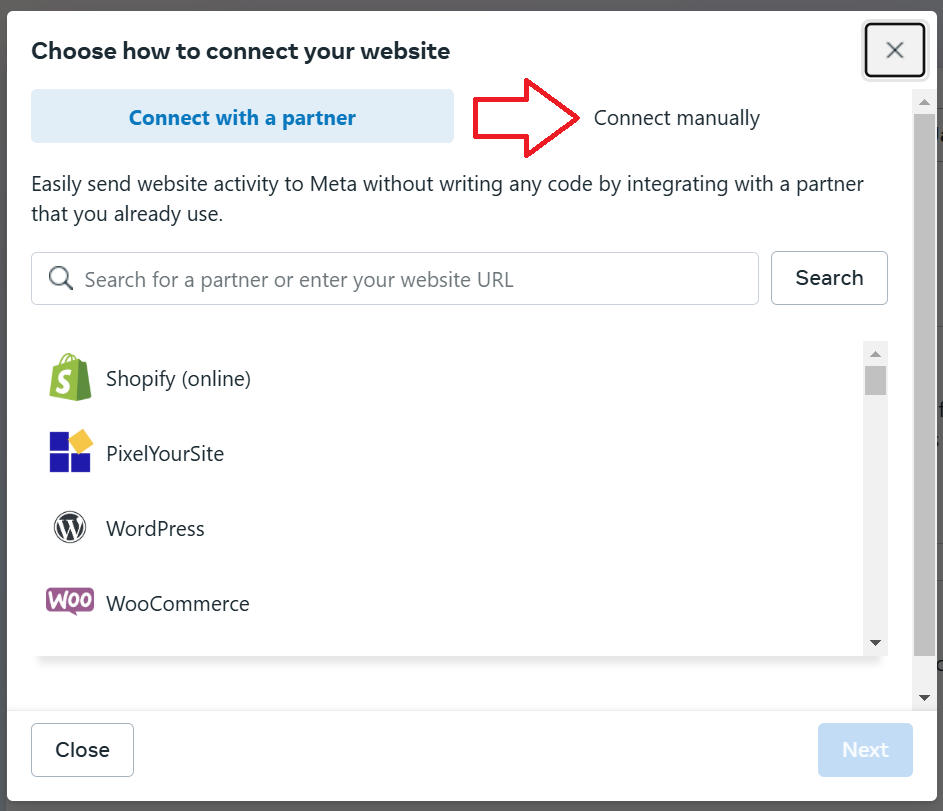
Step 11. It will open the ‘Choose how to connect your website’ pop-up. Click on the Connect manually option. (as shown below)
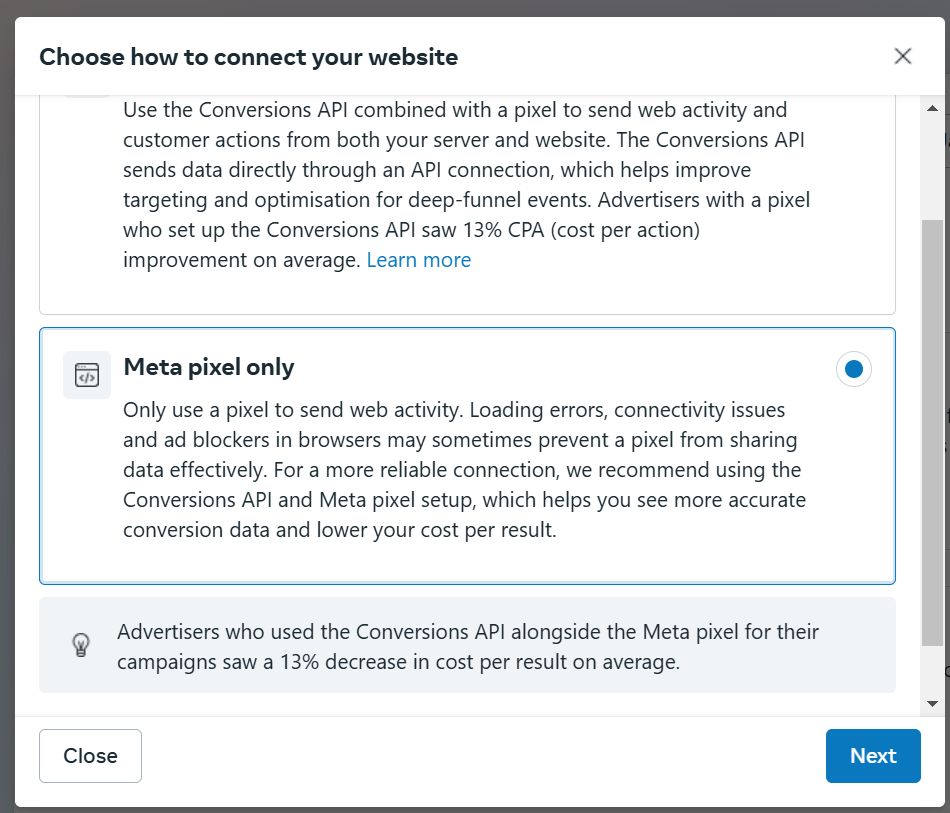
Step 12. Select the ‘Meta Pixel only’ option and click the Next button (as shown below)
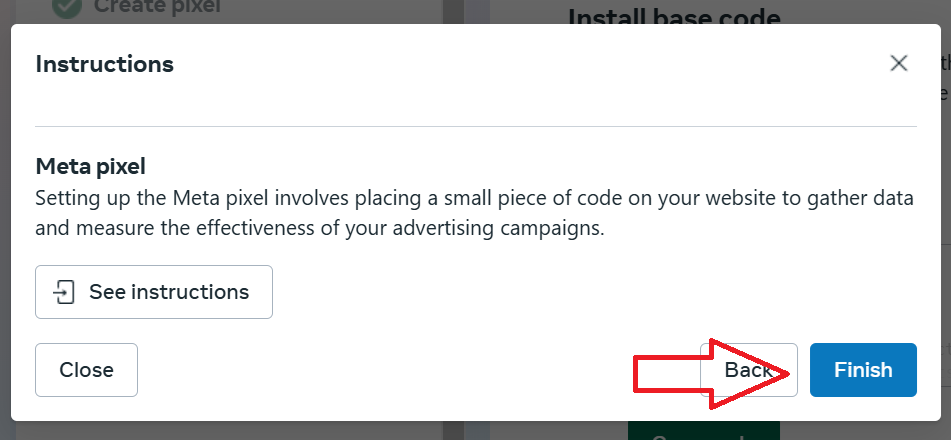
Step 13. Then click on the Finish button (as shown below)
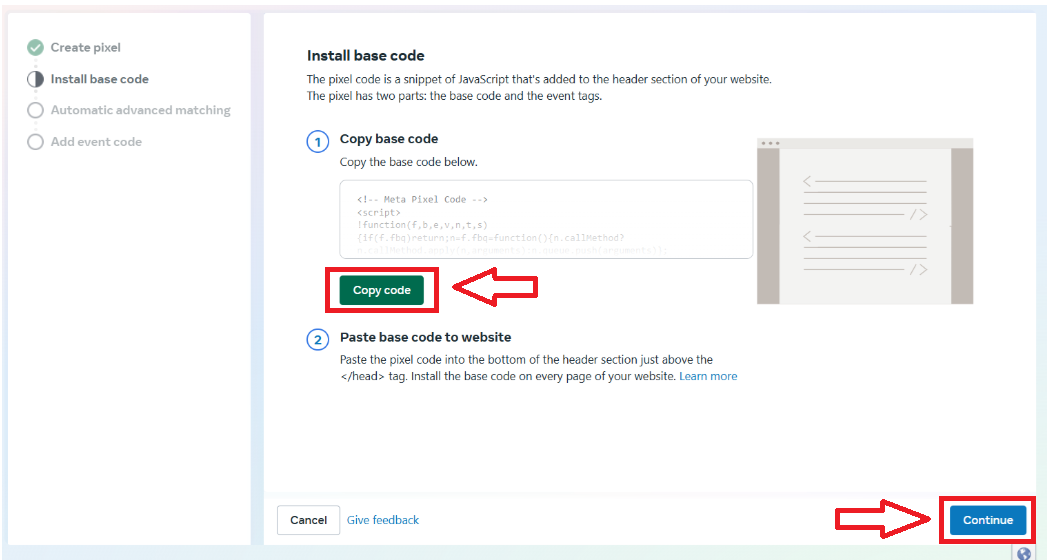
Step 14. After all this, click on the Copy Code button. The Continue button will be enabled once you click the Copy code button. (as shown below)
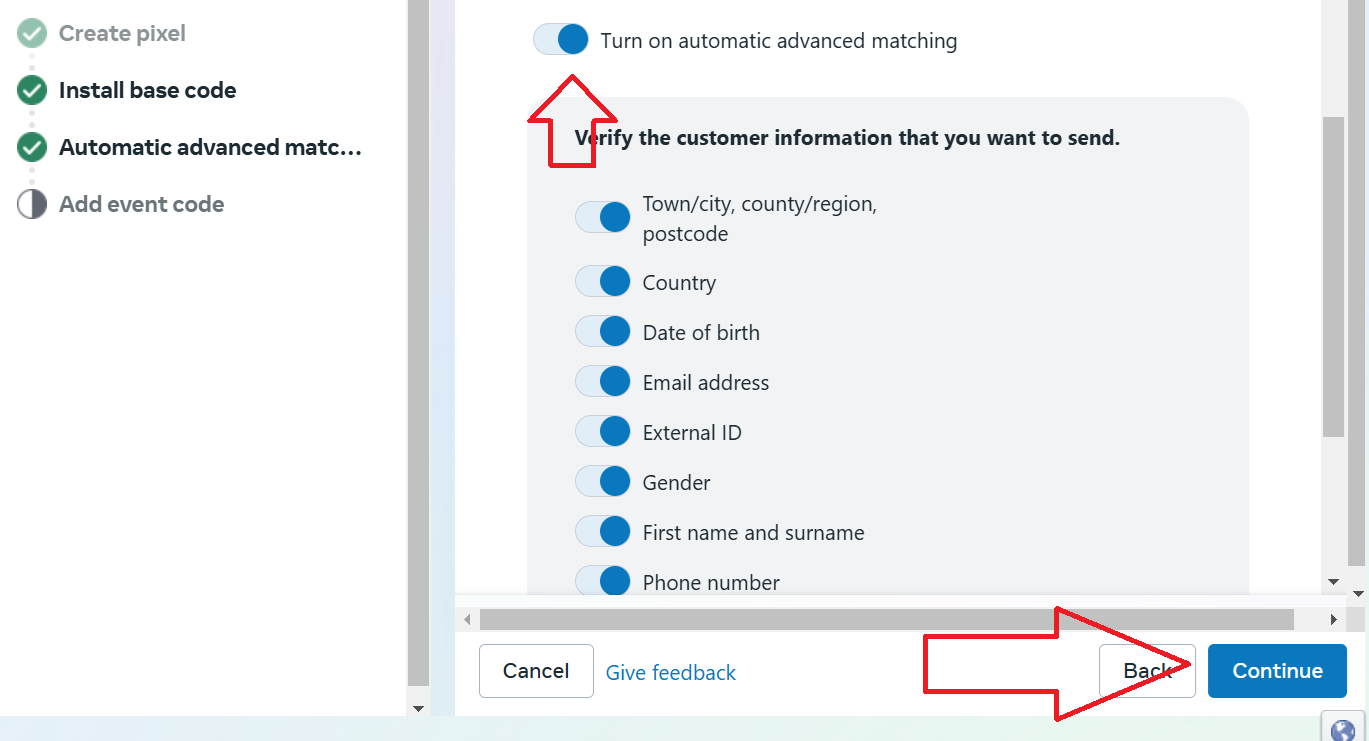
Step 15. After clicking the
Continue button, the page will redirect to the
‘automatic advanced matching’ page.
Select the
Turn on automatic advanced matching option and click the
Continue button. (as shown below)
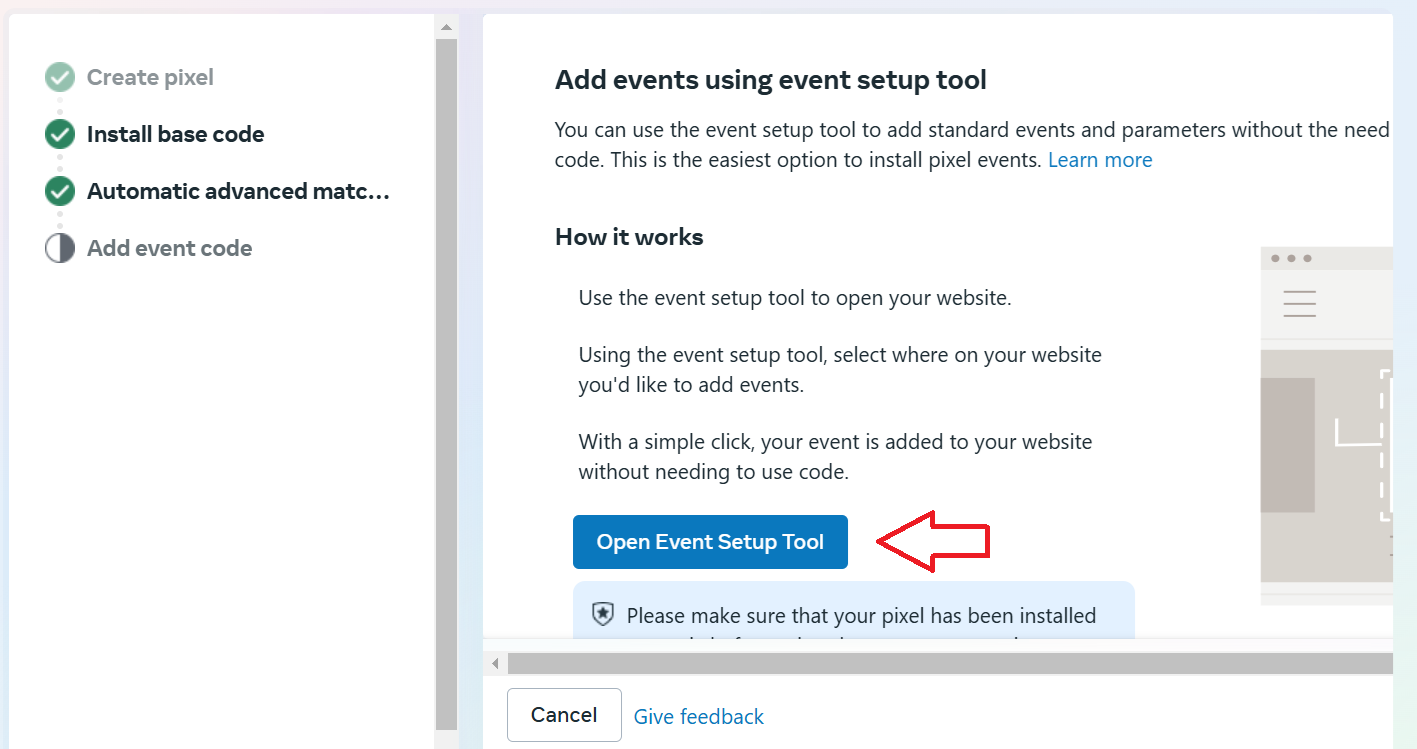
Step 16. Then click on the Open Event Setup Tool button (as shown below)
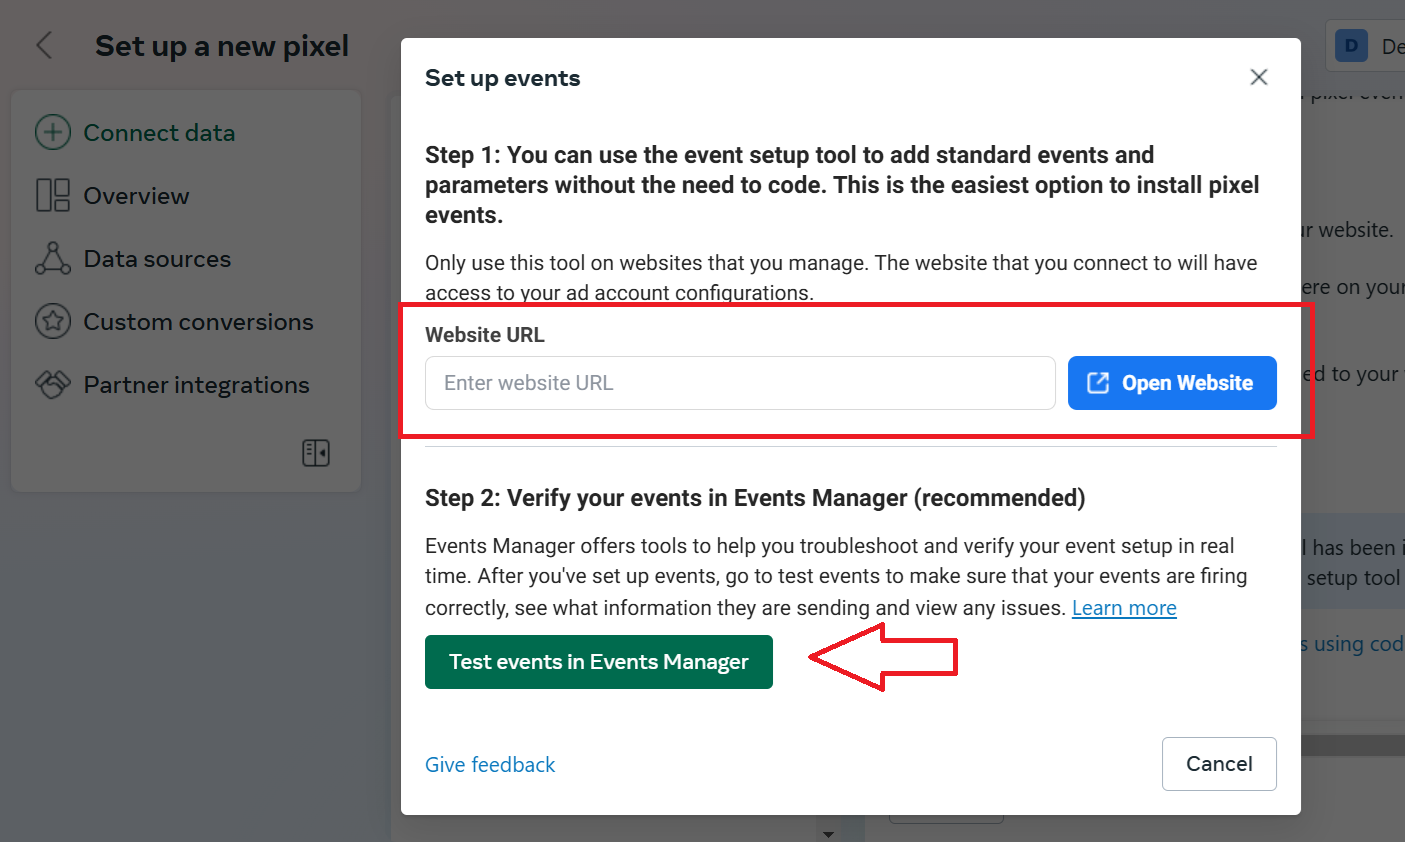
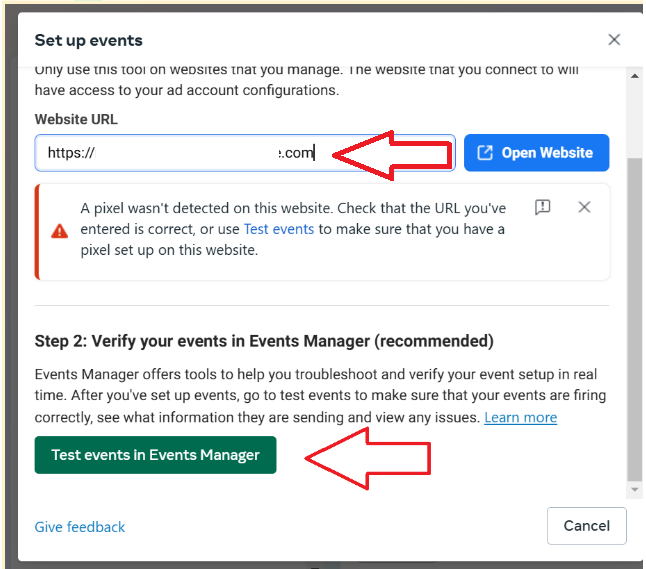
Step 17. It will open the Set up events pop-up
Step 18. Enter your store website URL and click on the
Open website button (Make sure your third-party cookies are allowed).
The website will open in a new tab. (ensure that products are added from the backend).
Once the website opens, follow the below steps:
- Click on the ‘Products’ menu.
- Choose a product and then click on the ‘Add to cart’ button to add the product to the cart.
- Next, click on the ‘Go to Cart’ button.
- The page will redirect to the Cart page. Then click on the ‘Checkout’ button
- The tab will automatically get closed and you will be redirected again to the ‘Set up events’ pop-up page.
Step 19. If it shows an error (as shown below), then click on the Test events in Events Manager button.
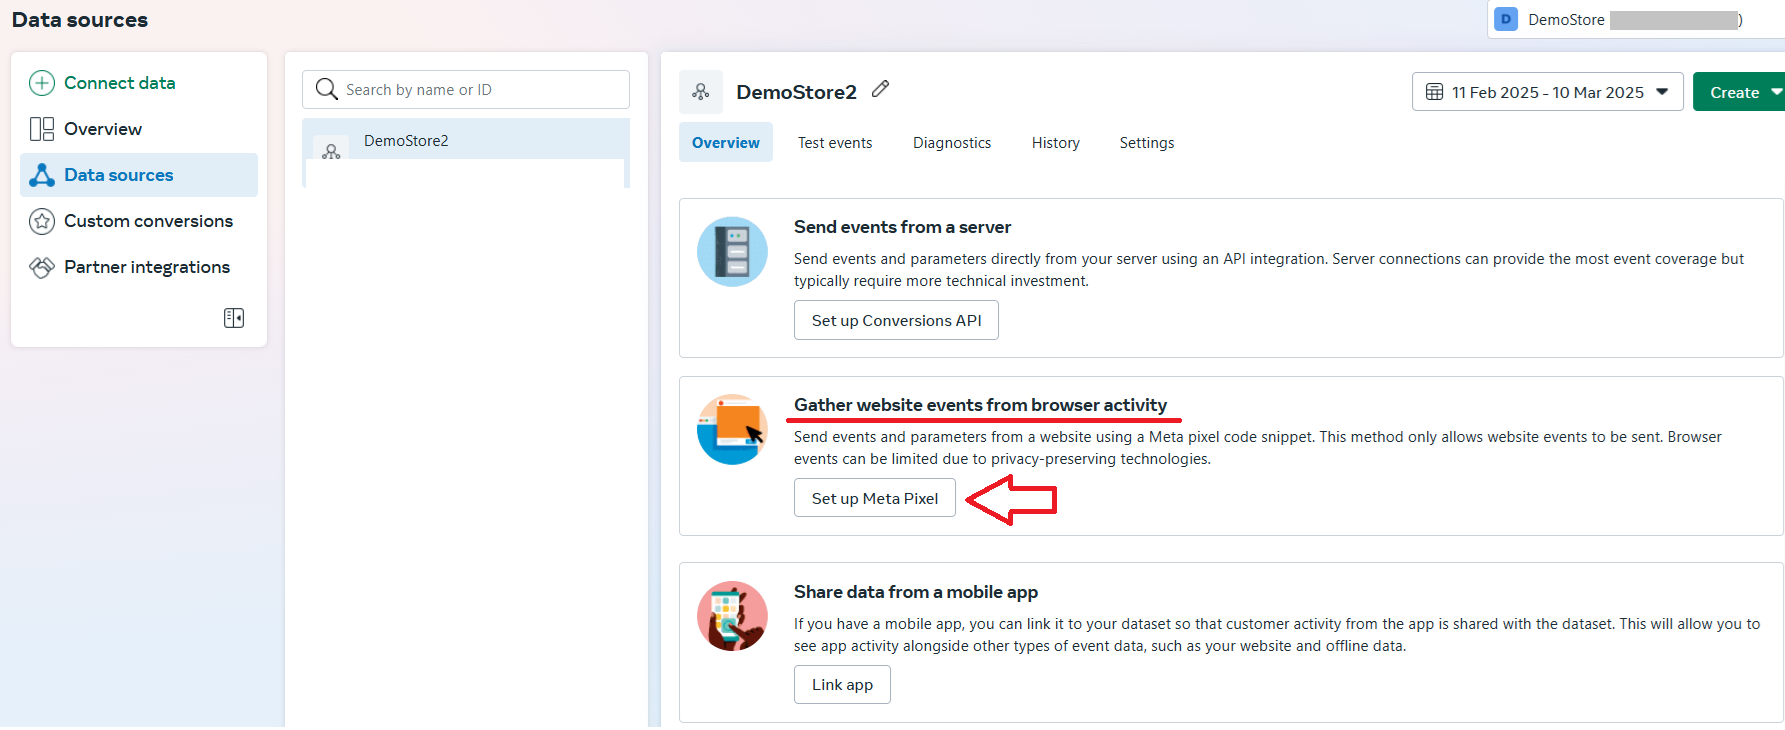
Step 20. The Overview tab will open after clicking the Test events in Events Manager button.
Check for the ‘Gather website events from browser activity’ in the overview tab. And then click on the Set up Meta Pixel button.
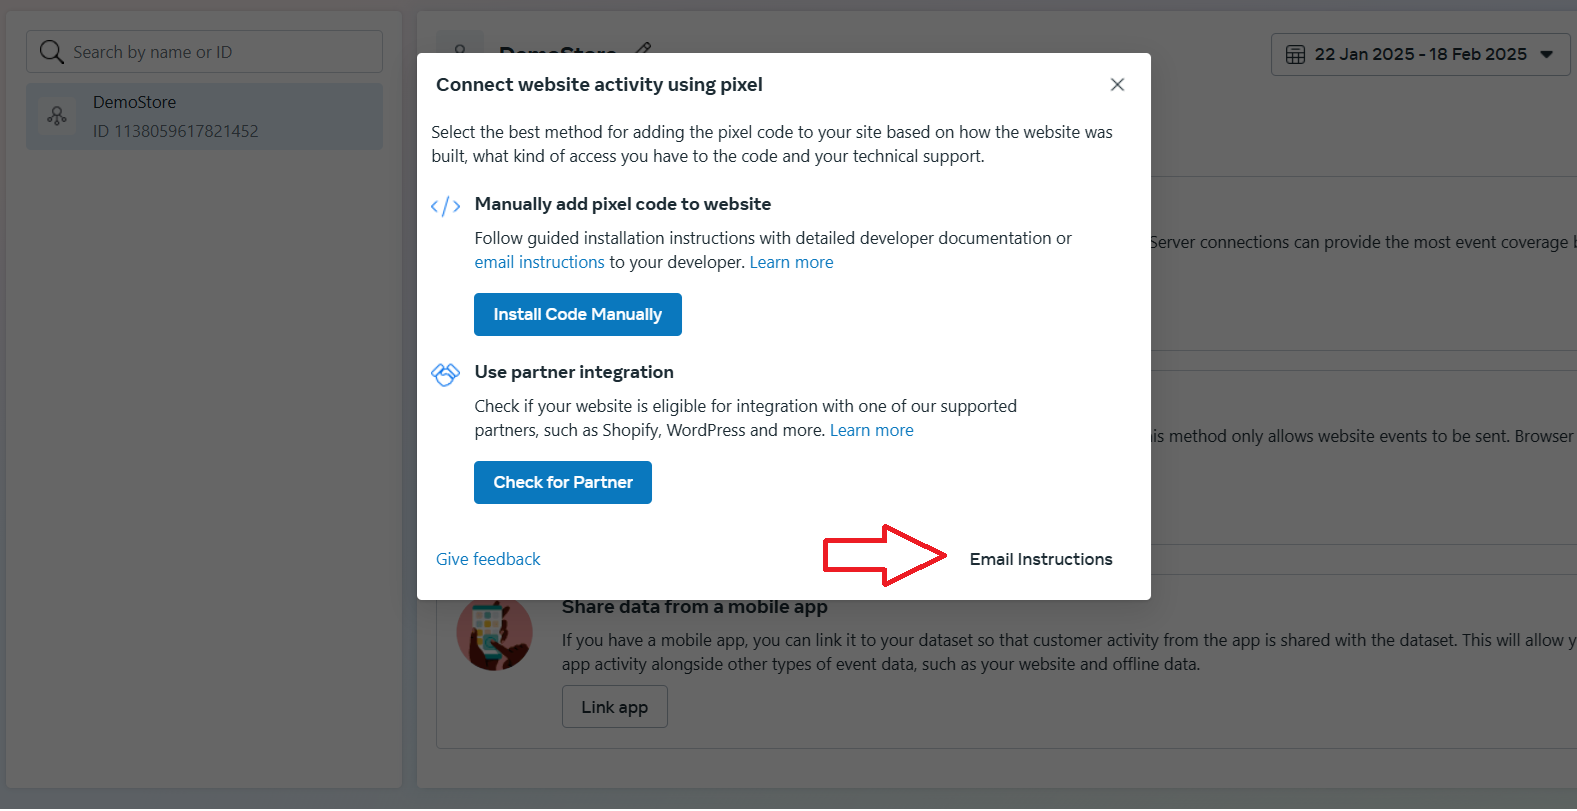
Step 21. On the Connect website activity using pixel pop-up, click on the Email Instructions button. (as shown below)
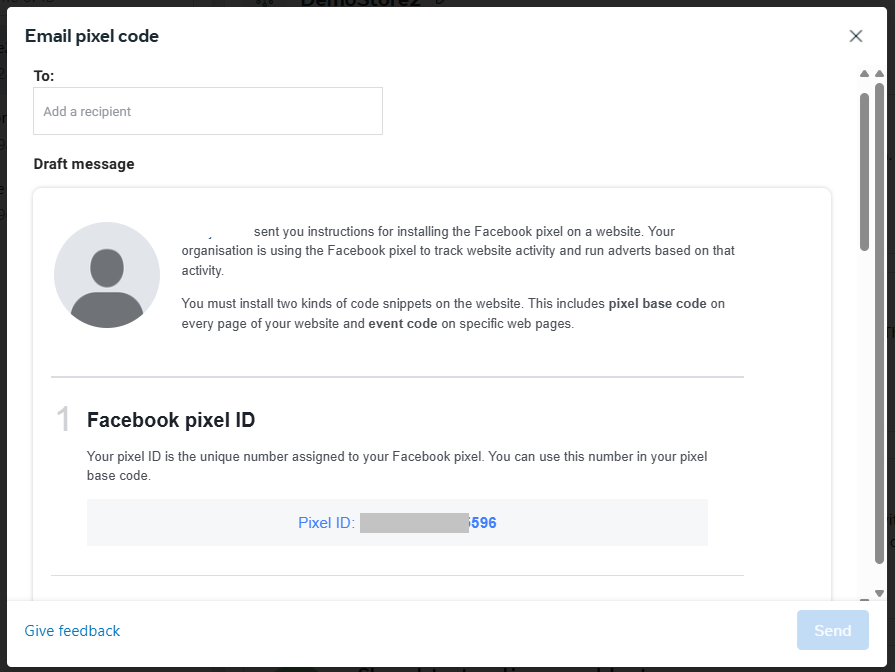
Step 22. A pop-up will open. Copy your Facebook pixel ID. E.g. Pixel ID: xxxxxxxxxxx21452
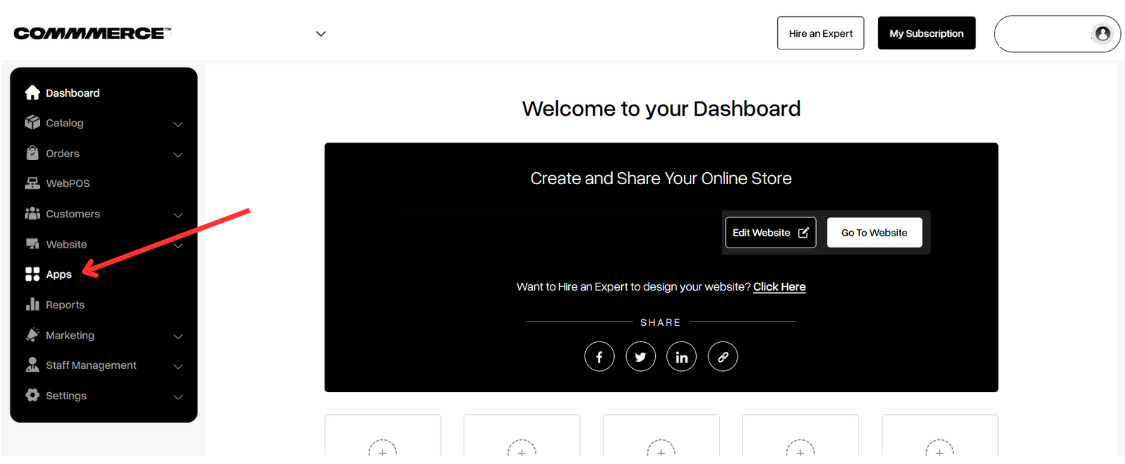
Step 23. Now you can go to the Commmerce admin dashboard and click on the Apps option on the left-hand side (as shown below)
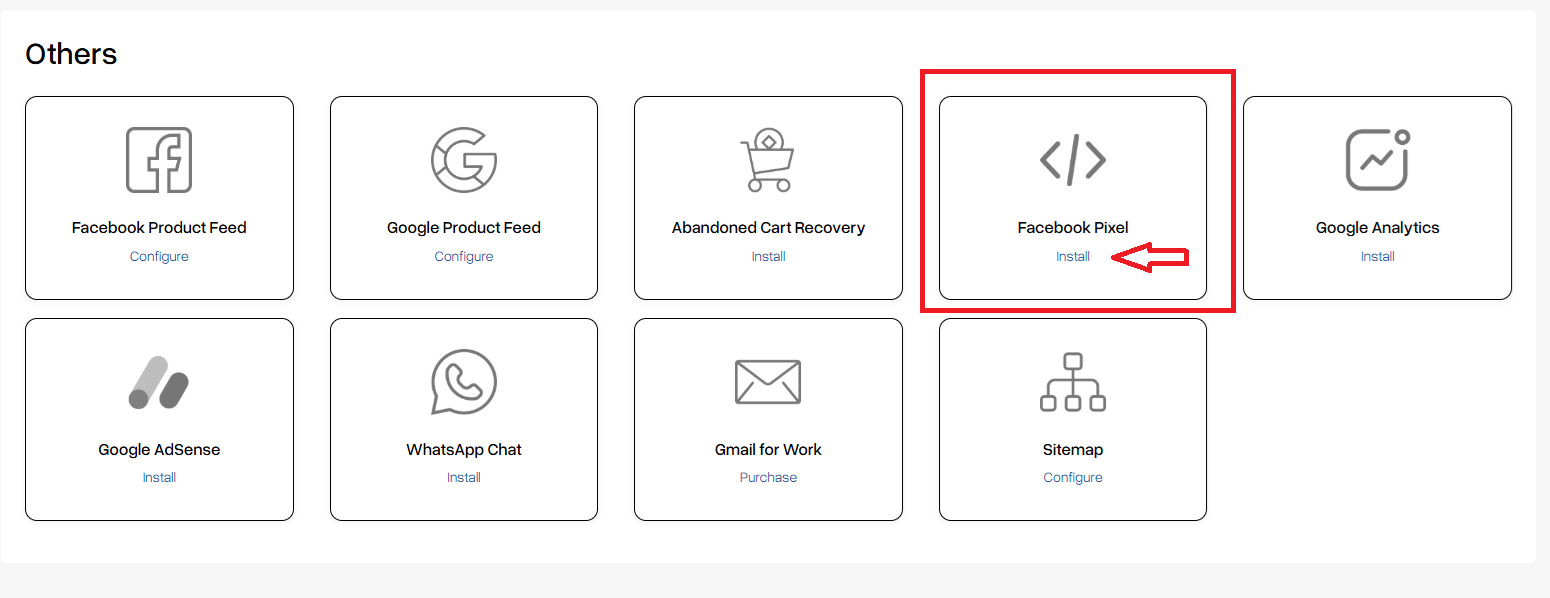
Step 24. In the Others section, click on the Install option below 'Facebook Pixel.’ If it is already installed, then click ‘Configure.’
Step 25. On the
"Facebook Pixel" Configuration page:
- Change status to ‘Enable’
- Add your Facebook Pixel ID in this field
- Select ‘Script-based trigger’ checkbox
Step 26. Click on the Submit button at the top of the page (as shown below)
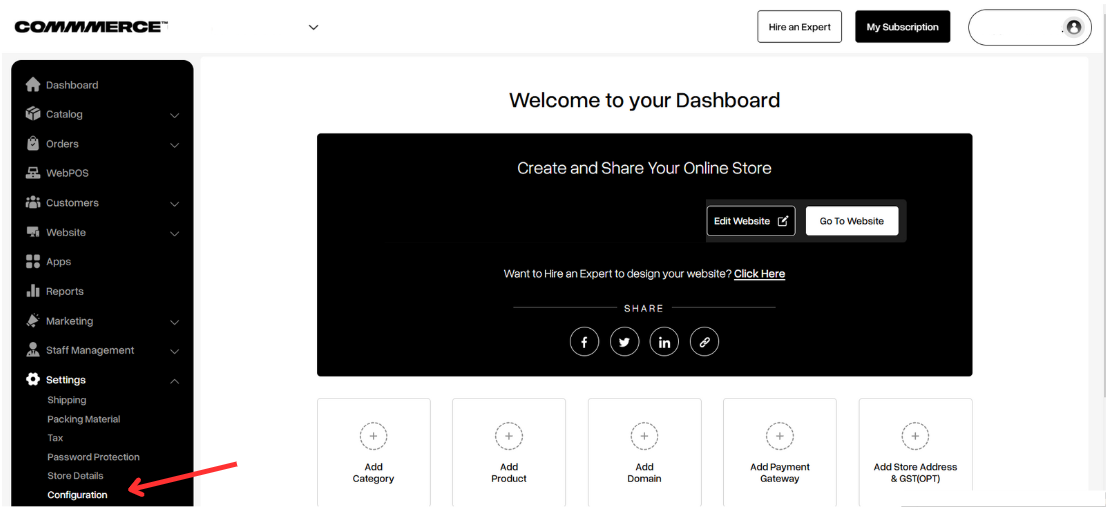
Step 27. If you have more than one Pixel code, copy the pixel script (as shown in Step 14) from the Pixel dashboard, then go to the Commmerce dashboard and find the Configuration option in the settings. (as shown below)
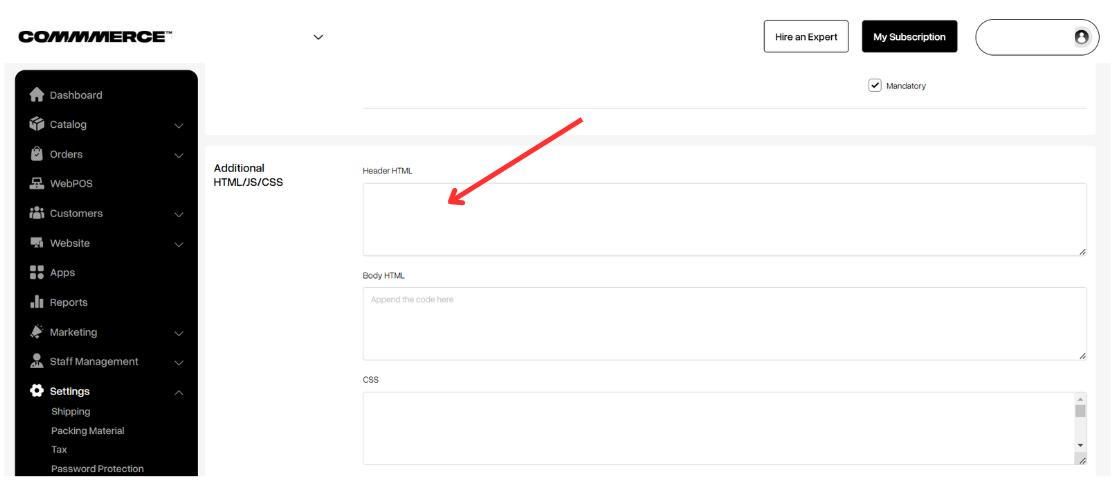
Step 28. After clicking on Configuration, find the Additional HTML/JS/CSS option and paste the code in the Header HTML.
Step 29. Click on the Save button at the top of the page.
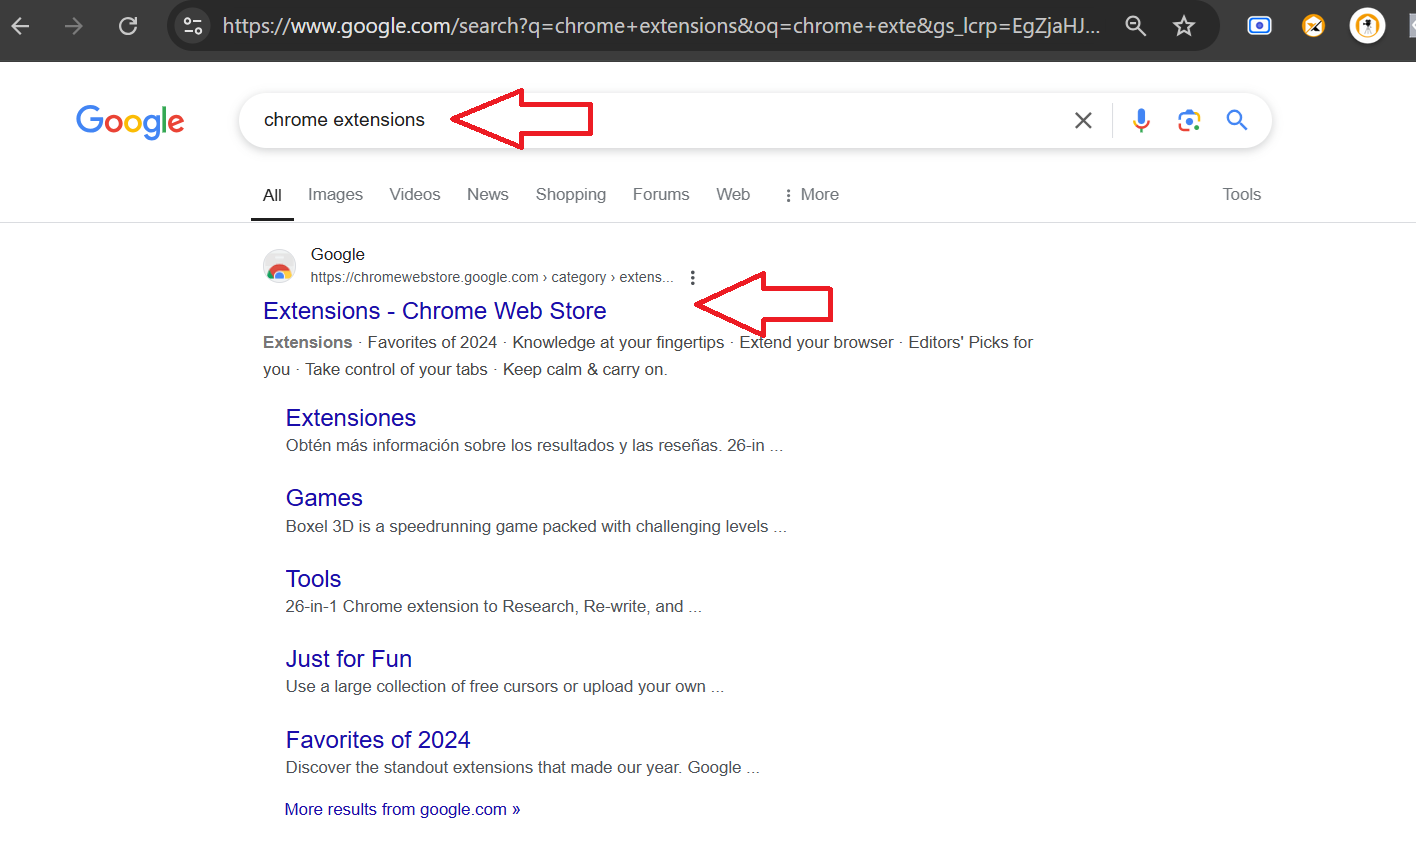
Step 2. Once the Chrome Web Store is open, search for Meta Pixel Helper in the search bar.
Step 3. Click on the Add to Chrome button.
Step 4. A pop-up will appear. Click on ‘Add Extension’ to add the extension to Chrome.
Step 5. In the browser, click on the extensions icon and check if Meta Pixel Helper is visible. Then, click on the Pin icon.
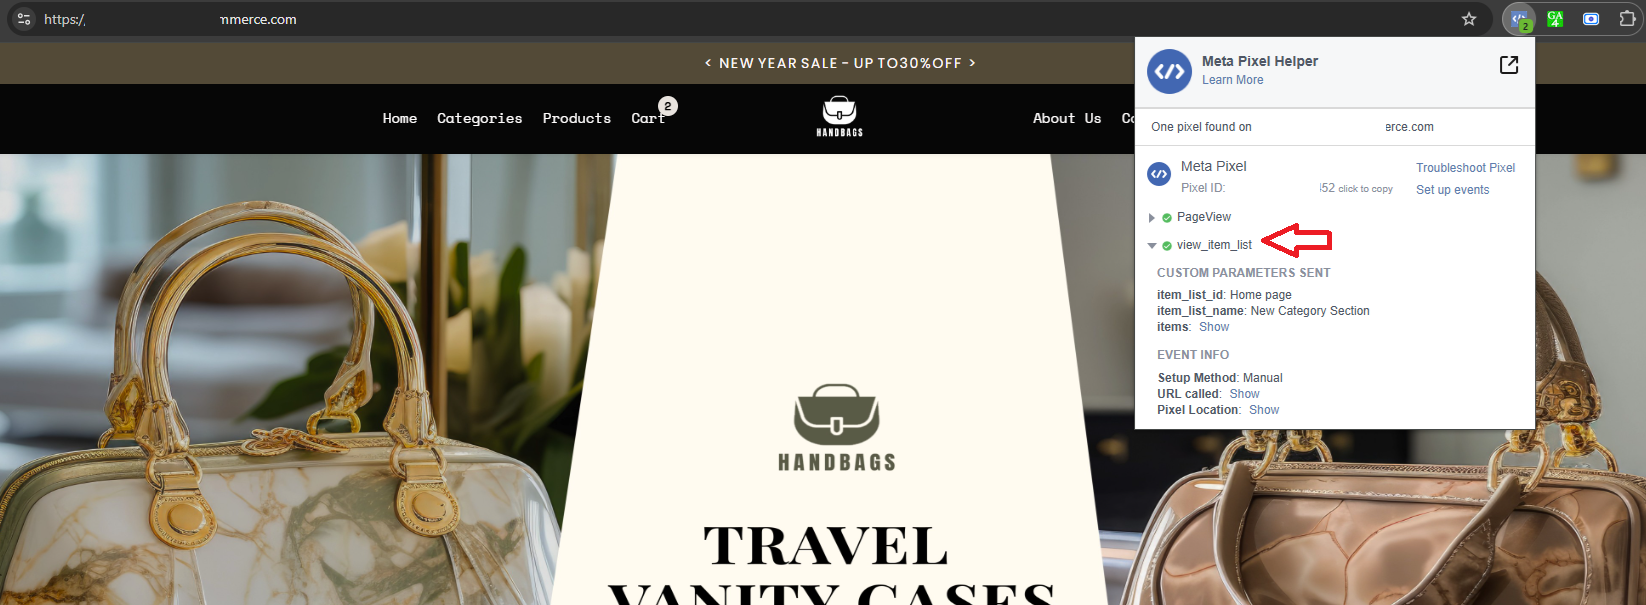
Step 6. Once the Meta Pixel Helper extension is pinned, open the website and check the Meta Pixel Helper extension; it will start showing the event triggers that occur on the website.
How can I check if Facebook events are being triggered on my Commmerce website?
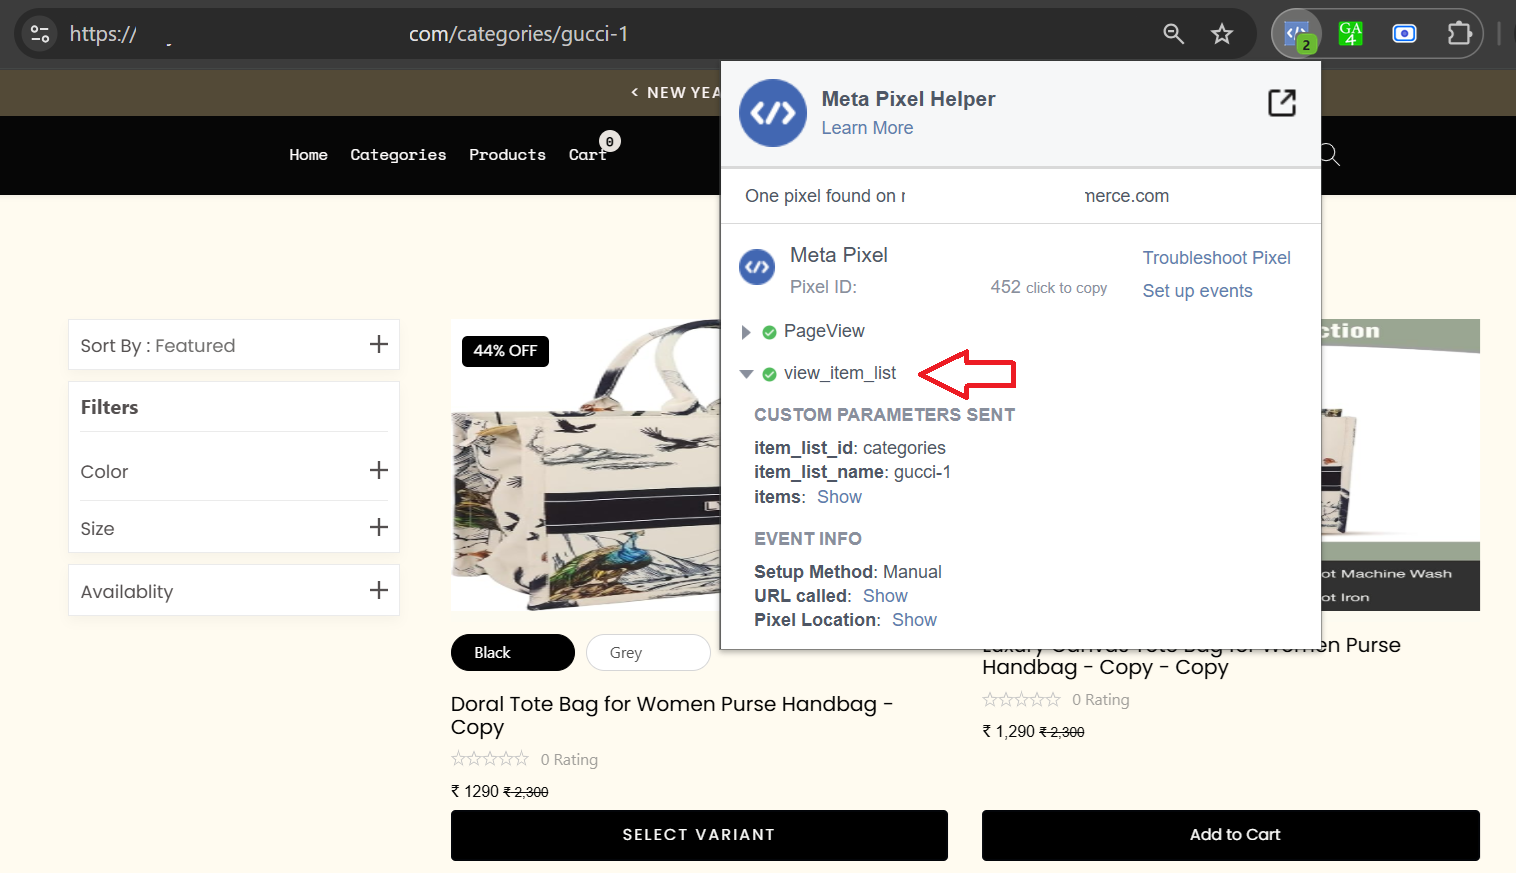
Step 1. The View_Item_list event will get triggered when the user is redirected to the page where the Product list is shown. This can be the Product List page, the Category List page, the Product details page, or the Home page (if the products are already added).
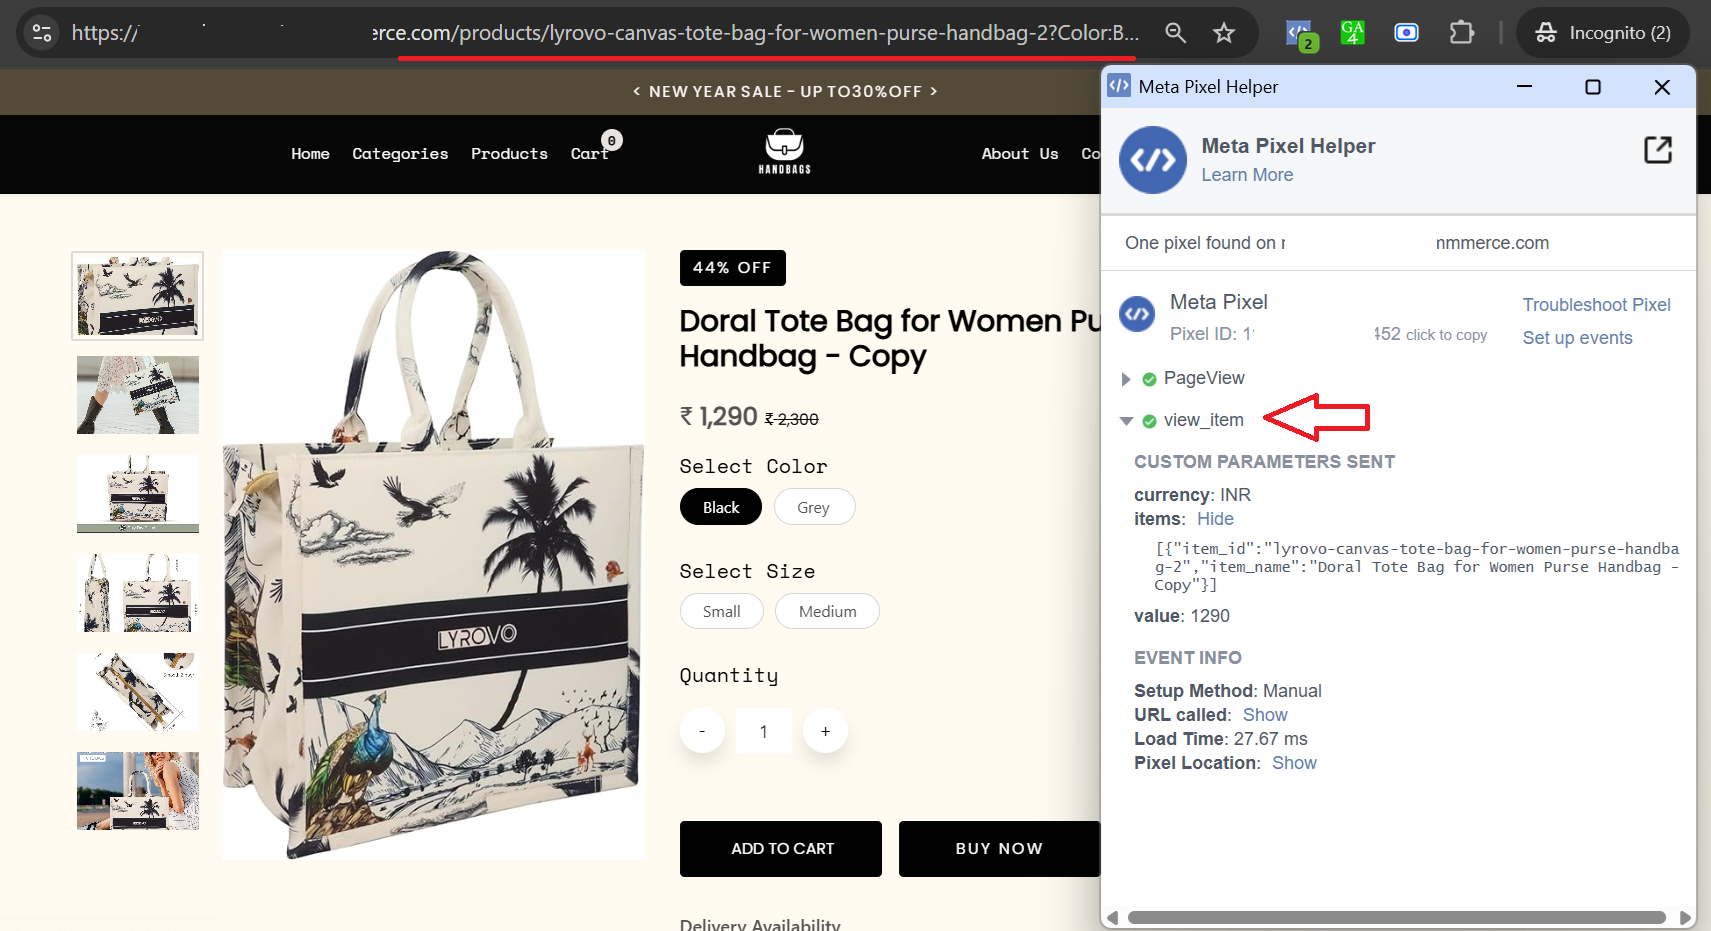
Step 2. The view_Item event will get triggered when the user is redirected to the product details page. On clicking the product card, the page will redirect you to the product details page, and the event will get triggered.
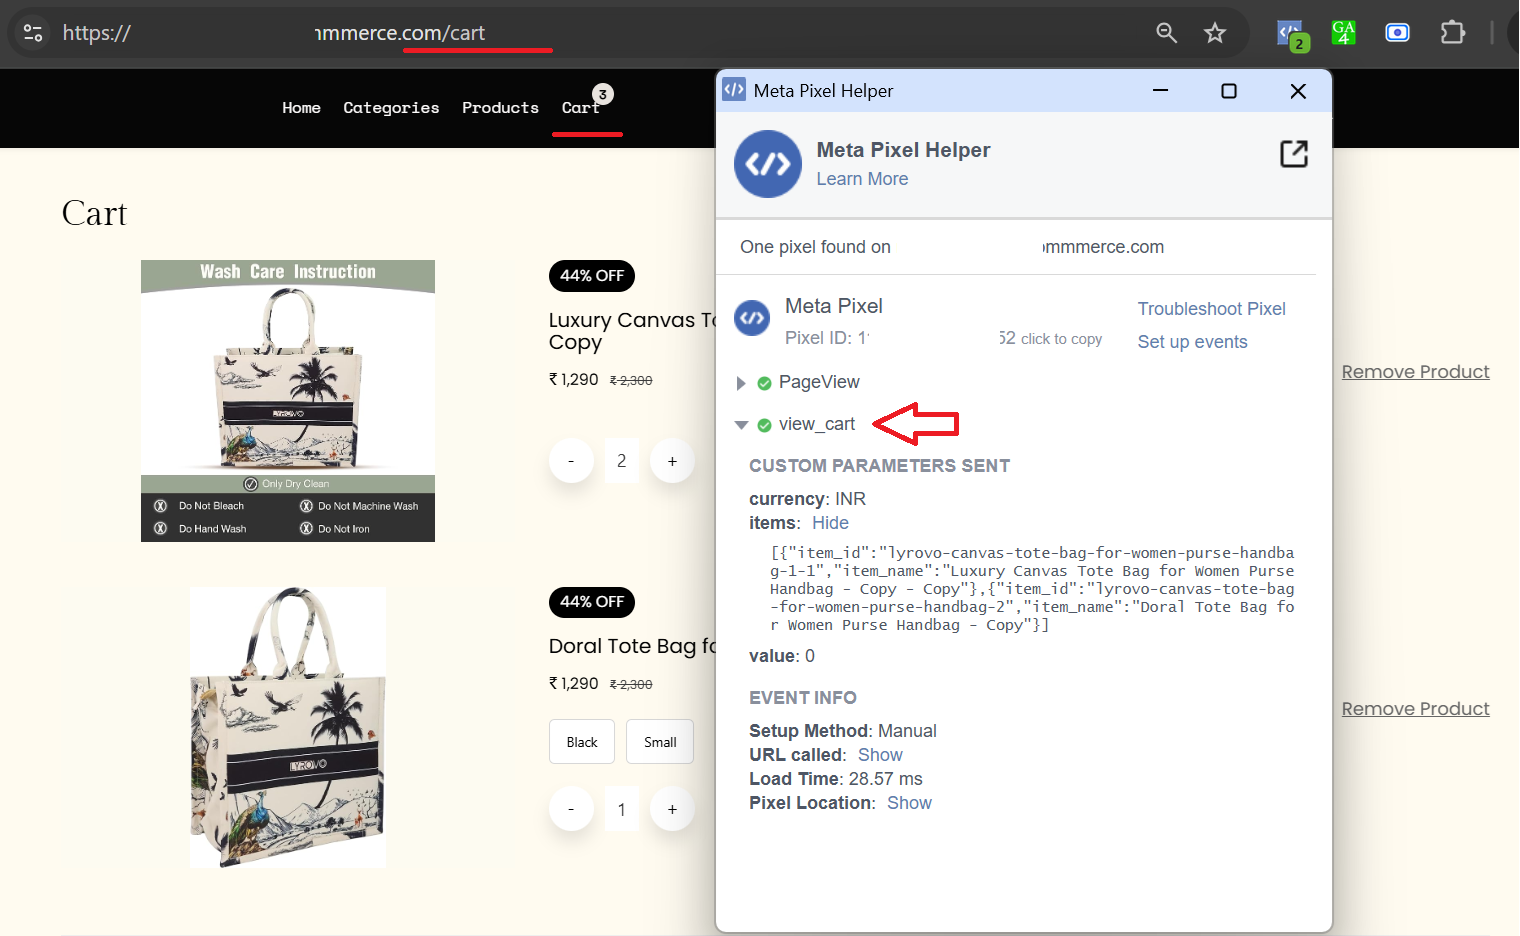
Step 3. The view_cart event will get triggered when the user is redirected to the Cart page. On click of the Cart menu or click on the Go to Cart button on a product details page, this event will get triggered.
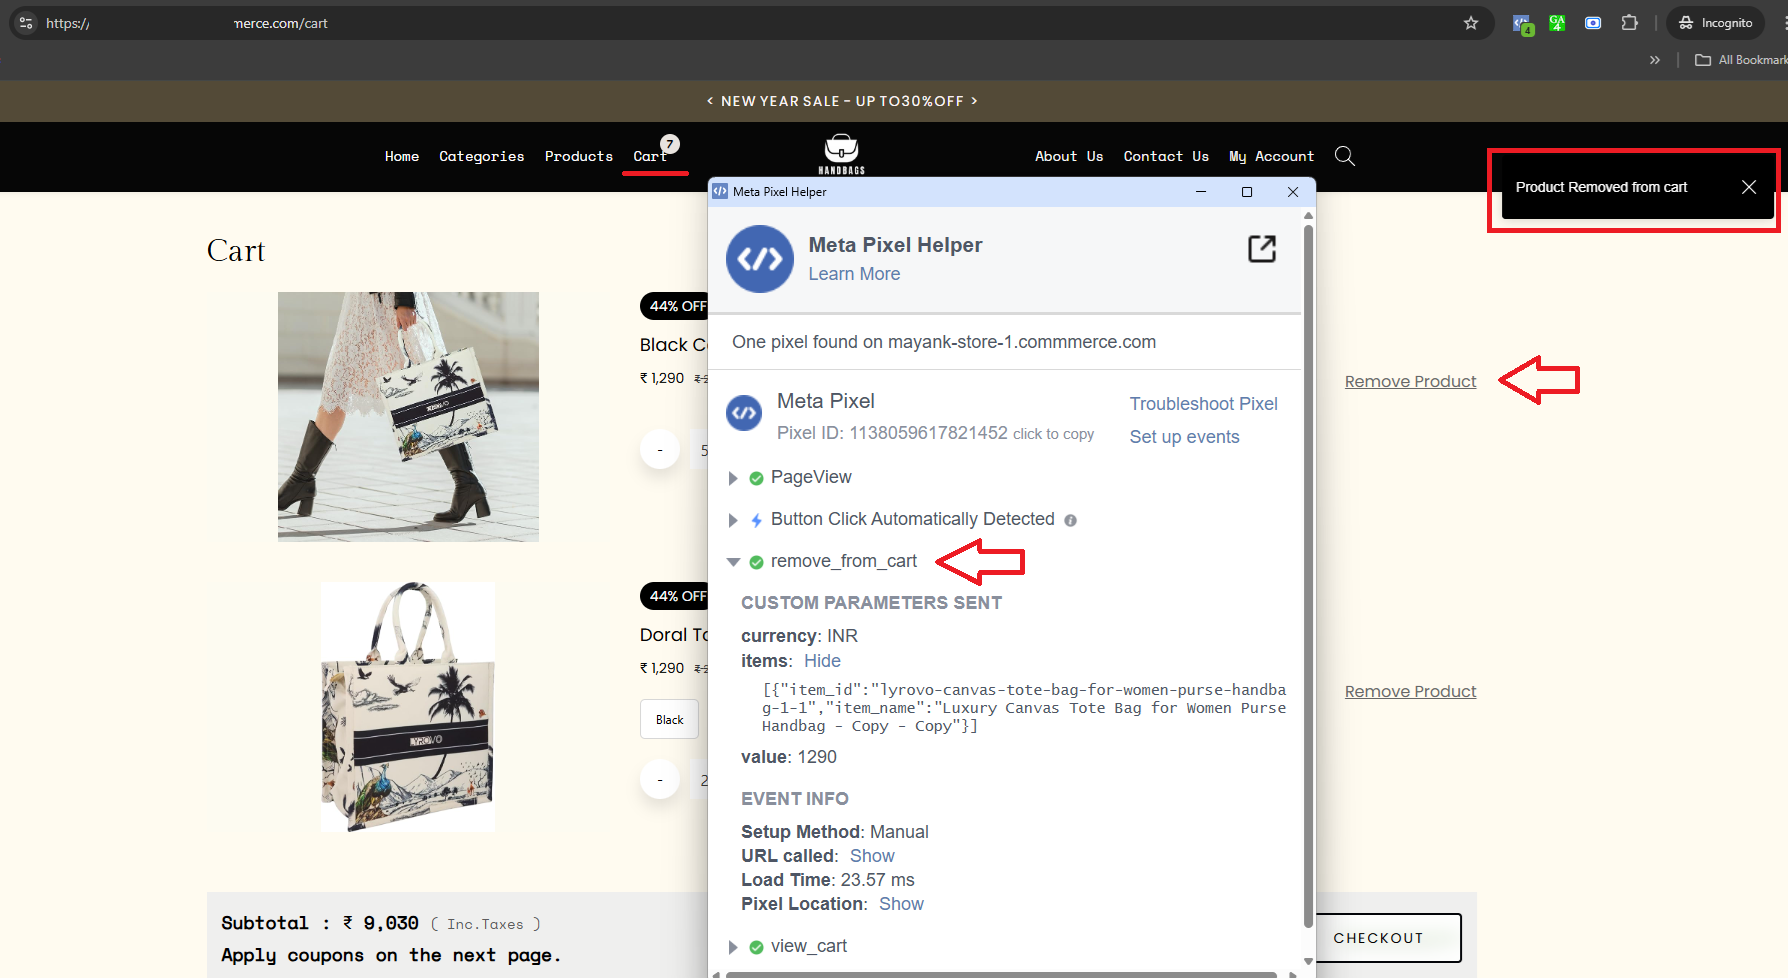
Step 4. The remove_from_cart event will get triggered when the user clicks on the Remove Product link on the cart page or clicks (-) sign-on product quantity to remove the product from the cart on the cart page.
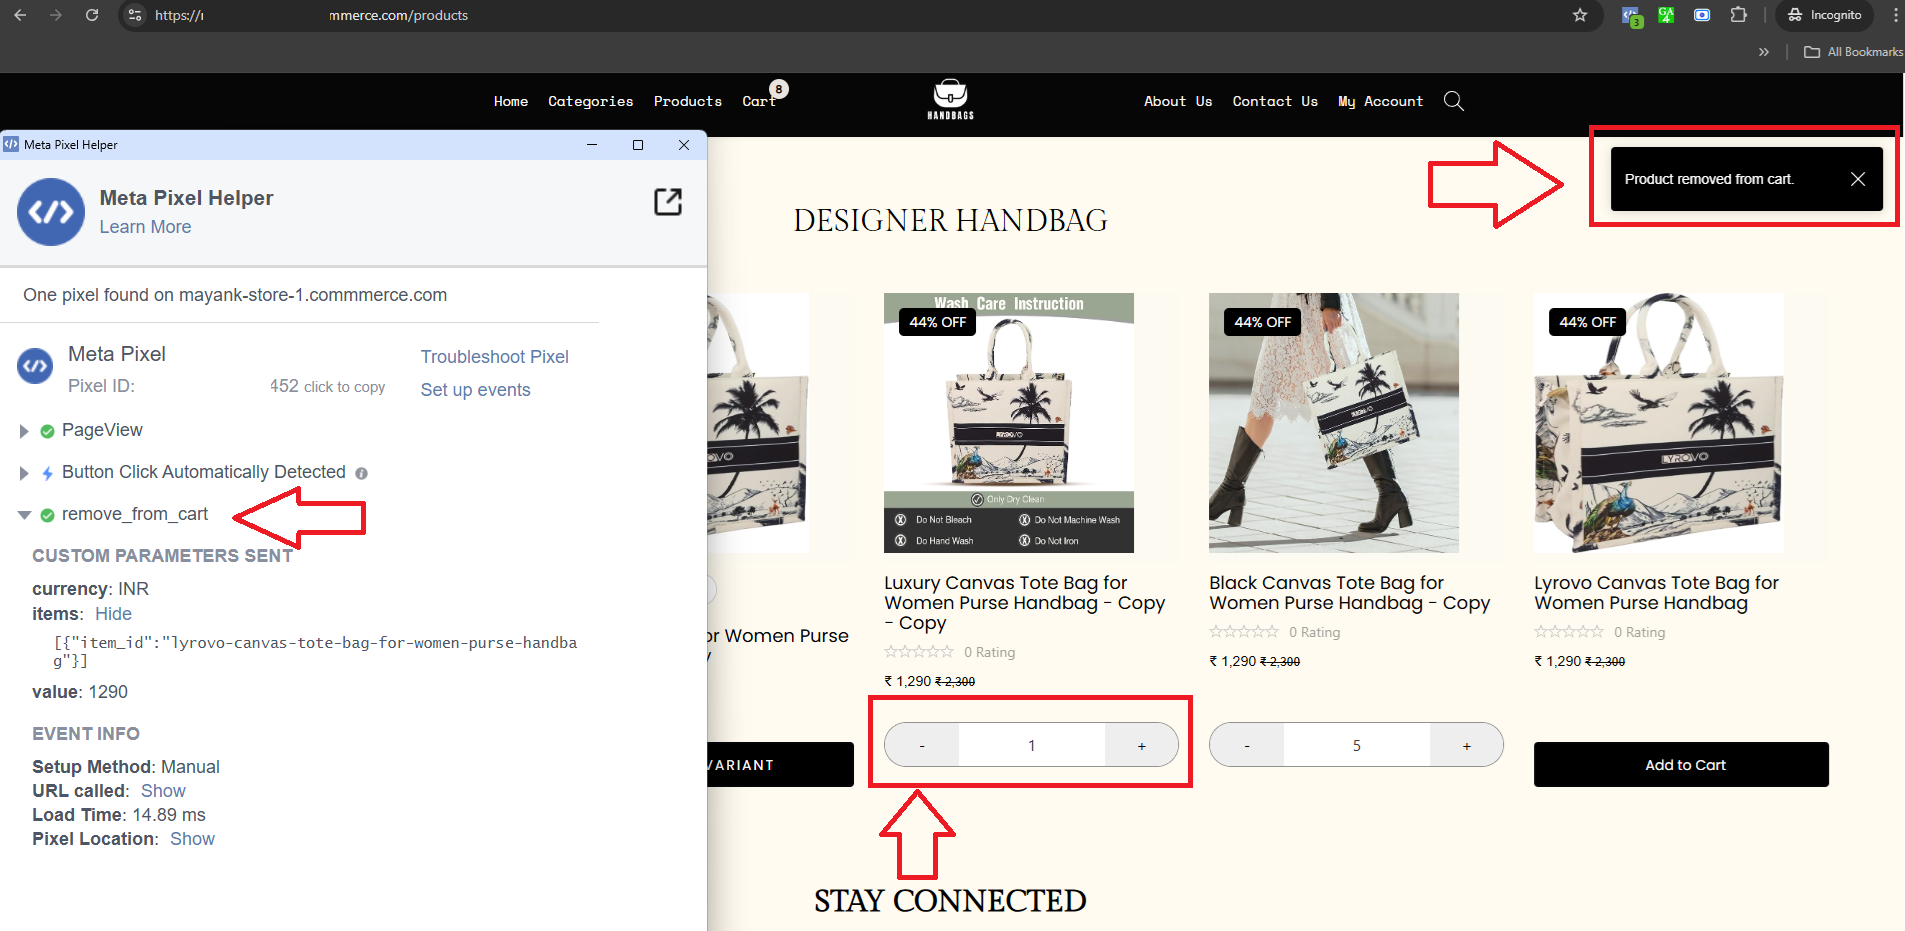
Step 5. The remove_from_cart event will also get triggered when a new user removes the product from the Product cards that are already present on the Home page, Category page, Product list page, or product details page.
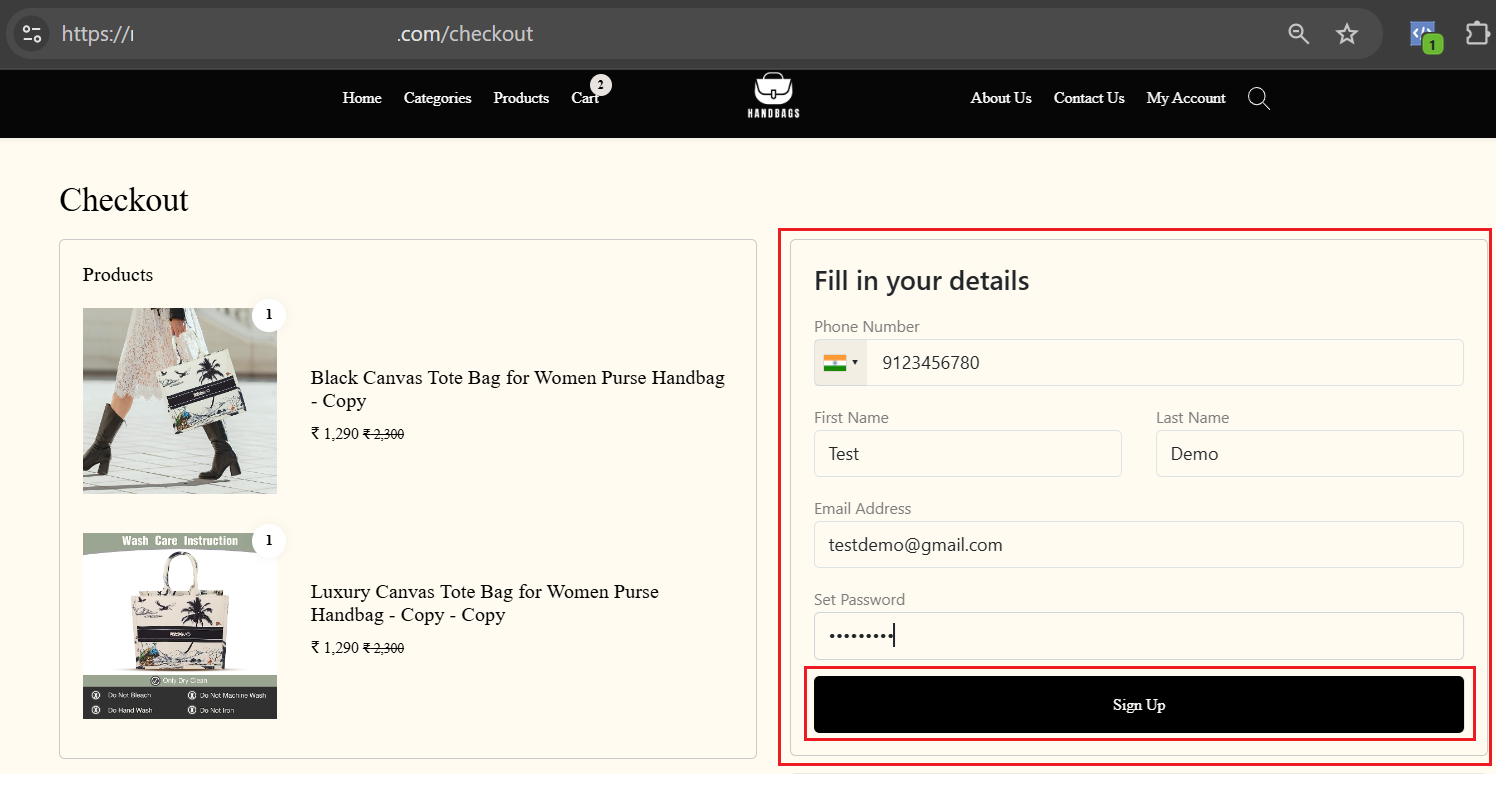
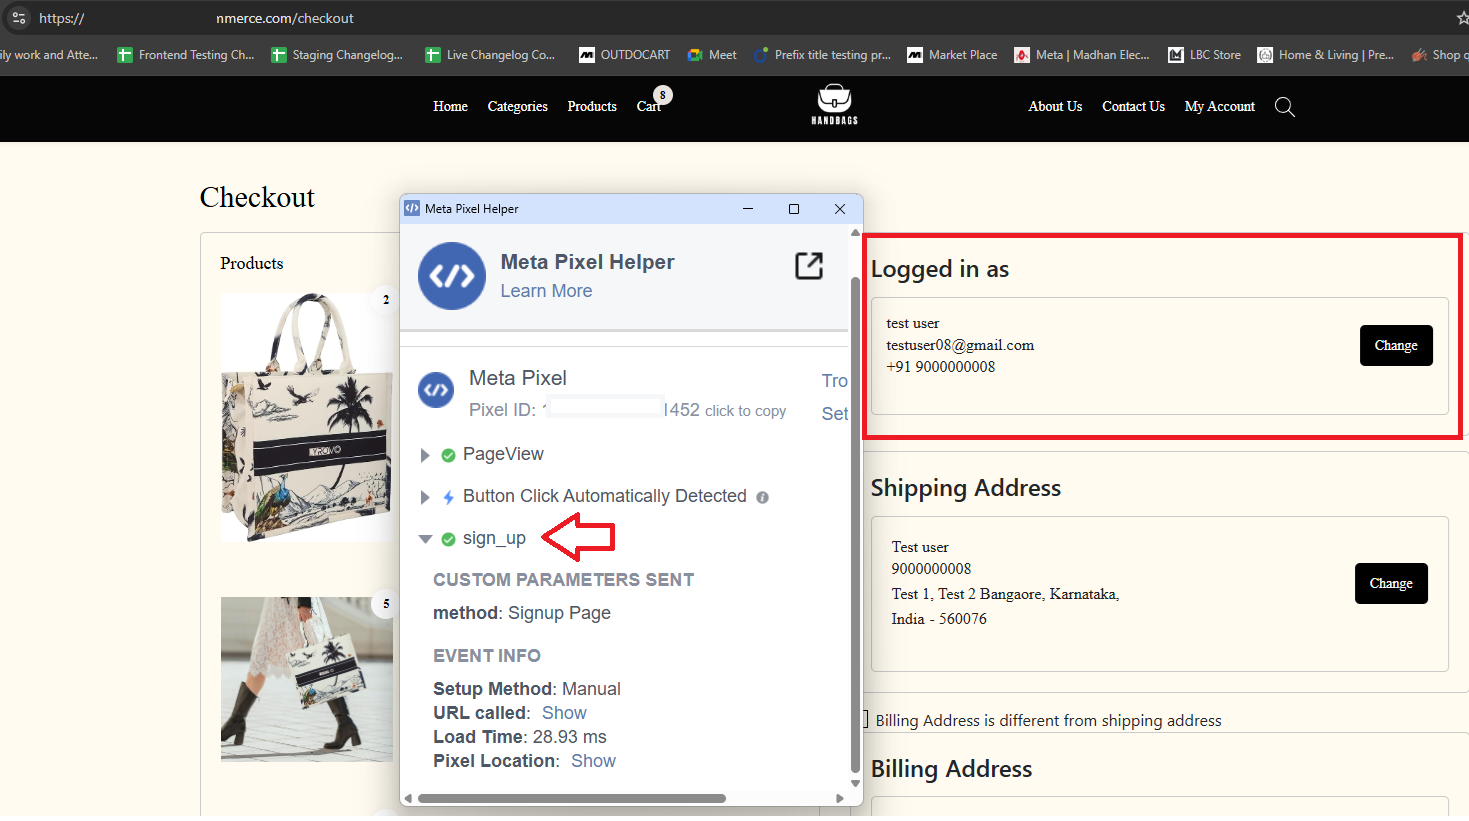
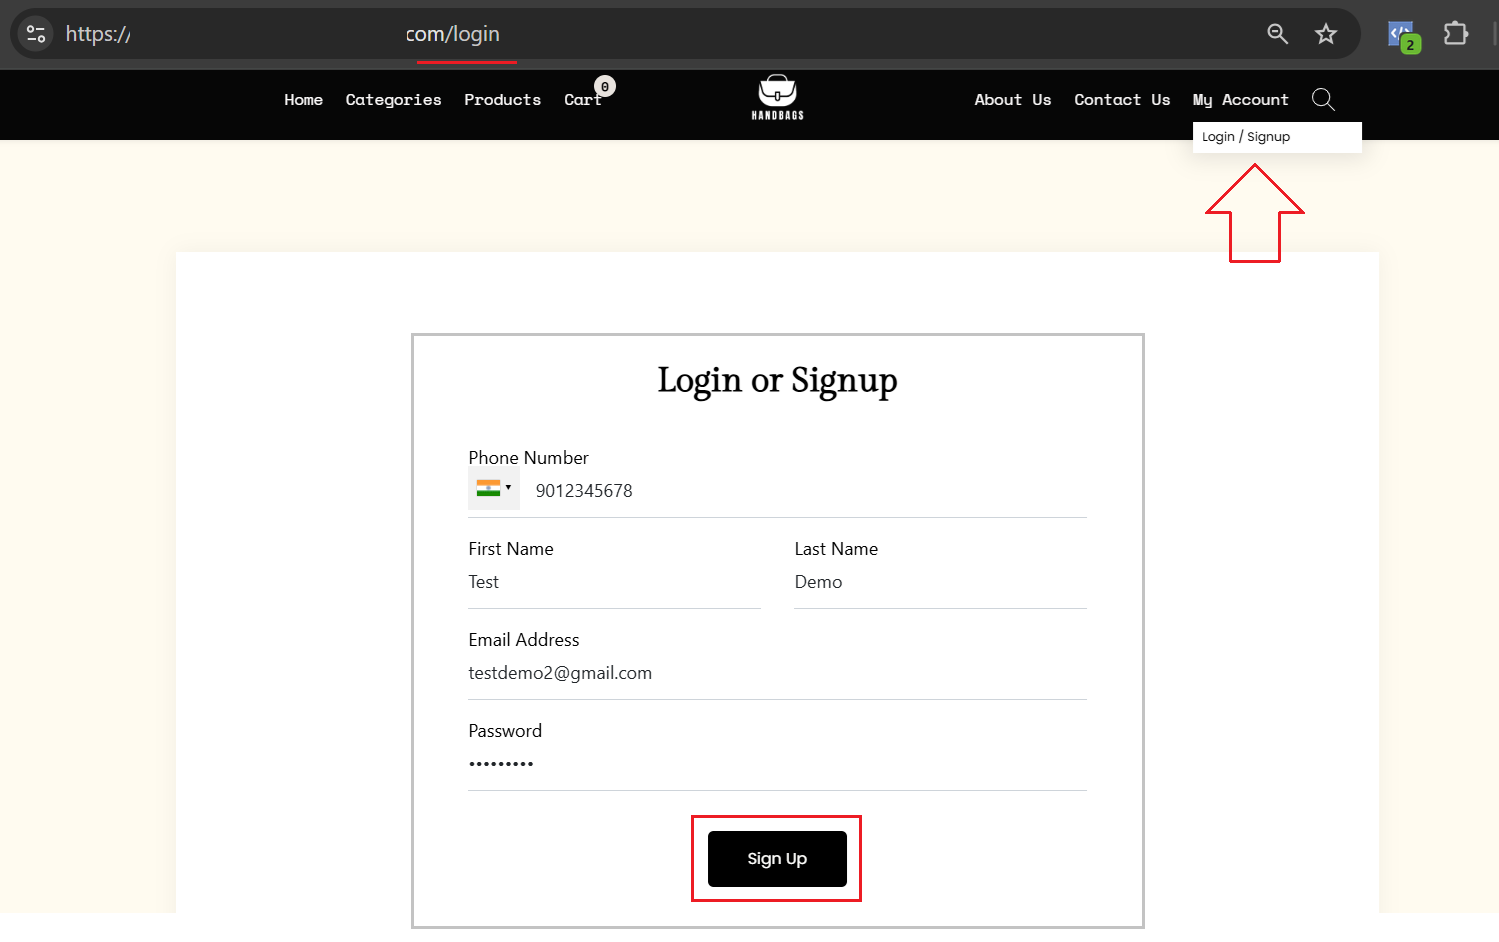
Step 6. The ‘signup’ event will get triggered when a new user signs up on your website from the checkout page or login page.
Sign Up from the Checkout page:
Sign Up from the Login page:
On the Commmerce platform, which Facebook Analytics events are triggered automatically?
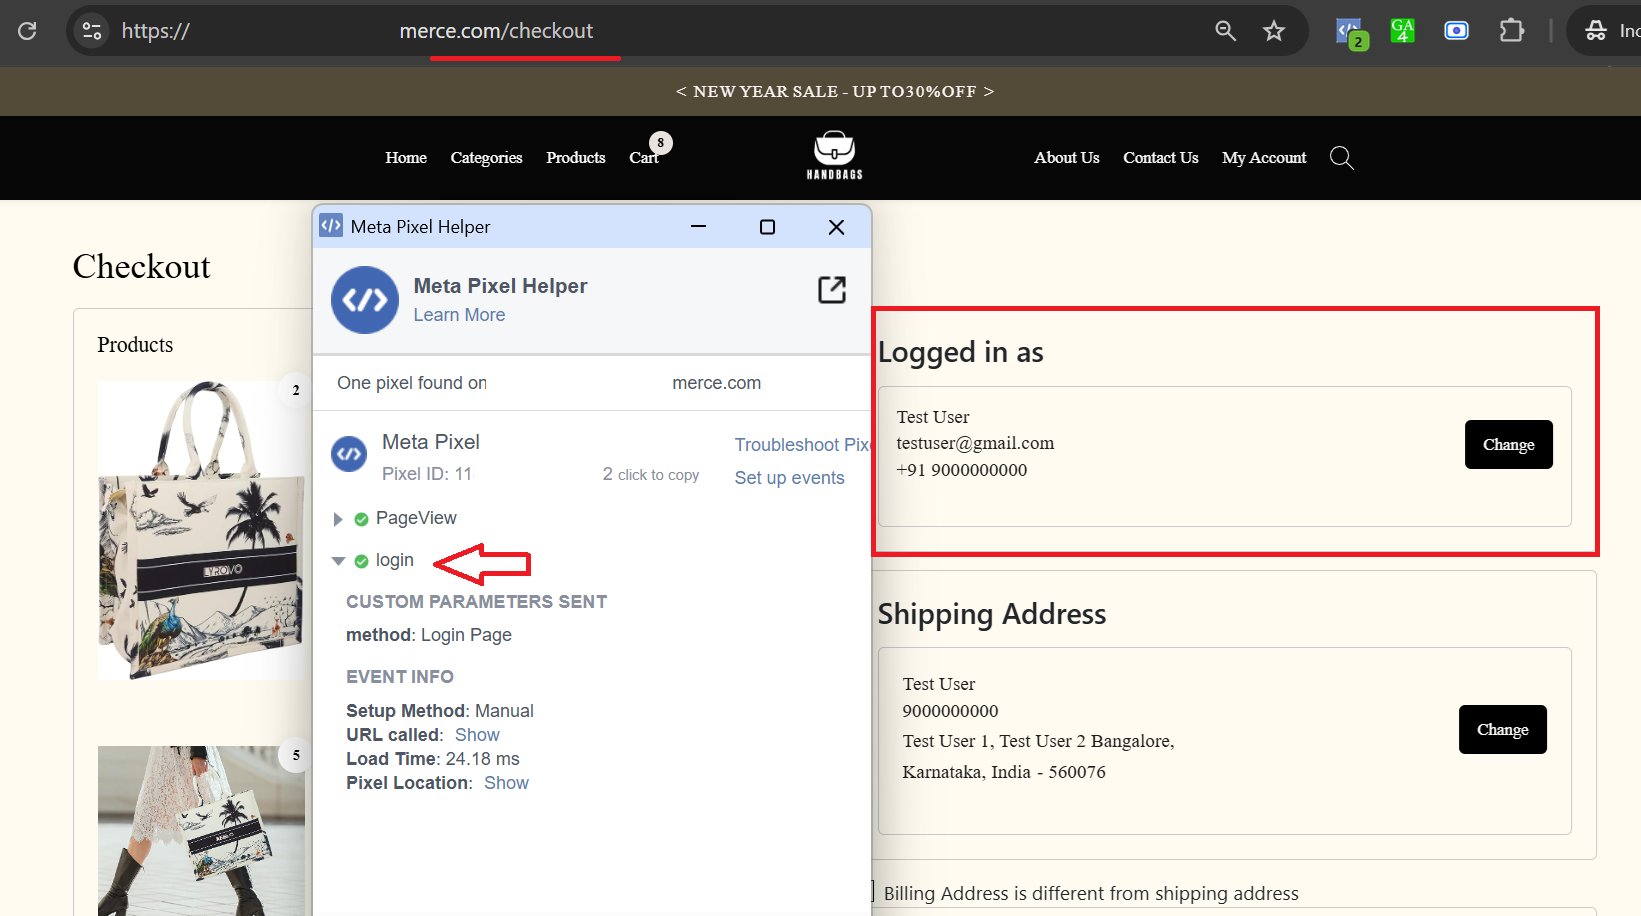
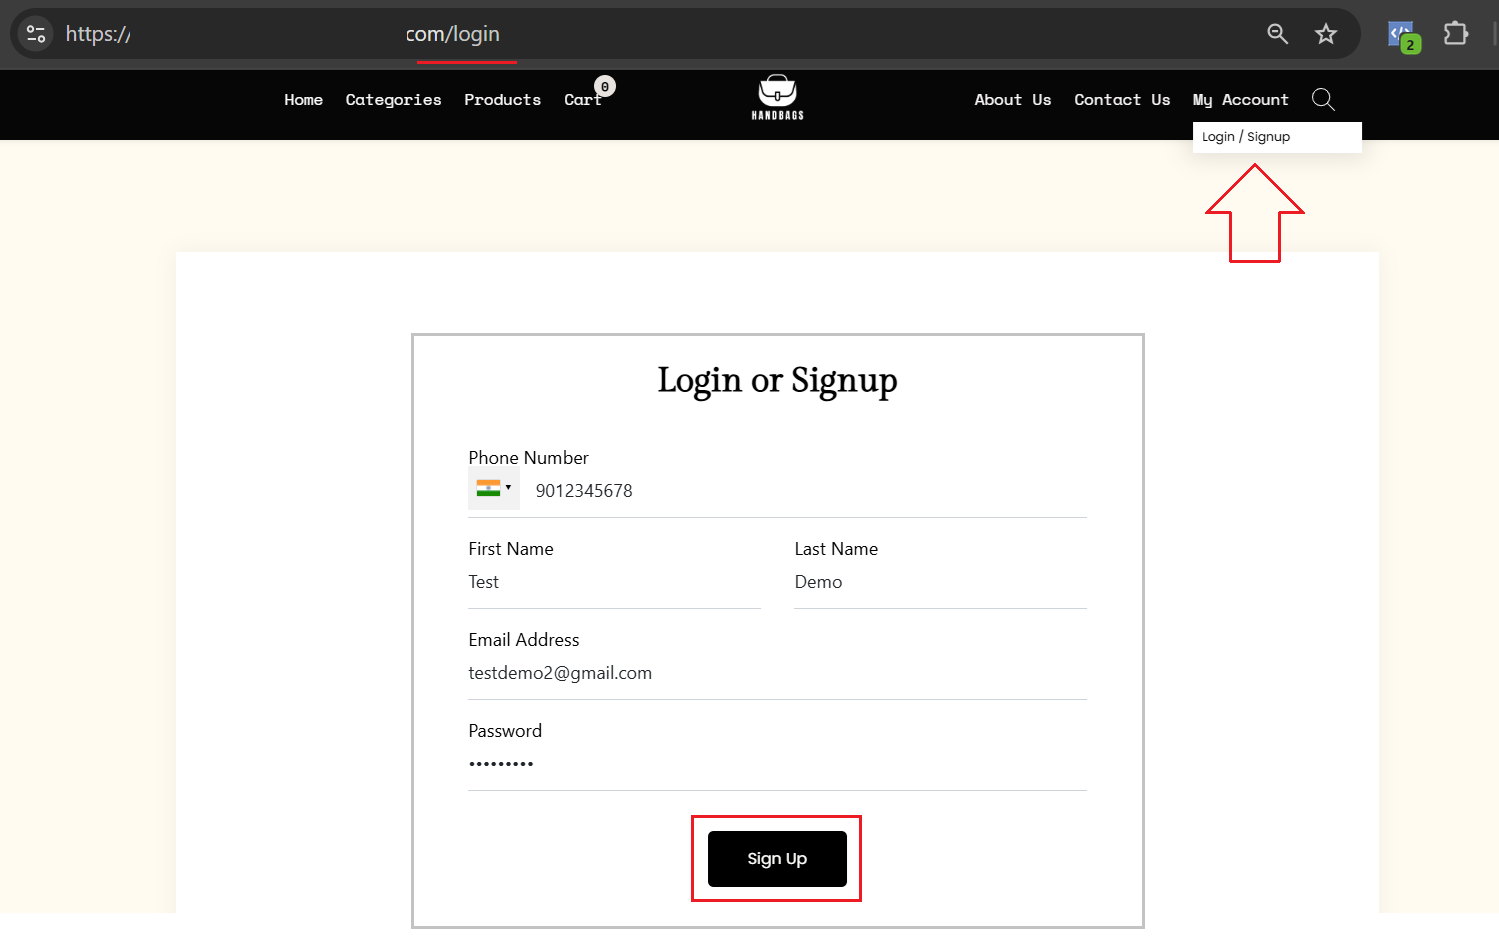
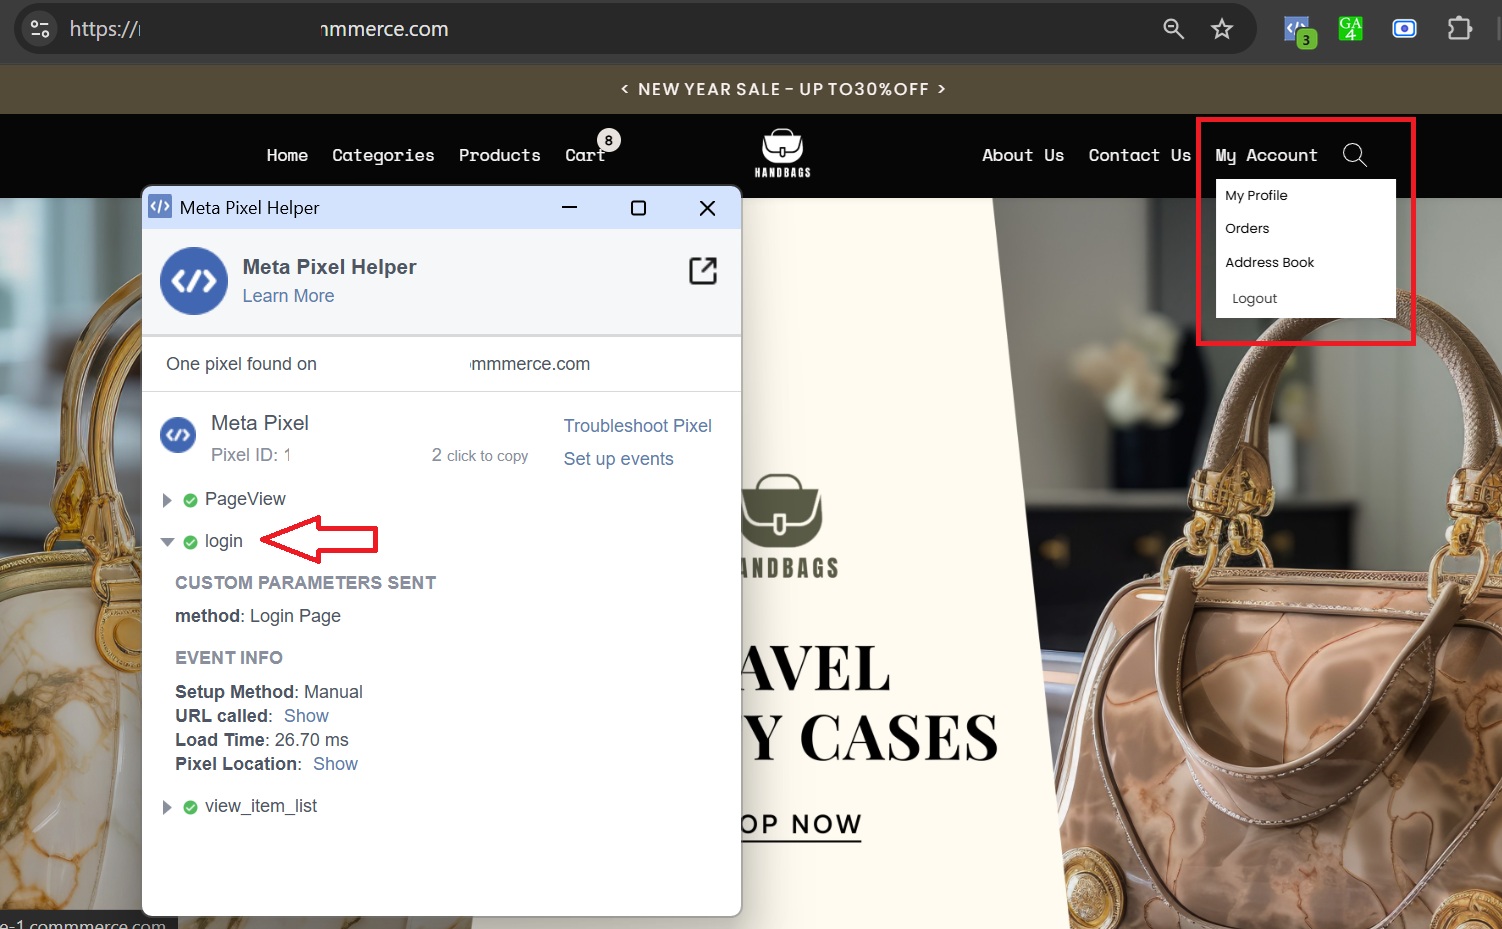
1. The login event will get triggered when a user logs into your website from the checkout page or the login page.
Login from the Checkout page:
Login from the Login page:
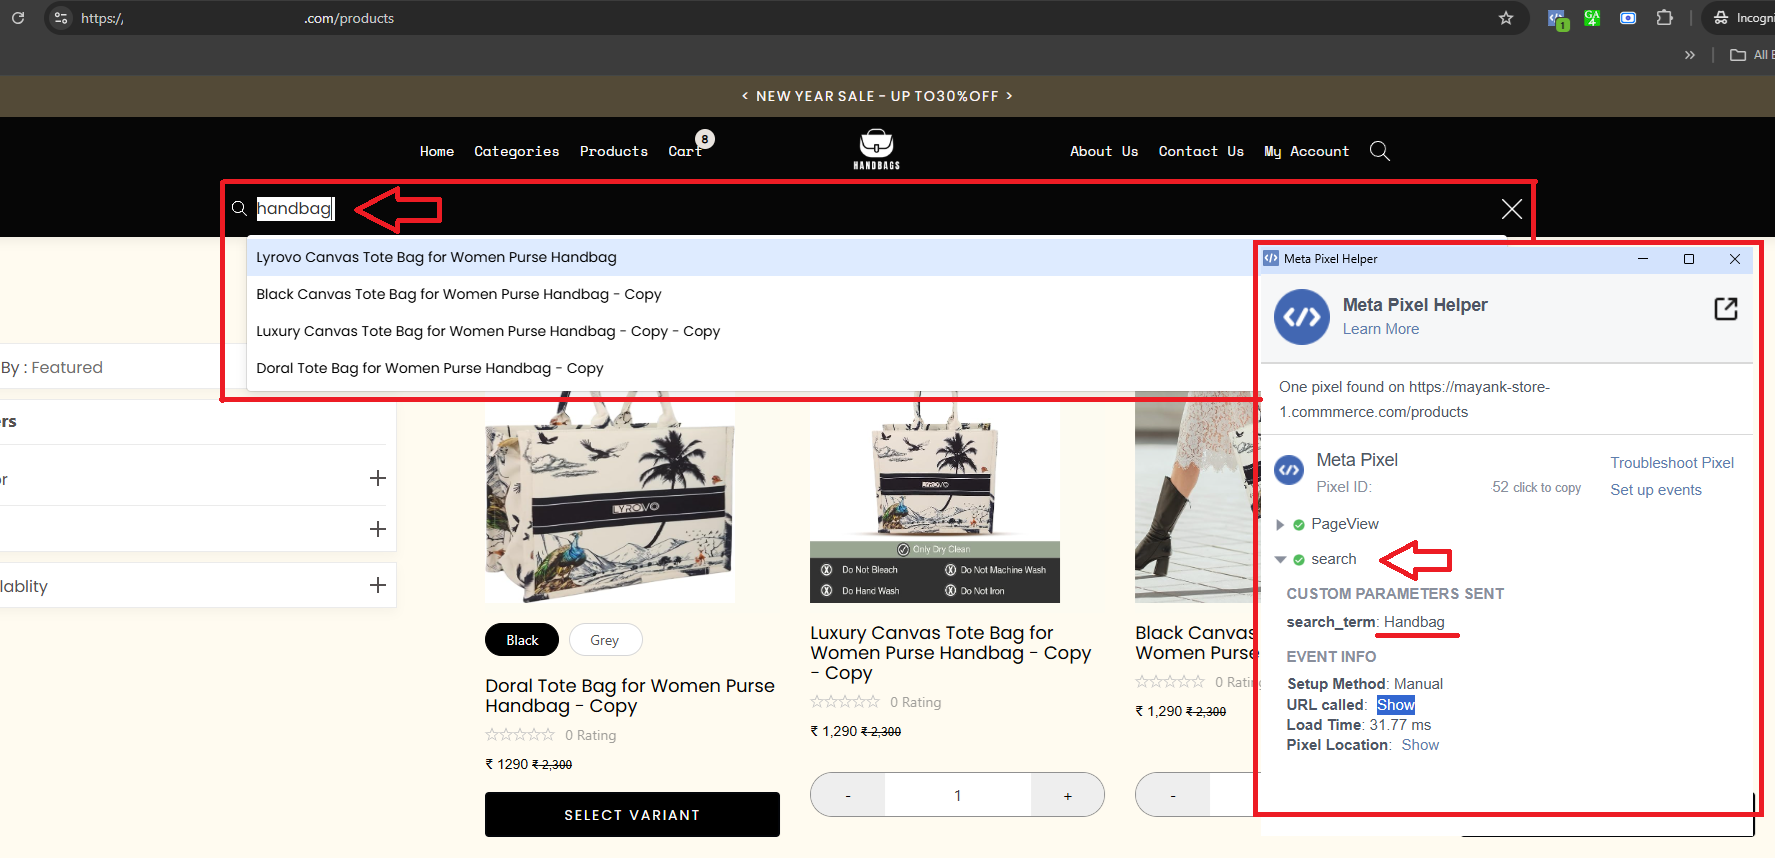
2. The search event will get triggered when the user clicks on the search icon in the header menu and enters a keyword in the search bar to search for a product. Search events can be triggered from any page as the Search icon is present on all pages in the header menu.
3. The add_to_cart event will get triggered with the click of the add to cart button and the buy now button.
The Add to Cart button is present on the homepage product card, product list card, category list card, under the product details page section ‘You May Like,’ the related products list, the product details section, and the variant selection pop-up options.
The Buy Now button is present on the product details page and the Select Variant pop-up.
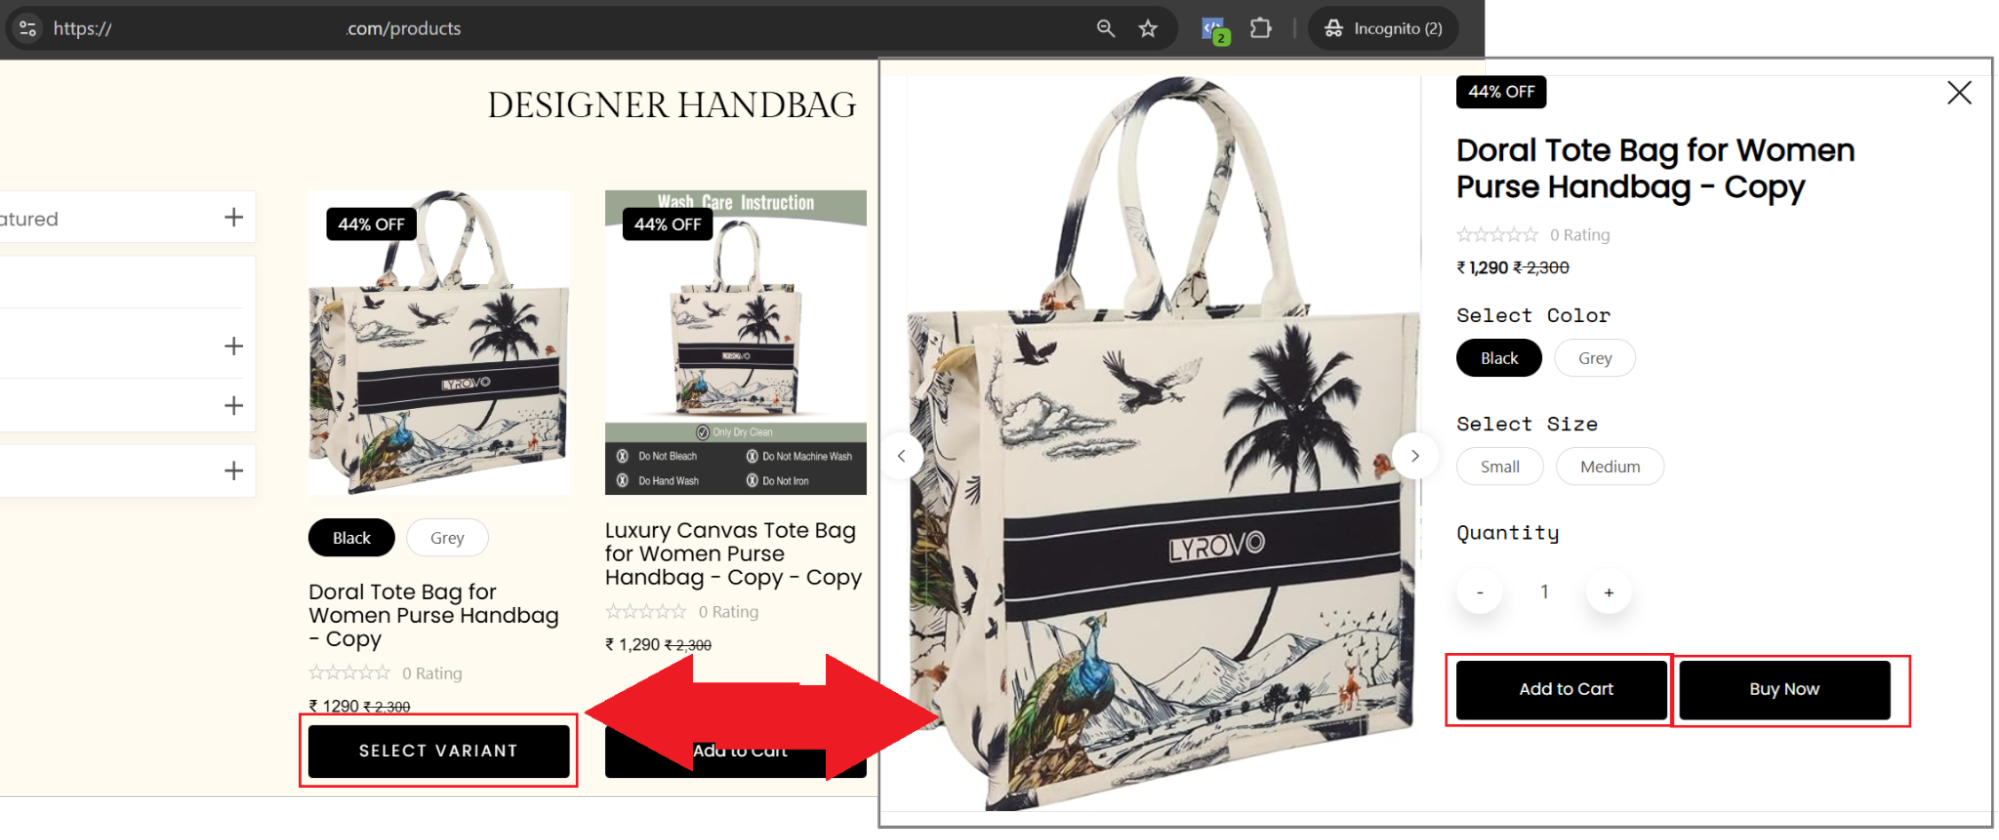 The ‘Add to cart’ and ‘Buy now’ buttons on the select variant popup
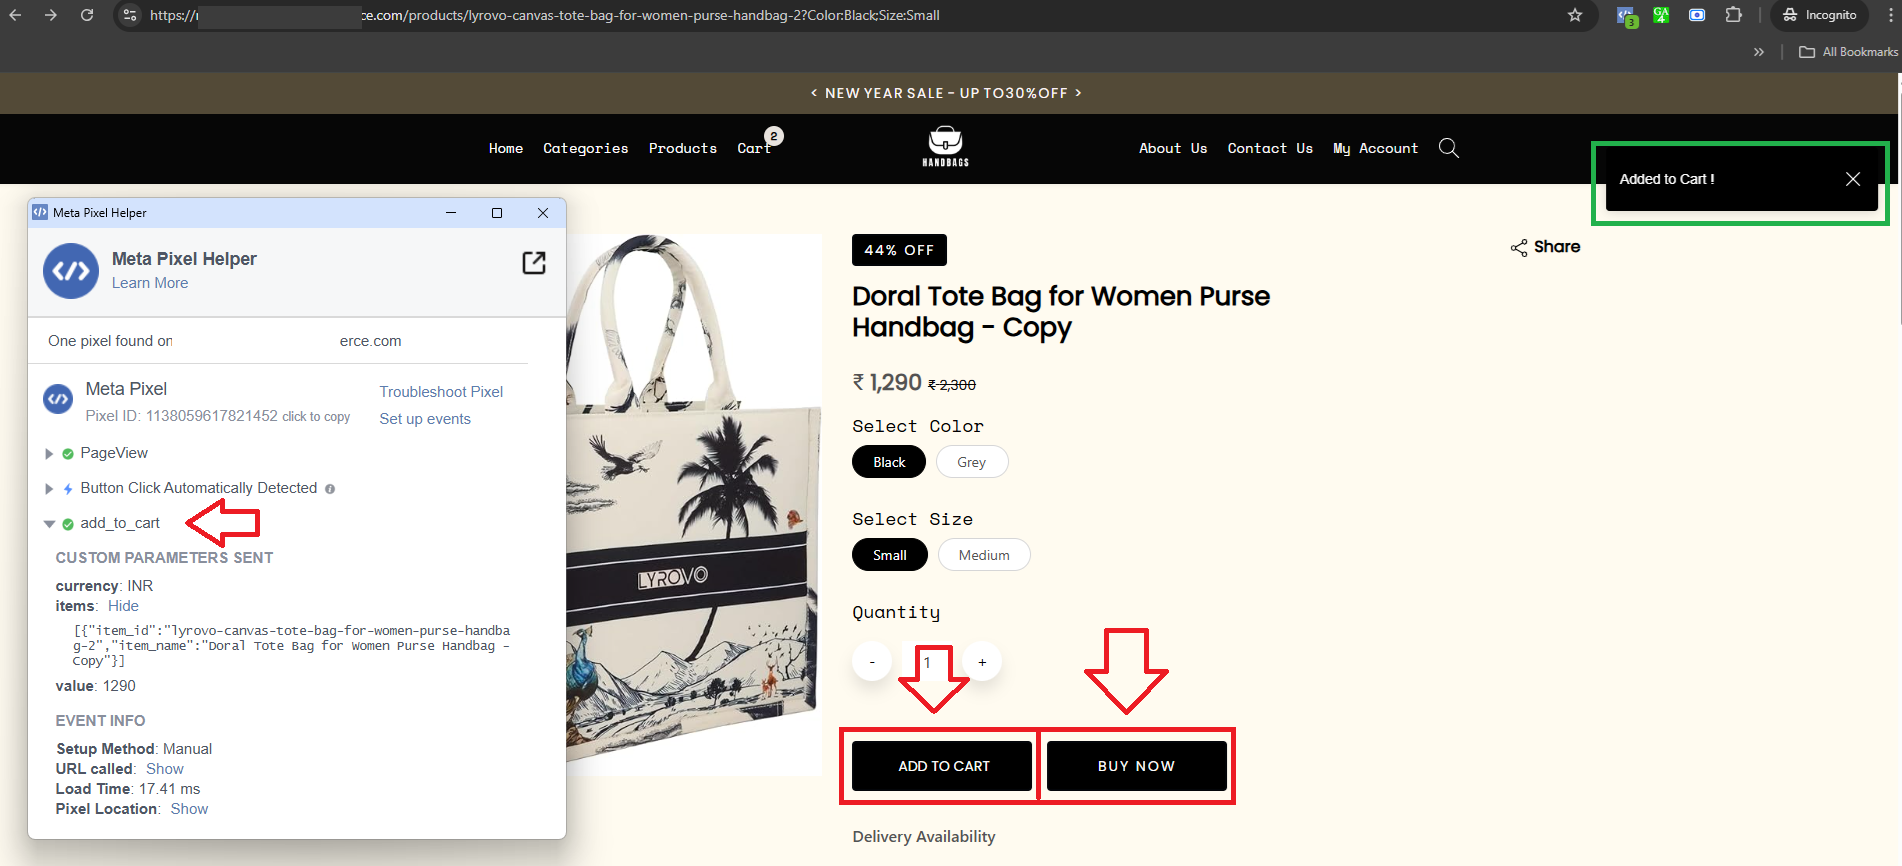 The ‘Add to cart’ and ‘Buy now’ buttons on the product details page
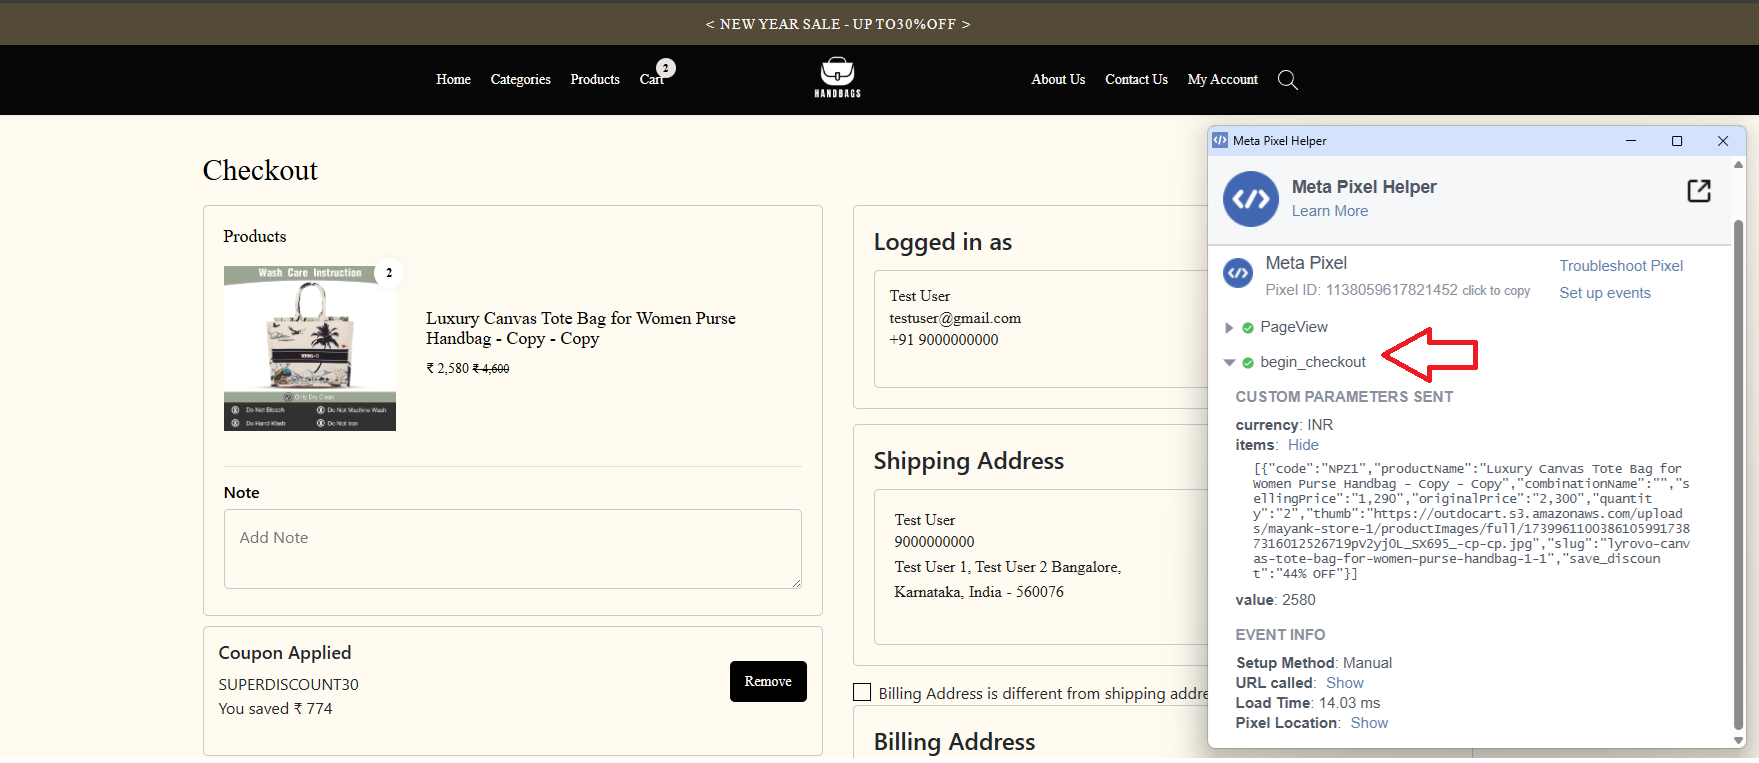
4. The begin_checkout event will get triggered if the user is logged in and is redirected to the checkout page or the login or signup options on the checkout page.
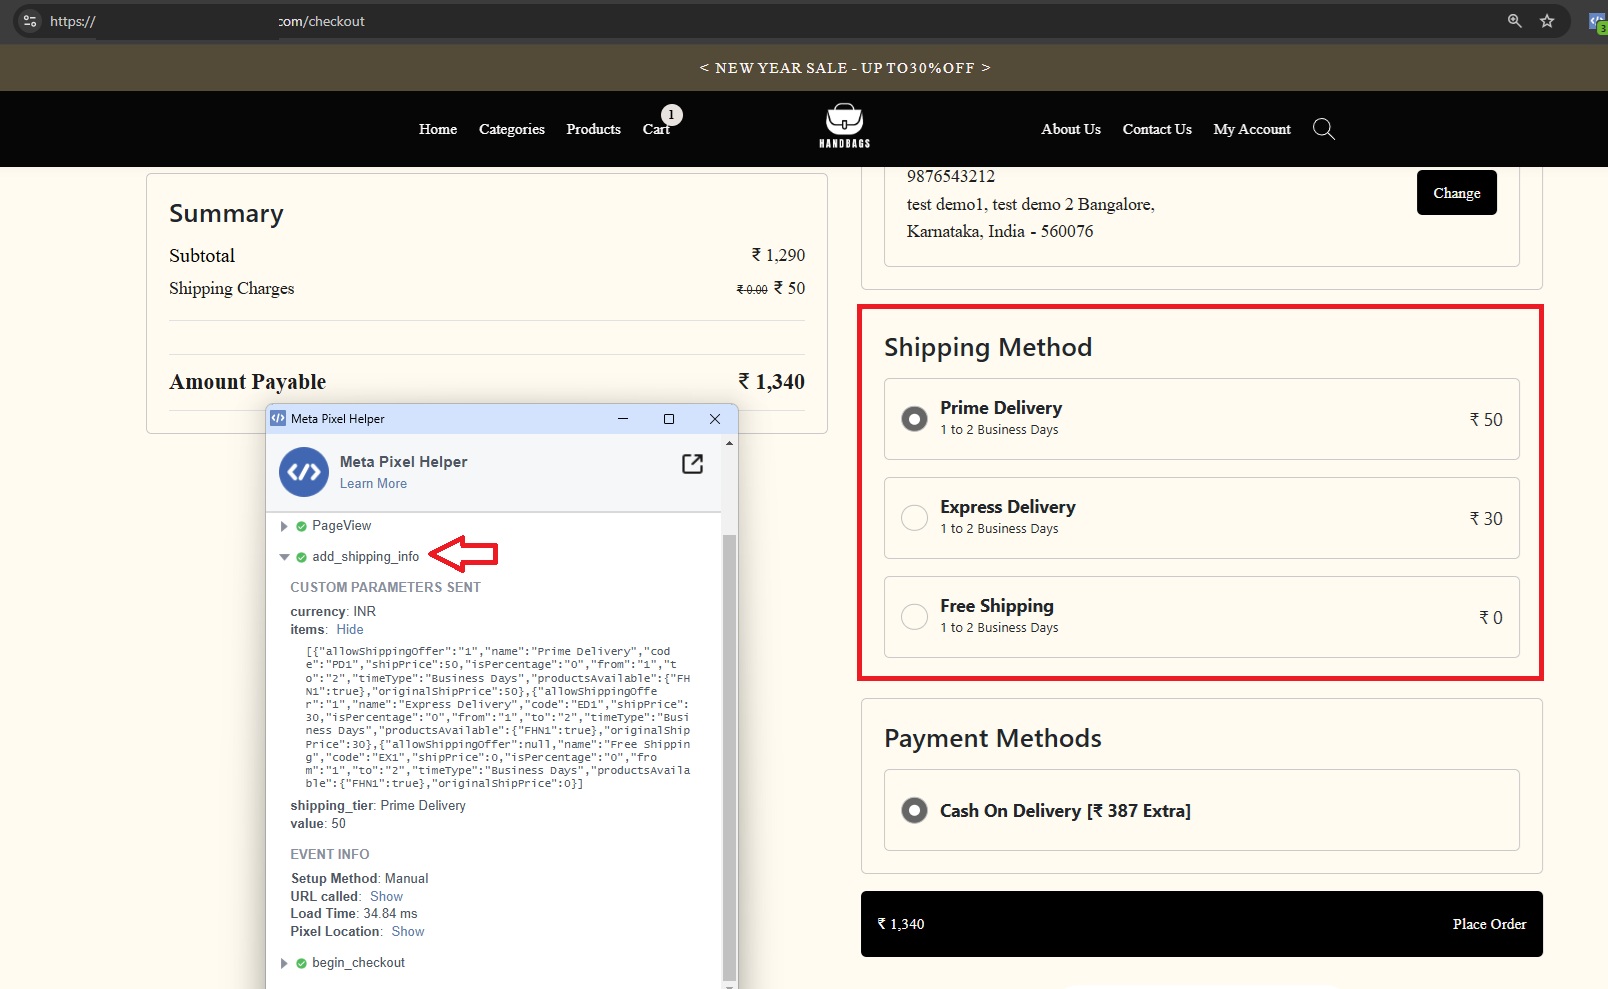
5. The add_shipping_Info event will get triggered as soon as the user selects the shipping method on the checkout page.
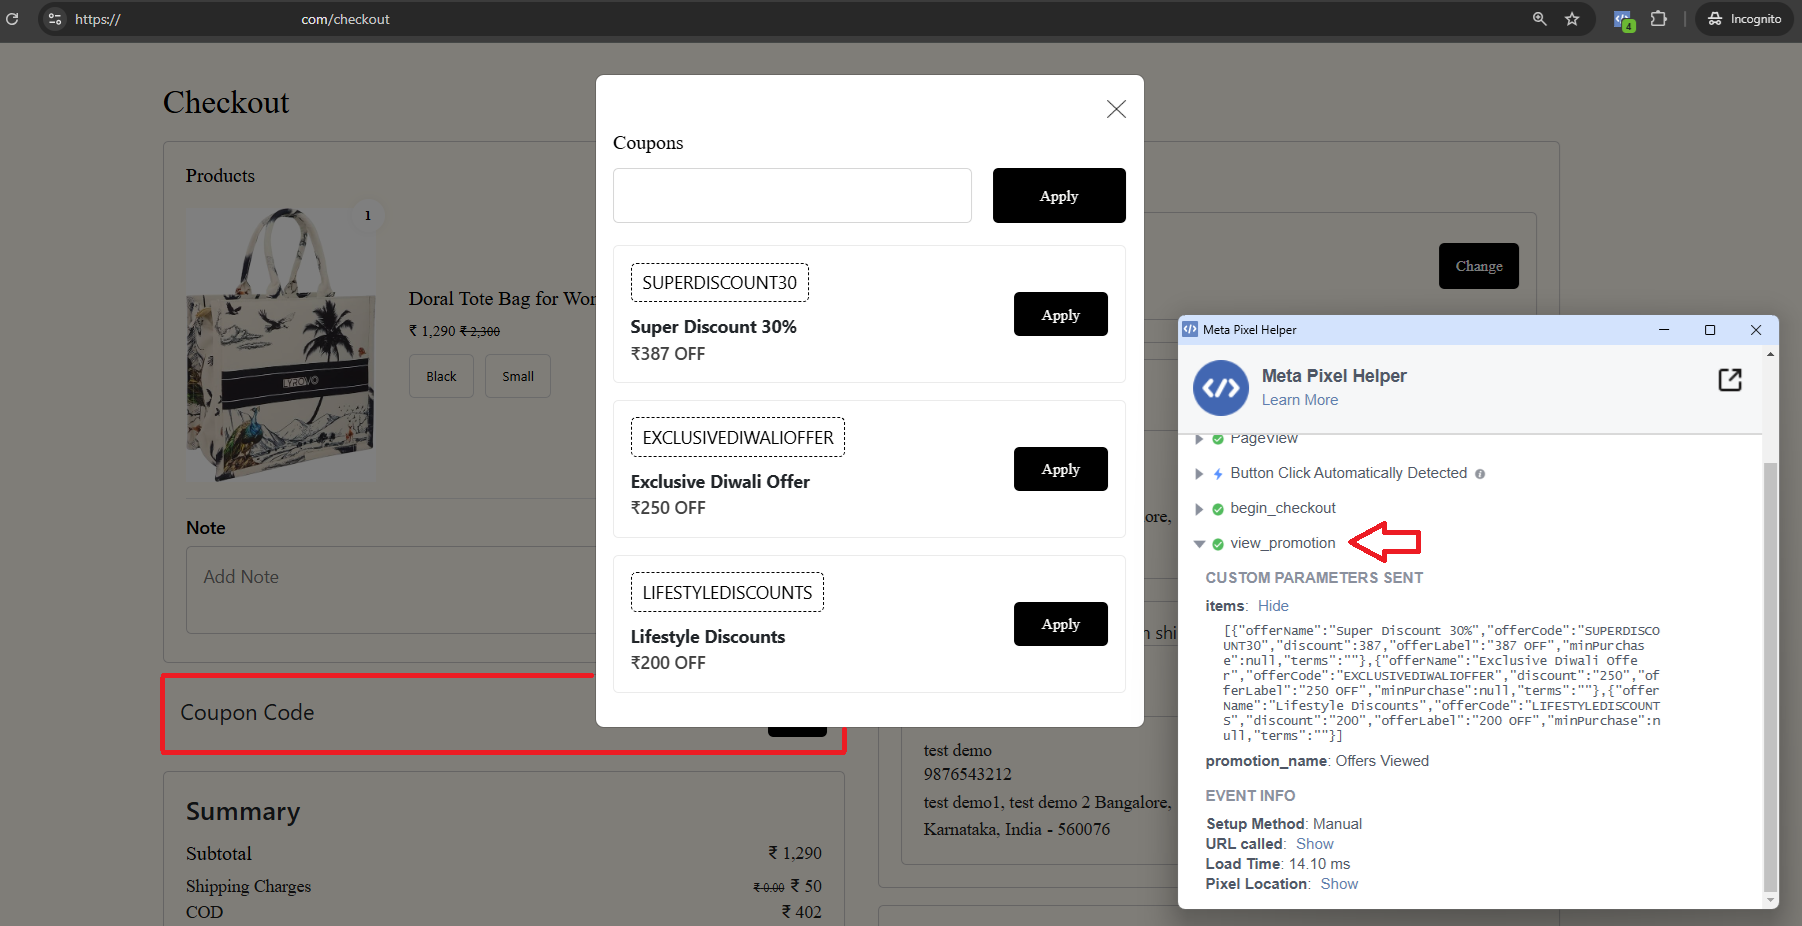
6. The view_promotion event will get triggered on the checkout page when the user clicks on the Add button on the Coupon Code, and an offer list popup will appear.
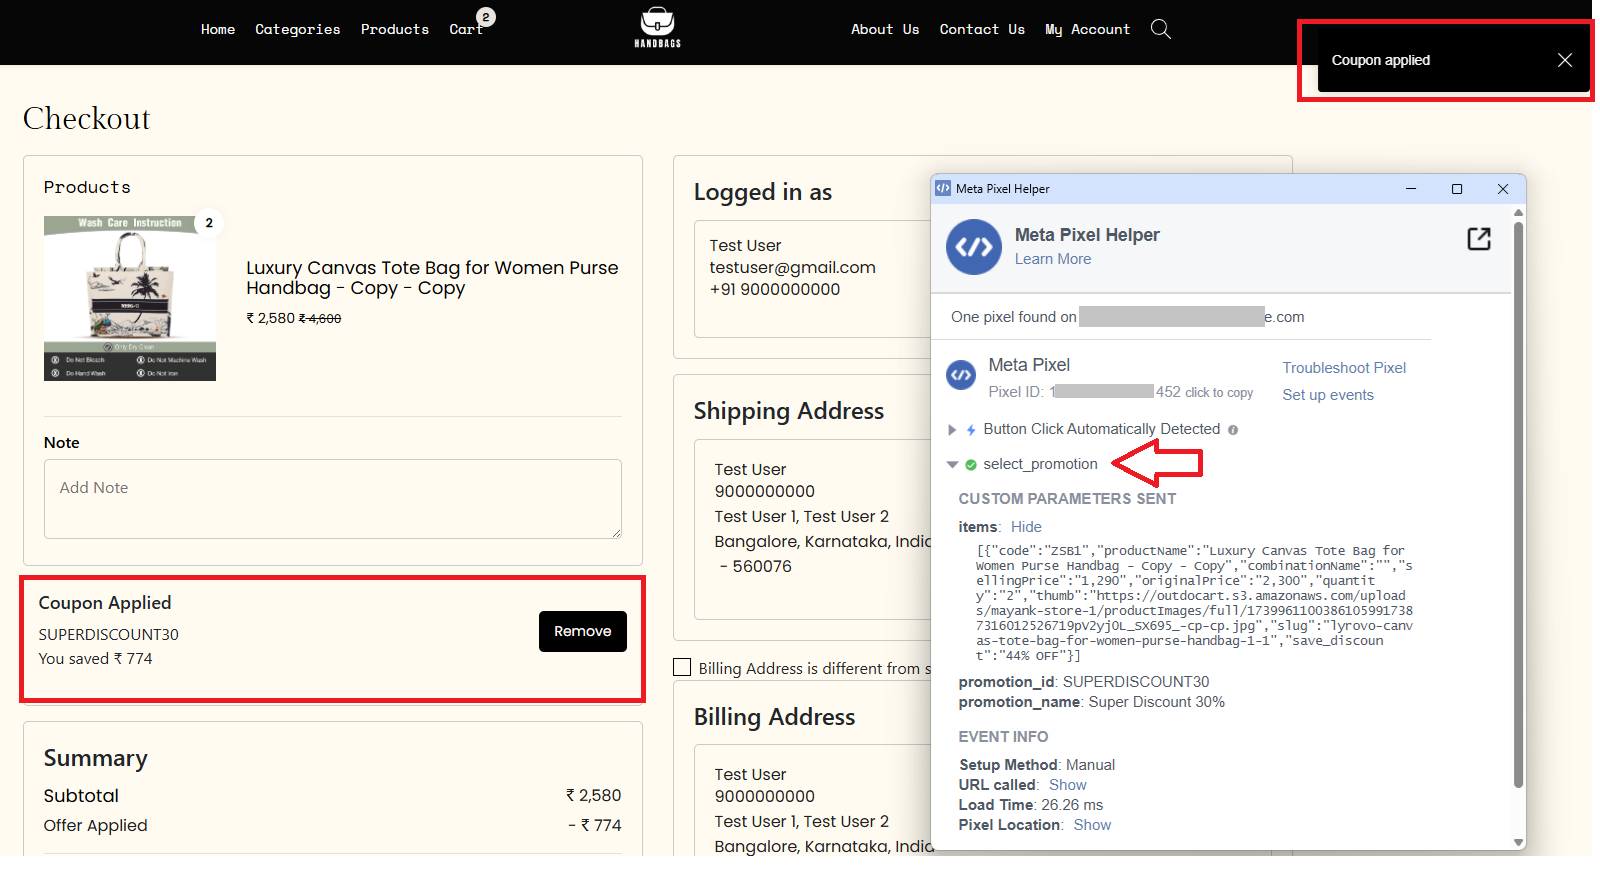
7. The select_promotion event will get triggered on the checkout page when the user applies for an offer.
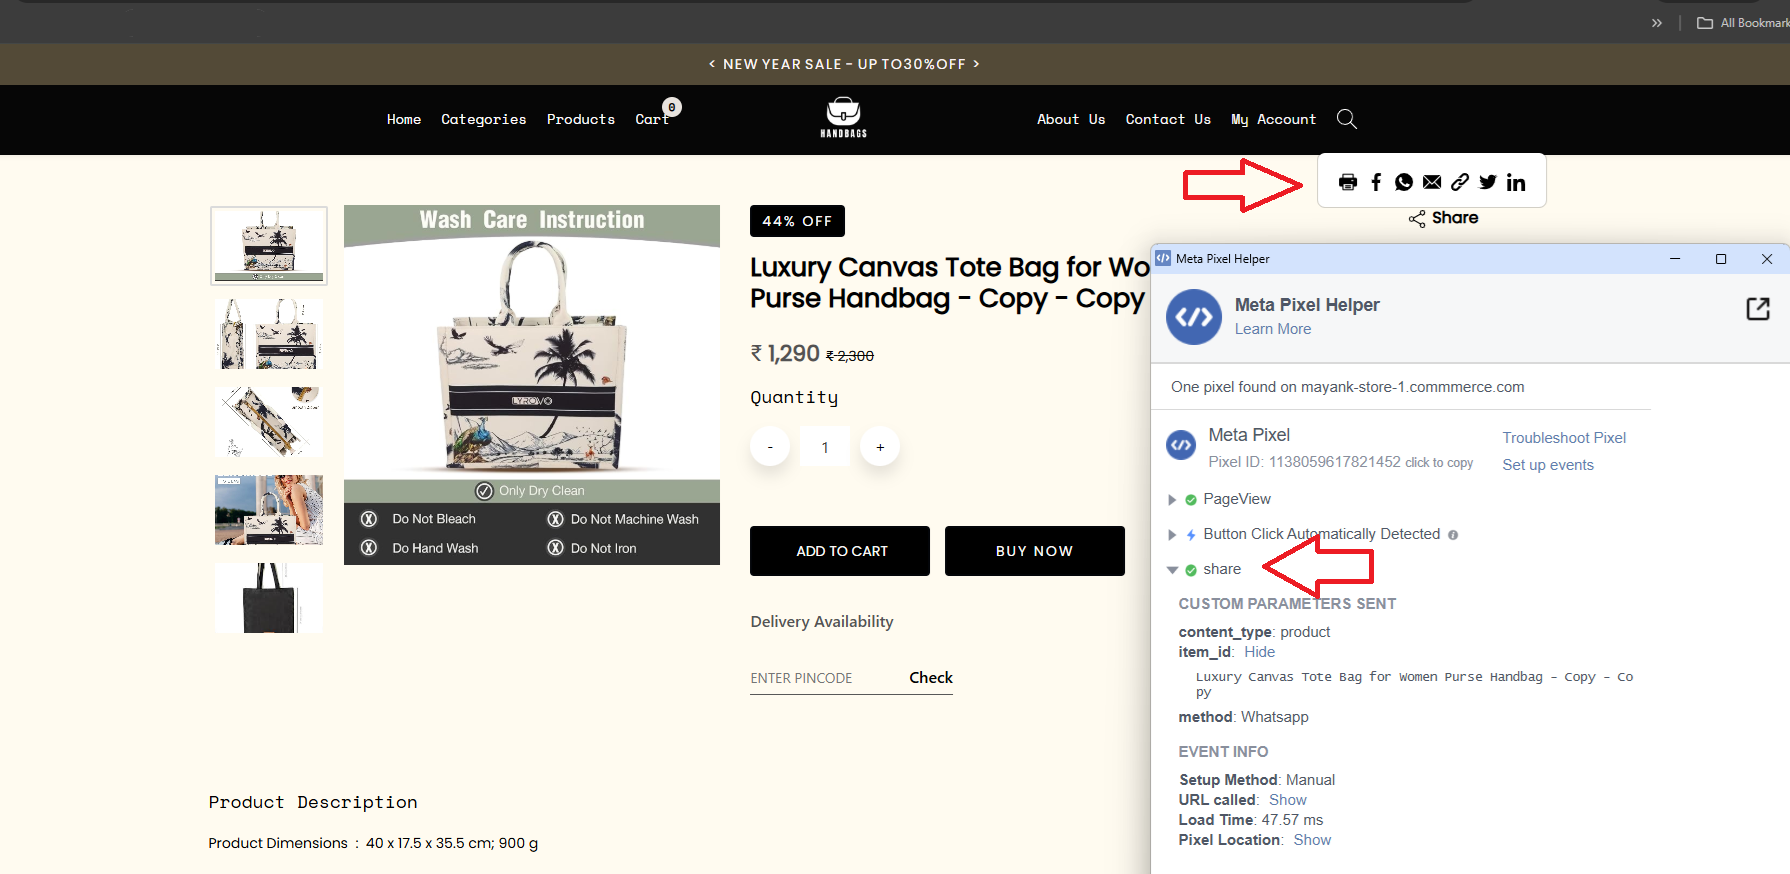
8. The share event will get triggered on the product details page when the user clicks on the share icon and selects a platform to share.
9. The purchase event will be triggered on the Order Success page when the user clicks the ‘Place Order’ button and makes a payment. The page will then redirect to the Order Success page.
How to check Facebook analytics calls on your dashboard?
To check Facebook analytics calls on your dashboard, follow the steps below:
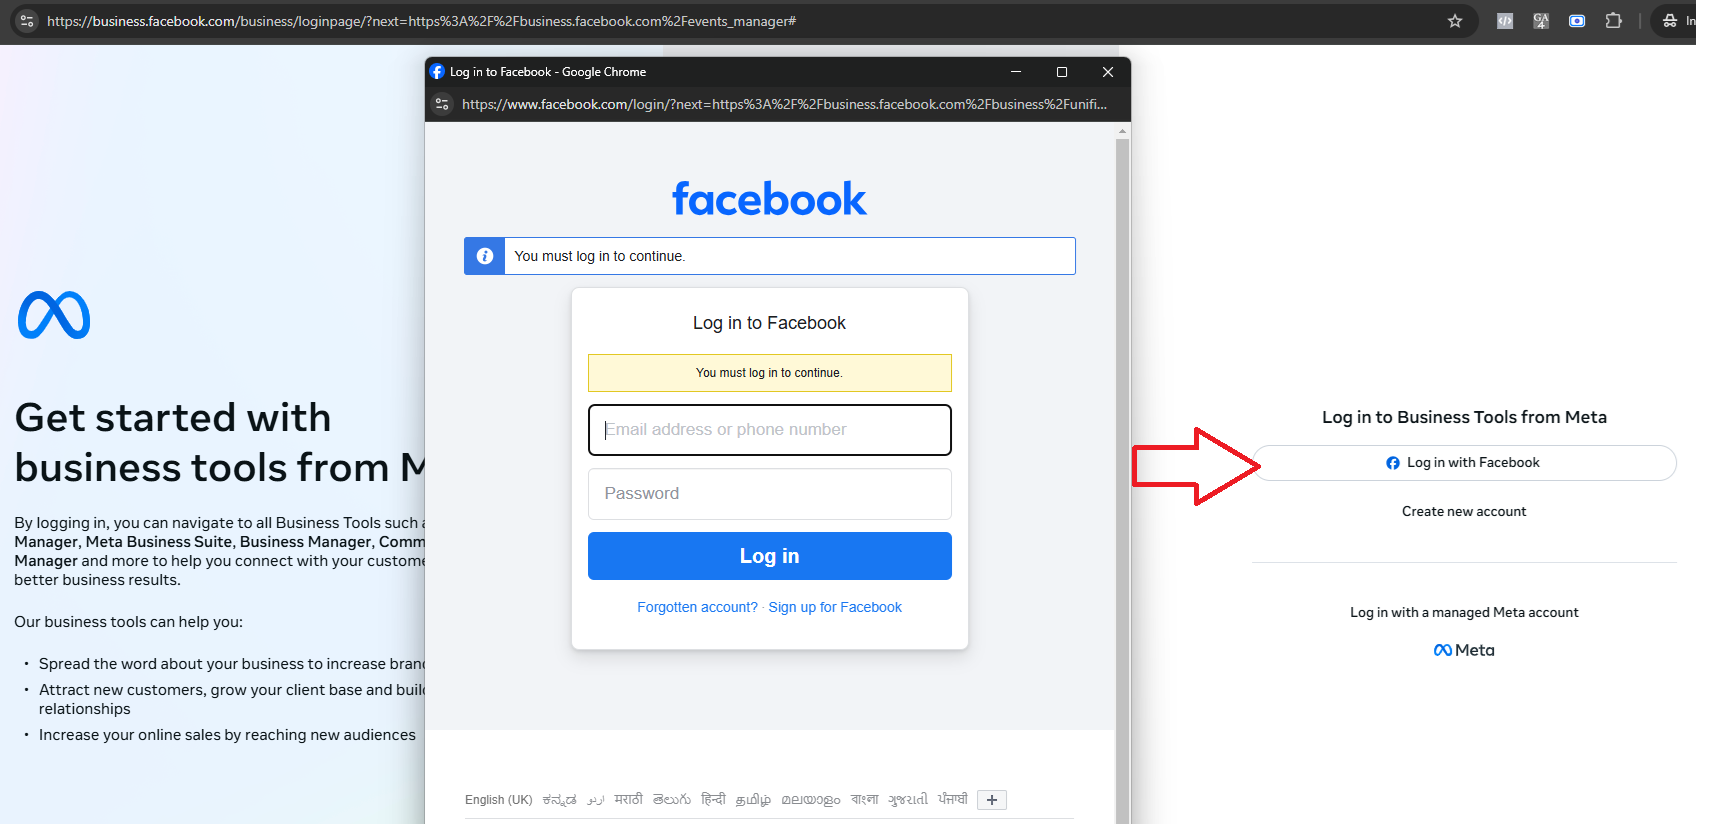
Step 1. To log in to your Facebook Business Manager account
click here.
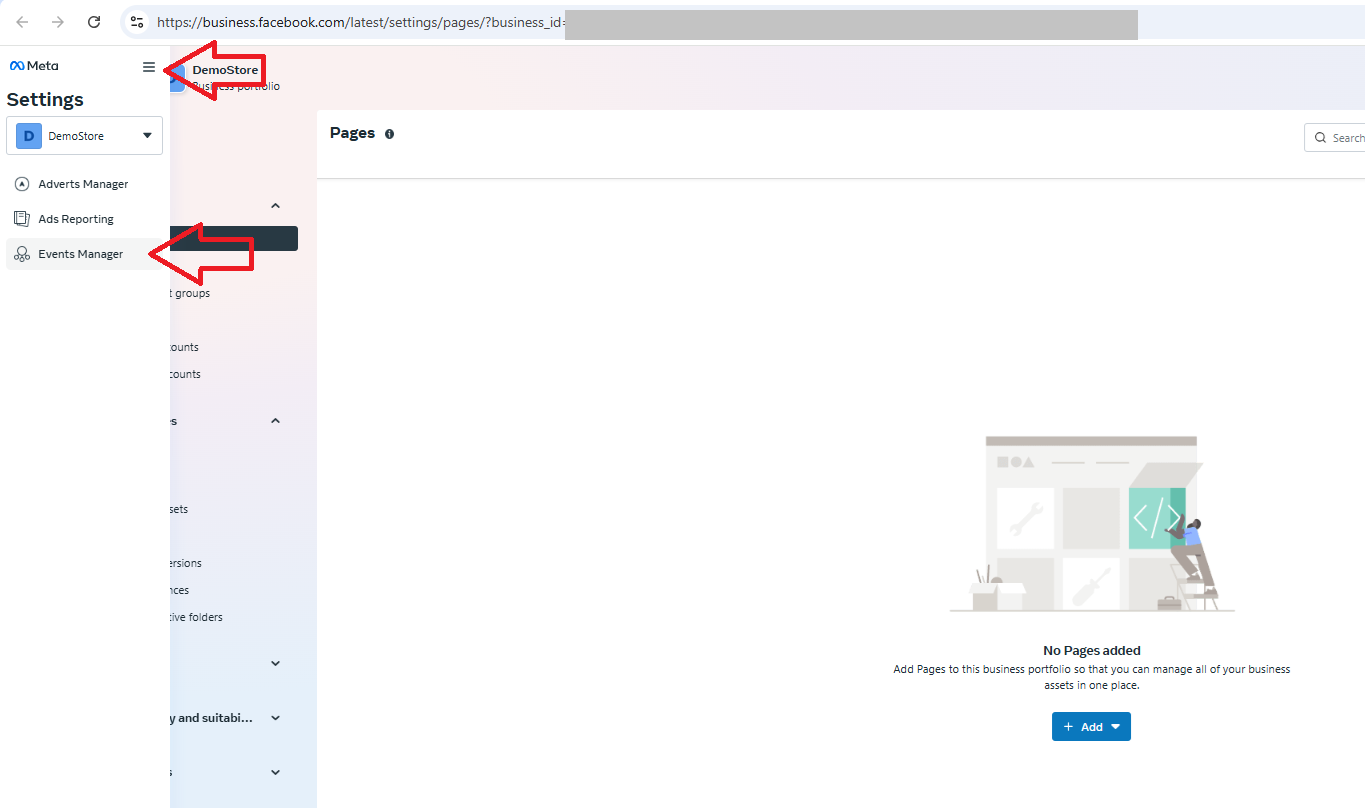
Step 2. Once you have logged in, you will be redirected to the Facebook Business Manager Dashboard. Hover over the three-line menu (hamburger icon) and click on Event Manager.
Step 3. You will be redirected to the Event Manager Overview page. Click on Data Sources (as shown below).
On this dashboard, you will see all the events triggered from your website, along with the total event count, 'Events' and 'Total Events.'
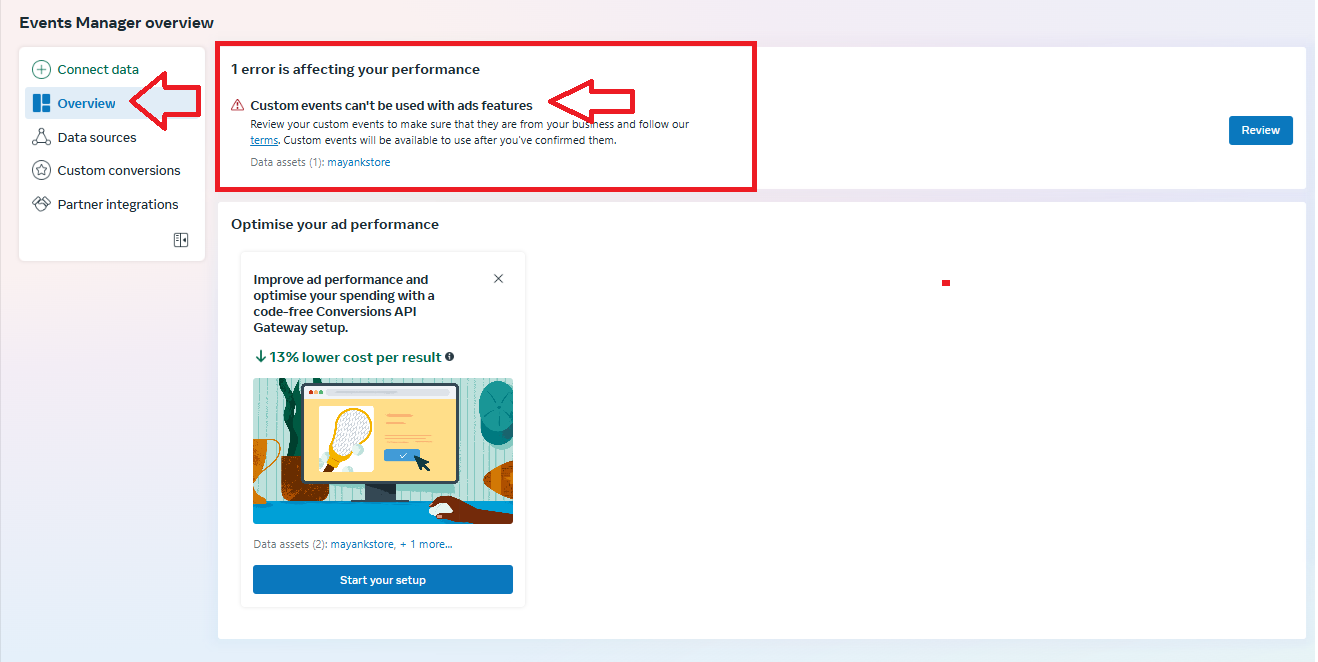
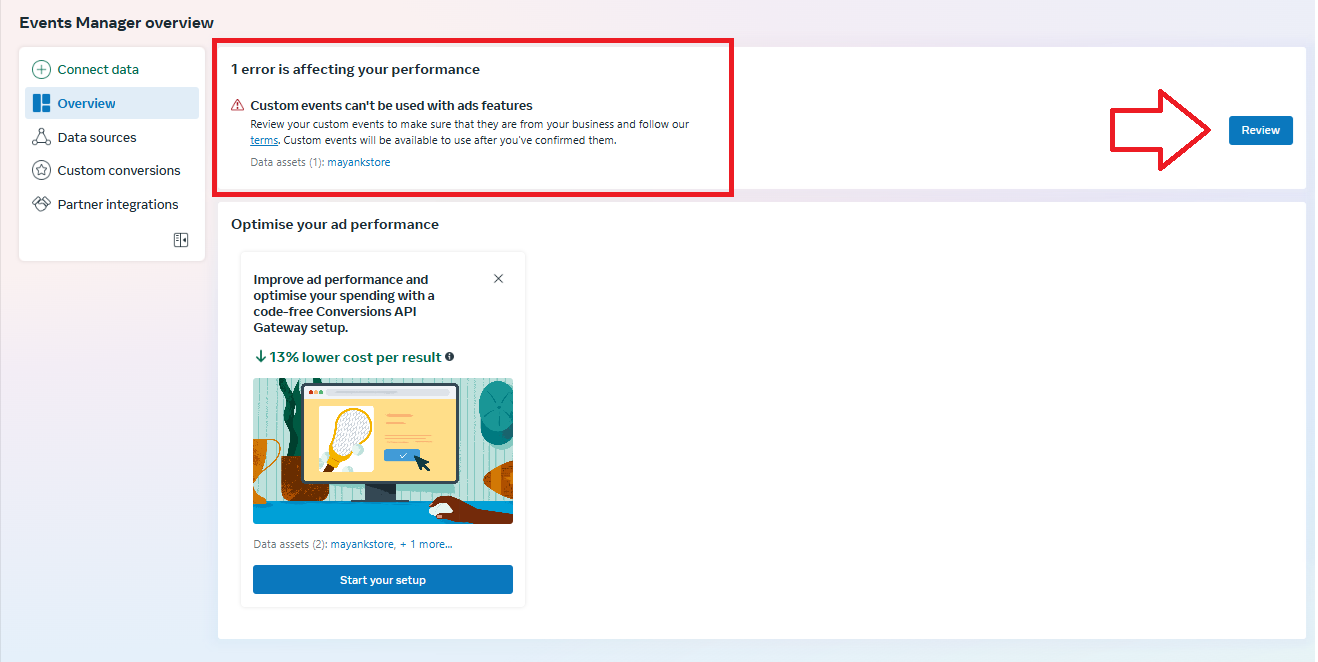
Step 4. If you see the warning "Custom events can't be used with ads features" on events, please follow the steps below:
4.1. Go to the ‘Overview’ option in the Event Manager overview
4.2. Click on the Review button on the right-hand side.
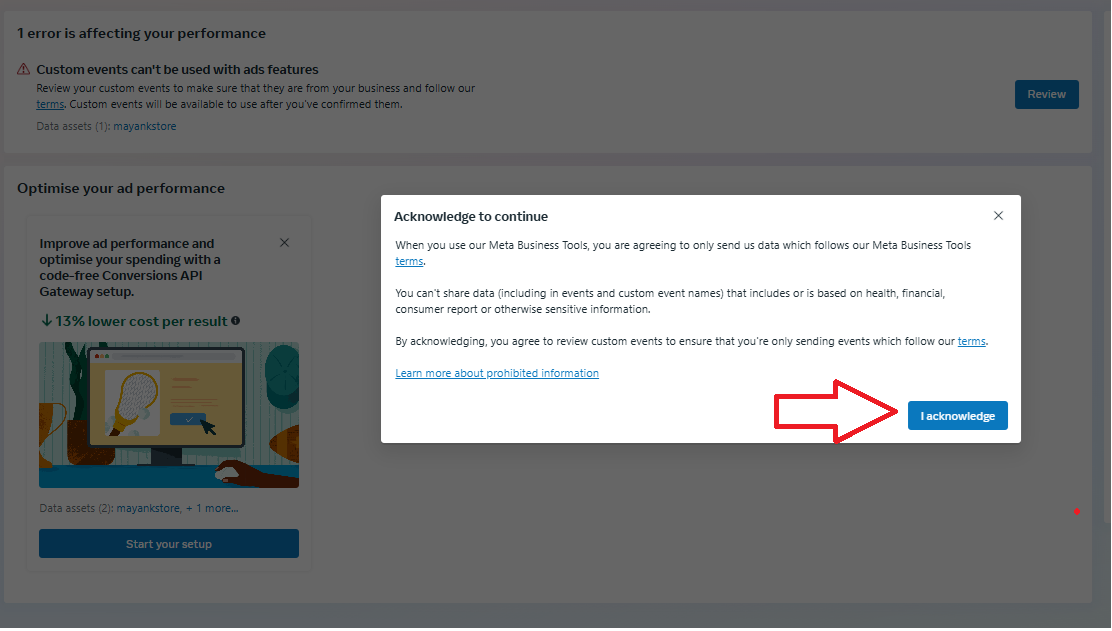
4.3. Click on the I acknowledge button.
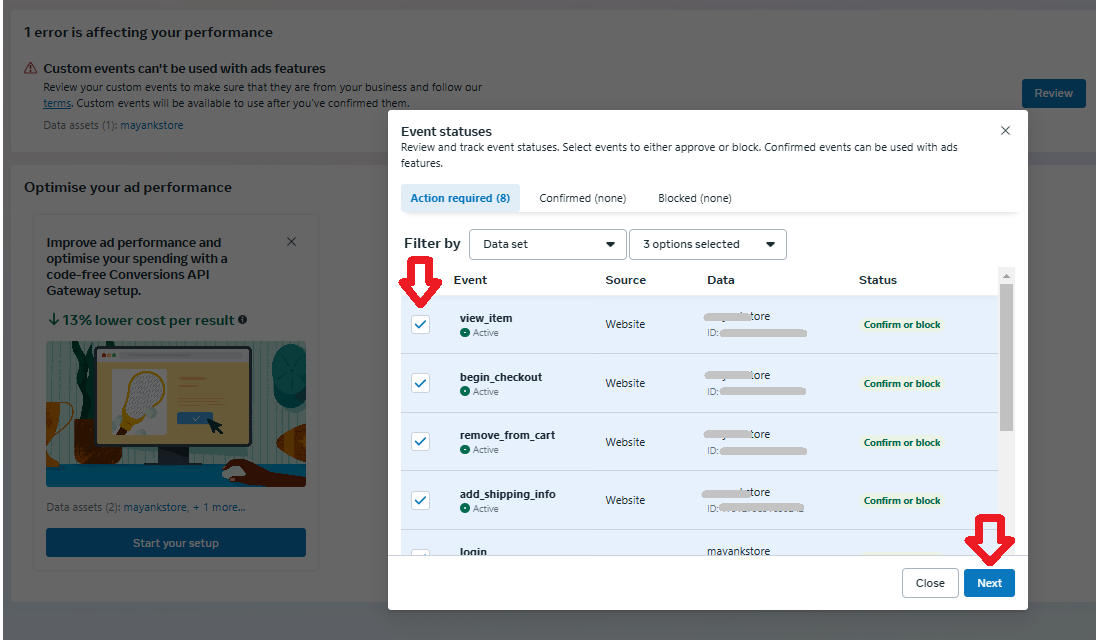
4.4 You can Select the Checkbox of Events to confirm the events that can be used with the ads features. Then you can click on the Next button.
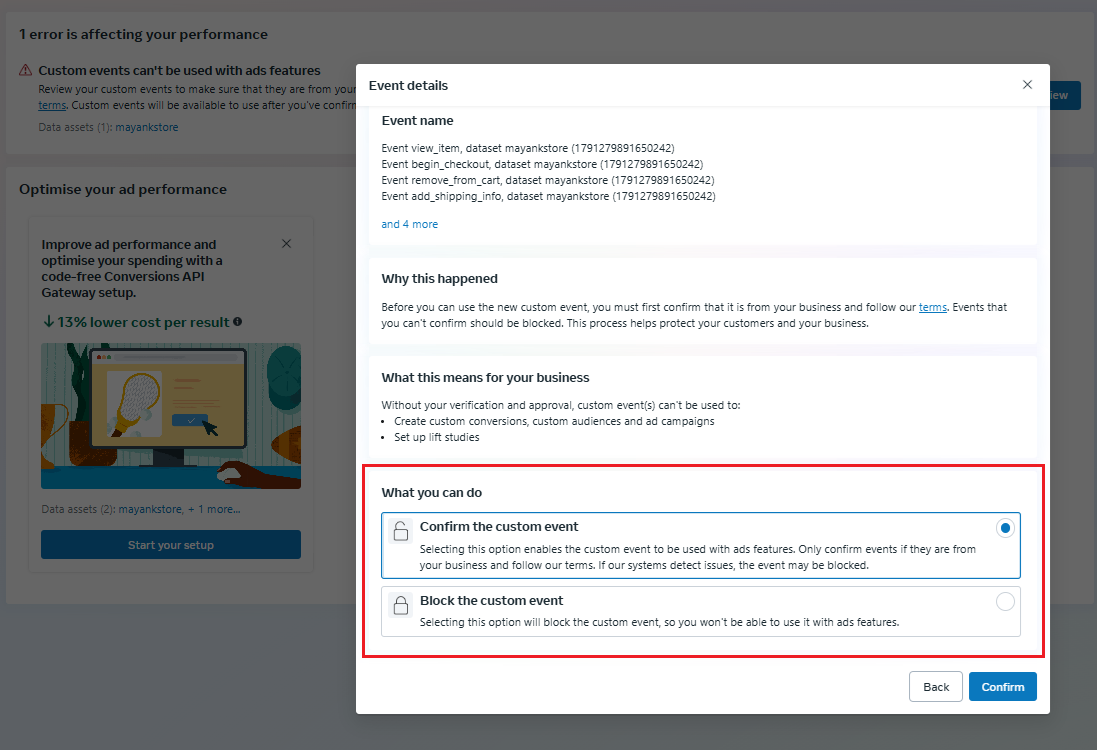
4.5. The Event Details popup will appear. Select ‘Confirm the custom event’ if you want to configure it. If you want to block it, select ‘Block the custom event’. Then, click on the Confirm button.
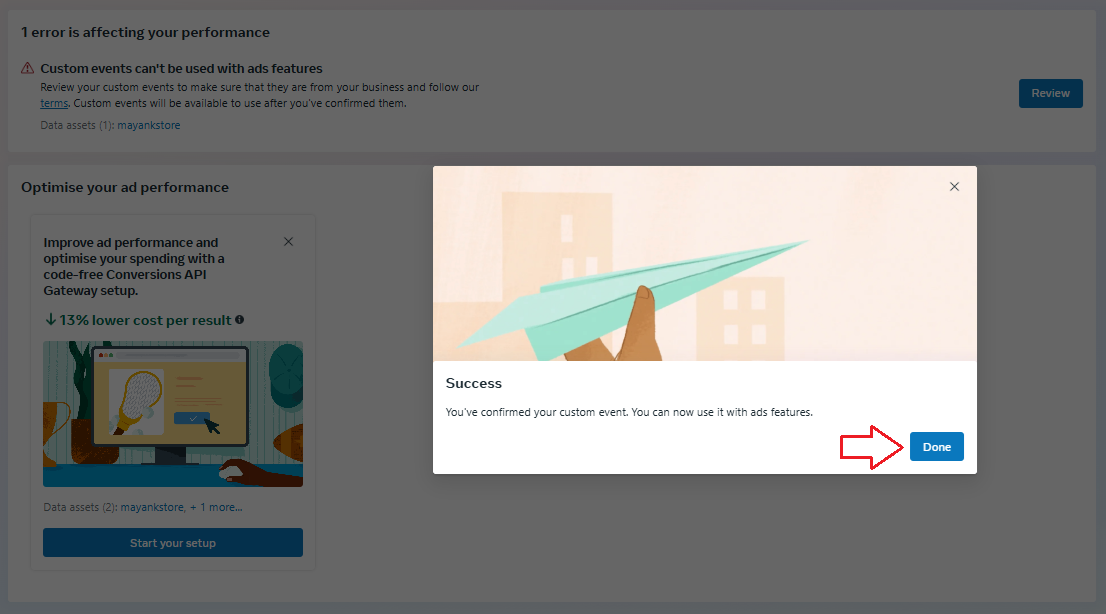
4.6. You will get the success popup. Then you can click on the Done button.






.png)
 The ‘Add to cart’ and ‘Buy now’ buttons on the select variant popup
 The ‘Add to cart’ and ‘Buy now’ buttons on the product details page
